# Introduction

## Welcome to the Flyability Knowledge Base!

We’re here to help you make the most of your Flyability experience. Whether you're a new user learning the basics or an experienced pilot looking for advanced tips, you'll find everything you need.

<figure><img src="/files/x3cNvpIXBKMbYKLFmAFl" alt=""><figcaption></figcaption></figure>

{% hint style="success" %}
[New Elios 3 Cockpit Hotfix: **2026.02.1**](/aircraft/elios-3/elios-3-system-update)
{% endhint %}

🔍 **What You Can Explore**:

* **Product Documentation**: Access manuals, updates, and technical specifications.
* **Troubleshooting & Maintenance**: Resolve issues and keep your drone in peak condition.
* **Advanced Techniques**: Take your skills to the next level with expert guidance.

💡 **Quick Tips**:

* Use the search bar to quickly find answers to your questions.
* Bookmark your favorite articles for easy access later.
* Stay updated with the latest features and best practices.

If you need further assistance, our support team is just a message away. Thanks for choosing Flyability—let’s take flight together! 🌟


# Getting Started

{% embed url="<https://www.youtube.com/watch?feature=youtu.be&v=aYjfVtgI7xM>" %}

#### Find this article on computer with: <https://knowledge.flyability.com/start>

***

<table data-view="cards"><thead><tr><th></th><th data-hidden data-card-target data-type="content-ref"></th><th data-hidden data-card-cover data-type="files"></th></tr></thead><tbody><tr><td>Start with Elios 3</td><td><a href="/pages/V2jaJJNpFSaEuMUJM9WV">/pages/V2jaJJNpFSaEuMUJM9WV</a></td><td><a href="/files/7m7GEOZqqOyh3LWzyRCo">/files/7m7GEOZqqOyh3LWzyRCo</a></td></tr><tr><td>Start with Payloads and accessories</td><td><a href="/pages/4OfvXG4b3bpV8kSeniT5">/pages/4OfvXG4b3bpV8kSeniT5</a></td><td><a href="/files/Gn0Vl8HCOipkcnuOPAcu">/files/Gn0Vl8HCOipkcnuOPAcu</a></td></tr><tr><td>Start with Software</td><td><a href="/pages/jFDB6UhPRvUhGBjU4eRy">/pages/jFDB6UhPRvUhGBjU4eRy</a></td><td><a href="/files/pWuPk81pgTk41O3IvuQz">/files/pWuPk81pgTk41O3IvuQz</a></td></tr></tbody></table>


# Start with Elios 3

{% embed url="<https://www.youtube.com/watch?v=-FEzrpFu4XE>" %}

Thank you for choosing the Elios 3! In this video, we’ll walk you through all the essential steps to ensure you get the most out of your new drone.

We'll also show you where to find key information and training materials to help you master your Elios 3 with ease.

At the end of this page, you'll see a Next button. Click it to move on to the next section of your onboarding, where you'll find detailed written information and links covering everything discussed in this video.


# Material check

### Package Reception Checklist

To ensure a smooth start with your new equipment, it’s important to carefully inspect your delivery as soon as it arrives. Here are a few key steps to follow:

1. **Verify the number of parcels**: Some orders may be shipped in multiple boxes. Check the delivery documents provided by the shipping company to see how many parcels you should expect. Packages may not always arrive on the same day, so it’s important to be aware of the total number.
2. **Inspect the packaging**: Take a moment to look over the general condition of each box. If any package appears damaged, it’s important to document it immediately and inform the delivery service or our support team. Additionally, please check beneath the carton protection to verify the condition of the wooden transport case.
3. **Check the contents**: Open the boxes and compare the items received with your purchase order to make sure nothing is missing. The purchase order serves as a reference for everything that was included in your shipment.&#x20;

<table><thead><tr><th width="248.5999755859375">What's in the box</th><th width="138.5999755859375" align="center">Light package</th><th width="164.5999755859375" align="center">Premium package</th><th align="center">Enterprise package</th></tr></thead><tbody><tr><td>Elios 3 UAV</td><td align="center">1</td><td align="center">1</td><td align="center">1</td></tr><tr><td>LiDAR Payload</td><td align="center">1</td><td align="center">1</td><td align="center">1</td></tr><tr><td>2.4 GHz digital RC and video receiver </td><td align="center">1</td><td align="center">1</td><td align="center">1</td></tr><tr><td>Tablet</td><td align="center">1</td><td align="center">1</td><td align="center">1</td></tr><tr><td>Transport case</td><td align="center">1</td><td align="center">1</td><td align="center">1</td></tr><tr><td>Maintenance toolbox</td><td align="center">1</td><td align="center">1</td><td align="center">1</td></tr><tr><td>Spare cage elements</td><td align="center">8</td><td align="center">8</td><td align="center">16</td></tr><tr><td>Pack of 4 propellers</td><td align="center">3</td><td align="center">5</td><td align="center">9</td></tr><tr><td>UAV Battery chargers</td><td align="center">2</td><td align="center">4</td><td align="center">7</td></tr><tr><td>UAV Batteries</td><td align="center">3</td><td align="center">6</td><td align="center">9</td></tr><tr><td>Range Extender </td><td align="center">-</td><td align="center">-</td><td align="center">1</td></tr></tbody></table>

In addition of the aircraft, you could check the content of additional payload and accessories

* [UT payload](/getting-started/start-with-payloads-and-accessories/start-with-ut-payload)
* [RAD payload](/getting-started/start-with-payloads-and-accessories/start-with-rad-payload)
* [Survey payload](/getting-started/start-with-payloads-and-accessories/start-with-survey-payload)
* [Gas Sensor payload](/getting-started/start-with-payloads-and-accessories/start-with-gas-payload)
* [Range extender](/getting-started/start-with-payloads-and-accessories/start-with-range-extender)<br>

By following these steps, you help ensure that any issues can be identified and resolved quickly.


# Set up the logins

At Flyability, we’ve worked to simplify your experience by minimizing the number of accounts you need to manage.

Your initial login will give you access to key services, including drone activation, the Inspector software, cloud connectivity, and the training simulator, all through a single account.

Please note, however, the access to the Flyability Academy requires a separate account, as it operates on a different platform.

## Steps to Activate Your Drone

* Turn on the tablet included with the drone and connect it to a Wi-Fi network.
* Connect the USB-C cable between the tablet and the remote control.
* Turn on the remote control.
* Open the Cockpit application on the tablet.
* Insert a fully charged battery into the drone and power it on.
* Wait for the Cockpit app to connect to the drone.
* A pop-up window will appear in the app prompting you to register the drone.

Click Register and follow the steps to create your account.

Keep your credential as you will need them after the installation of Inspector and for the simulator.<br>


# Download, install and connect to Inspector

Steps to download and install Inspector:

* [Download Inspector installer](/software/inspector/inspector-5)
* In your Download folder, install the file called InspectorSetup
* The first time you open Inspector, you will be asked to log in or register.
  * The license is attached to the drone and not to the user; this means that you can use the same login as for the activation of the drone. If another user want to install Inspector too, he can create a login for himself by clicking on “register.“
* Inspector training videos are available in the training simulator.


# Activate the Warranty

## Step 4: Activate Your Warranty

To activate your warranty, you must pass the exam in the training simulator, even if you've completed in-person training.

The simulator comes pre-installed on your drone’s tablet. To access it, you’ll need:

* The tablet
* The remote control
* A WiFi connection

To start the simulator:

1. Turn on the tablet and connect the tablet to a Wifi
2. Connect the Tablet to the RC using the Usb-C cable
3. Turn on the remote control with a short and a long click on the power button.
4. Open the Elios training application.

**You will then have two options to get certified:**

* ***Standard Training Path***\
  Start with the first course titled “Training Introduction.” Once you complete this chapter, the next one will be unlocked.\
  To progress, you must successfully complete the training simulator scenarios and pass the exam at the end of each chapter.<br>
* ***Direct Exam Access***\
  If you have already completed in-person training or prefer to skip the simulator, you can click on “Skip the training” and go straight to the exams.\
  You will then be able to take all exams directly, without watching the videos or completing the simulations.<br>

Note: Even if you have attended in-person training, you still need to pass the simulator exam to receive your certificate and have your warranty registered.

**Additional Information**

* If you're having trouble passing the simulation, feel free to contact our Support or Training team for assistance.
* The exam is available in French and Chinese.
* After completing the exams, all chapters will be unlocked. You can then revisit any simulator exercises or training videos for further practice.


# Additional Training Material

### Additional Training Resources

In addition to the mandatory training on the simulator, we offer other resources to help you get the most out of your equipment.

One of the key resources is the [Flyability Academy](https://flyabilityacademy.thinkific.com/).\
Please note that this platform requires a separate login, as it operates in a different environment from the simulator.

**In the Flyability Academy, you’ll find:**

* Payload-specific training content
* Industry-specific training modules<br>

To access the Flyability Academy, simply copy and paste the following web address into your browser:

<https://flyabilityacademy.thinkific.com/>

### Flyability YouTube Channel

Our YouTube channel provides tips and tricks, tutorials, and various videos demonstrating how to use the Elios drone effectively.

It’s a great resource for quick learning and visual guidance.

<https://www.youtube.com/playlist?list=PLhdfG8lI4JrZoRrIusugaavNujSjVQrAG>

### In Person Training

Flyability and its partners offer in-person training. Depending on your use case and flight experience, in-person training can be very valuable. It allows you to spend time with experienced Elios 3 pilots that can help you plan your inspection and identify the risks in your inspection.

You can contact your local distributor or [Flyability](https://calendly.com/charles-rey/getting-started-with-elios-3-meeting) if you have questions about the training options or how to start with your Elios.

To find the full training offer, [www.flyability.com/training](http://www.flyability.com/training)


# Resources and Support

### Ressource

Over the years, a wide range of resources has been created to help new customers learn how to use their drone effectively and get the most out of it.

These resources cover various formats and topics, including:

* [Webinars](https://www.flyability.com/resources?blogs=Webinar)
* [Case studies](https://www.flyability.com/resources?blogs=Case+studies)
* [Industry-specific infographics](https://www.flyability.com/resources?blogs=Infographics)
* [White papers](https://www.flyability.com/resources?blogs=White+papers)
* [Fact Sheets](https://www.flyability.com/resources?blogs=Factsheets)<br>

They are designed to provide insights, best practices, and real-world examples tailored to different applications and industries.

<https://www.flyability.com/resources>

### Knowledge base

You're now on our Knowledge Base, where you’ll find a wealth of helpful resources.

* On the left side of the page, you’ll find different categories containing a wide range of useful articles.
* Use the search bar at the top of the page to quickly find specific topics.
* On the right side, you’ll have direct access to the main website, the cloud platform, and contact details for our support team.<br>

As mentioned in the video, we’re happy to schedule an onboarding call with you. During this session, we can answer any remaining questions you may have and provide guidance on how to perform an inspection. You can book a call with one of our pilots on this[ link](https://calendly.com/charles-rey/getting-started-with-elios-3-meeting)

Accessing the Flyability Knowledge Base\
You’re currently on Flyability’s Knowledge Base, where you can find:

* Quick start guides
* User manuals
* Maintenance documentation

### Support

If you need assistance with your drone, our Support Team is here to help. You can reach us through the [contact form on our website](https://www.flyability.com/support-request) or by email at **<support@flyability.com>**.

You can also contact the Support Team by phone at: **+41 21 311 55 00**.

For questions related to specific inspections or use cases, our Training Team will be happy to assist you.

With these steps, you’re now ready to begin your journey with the Elios 3! Click Next to continue.


# Learn more about Software

<table data-view="cards"><thead><tr><th></th><th data-hidden data-card-cover data-type="files"></th><th data-hidden data-card-target data-type="content-ref"></th></tr></thead><tbody><tr><td><strong>Cockpit App</strong> is the flight control App, providing real-time video, telemetry data, and advanced features</td><td><a href="/files/WoEzD1lQzwCPcU5rxYSq">/files/WoEzD1lQzwCPcU5rxYSq</a></td><td><a href="/pages/PZUYMkpuOxS8tcbq7ja2">/pages/PZUYMkpuOxS8tcbq7ja2</a></td></tr><tr><td><strong>Inspector</strong> is the post-flight software that organizes and analyzes inspection data—like video, thermal images, and 3D maps—to help identify defects and generate reports efficiently.</td><td><a href="/files/nhVH088xsdK8o4XRZyc4">/files/nhVH088xsdK8o4XRZyc4</a></td><td><a href="/pages/g7SKL4ipEOzpGzali3eC">/pages/g7SKL4ipEOzpGzali3eC</a></td></tr><tr><td><strong>Inspector Online</strong> provides a centralized platform for storing, analyzing and sharing inspection data collected by Elios 3 drones, enhancing collaboration and asset management</td><td><a href="/files/Zz0sxEFiu95Ghaen9a4a">/files/Zz0sxEFiu95Ghaen9a4a</a></td><td><a href="/pages/Iq9l8XB40zC3NOan6XNK">/pages/Iq9l8XB40zC3NOan6XNK</a></td></tr><tr><td><strong>Third-party software</strong> extend Elios 3 capabilities by enabling advanced data processing, analysis, and integration with external asset management or inspection platforms</td><td><a href="/files/VzMGNwjUEDZogvCpAdWI">/files/VzMGNwjUEDZogvCpAdWI</a></td><td><a href="/pages/BsanHKeBIUhs5UILBlVq">/pages/BsanHKeBIUhs5UILBlVq</a></td></tr><tr><td><strong>Training simulator</strong> provide pilots a realistic, risk-free environment to develop and refine their flying skills for confined space inspections, using the actual Elios 3 ground control station</td><td><a href="/files/Kv7UlHA8YmgQJfTzYugl">/files/Kv7UlHA8YmgQJfTzYugl</a></td><td><a href="/pages/ONgldJ34kPKzwz5irvES">/pages/ONgldJ34kPKzwz5irvES</a></td></tr></tbody></table>


# Start with Cockpit

**Cockpit** is the official Flyability application used to pilot and monitor the **Elios 3** drone.\
It provides pilots with a live video feed, flight telemetry, and access to essential settings and mission data.\
Through the Cockpit app, users can control flight modes, monitor system status, record flight data, and perform firmware updates for both the drone and its components.

This training video explains how to use the Cockpit app and its main features.

{% embed url="<https://youtu.be/azIDvTXWrsY>" %}


# Start with Inspector 5

Inspector is software that evolves quickly. So we made these 4 videos to help you locate the different functions of the software.

{% embed url="<https://youtu.be/WIuDJJFT2FI>" %}

{% embed url="<https://youtu.be/oDTwHY9Idao>" %}

{% embed url="<https://youtu.be/ex2BKHZkcWE>" %}

{% embed url="<https://youtu.be/FhespQfsruI>" %}


# Start with Third-party software

We offer some training on the Faro Connect software. If you purchased the Survey payload, and you did not already receive the access for the training. Please contact <training@flyability.com> and indicate your name, your company, and your country. The training team will send you a link for the online training.

For volumetric calculation, we recommend the use of the Leica Cyclone software, or for a free option, you can also use CloudCompare.

This video show how to do stock volumetry calculation with CloudCompare.

{% embed url="<https://youtu.be/RAJ8i9g4Dqw>" %}


# Start with Training Simulator

To start using the simulator, you need a Wi-Fi connection, the remote control of the drone, and the tablet. Then simply follow the instruction to complete your training.

{% embed url="<https://youtu.be/sFaH7oVrPoI>" %}


# Start with Payloads and Accessories

One of the standout features of the Elios 3 is its **modular payload system**, which allows it to be equipped with **different payloads and accessories** depending on the mission requirements.

<table data-view="cards"><thead><tr><th></th><th data-hidden data-card-cover data-type="files"></th><th data-hidden data-card-target data-type="content-ref"></th></tr></thead><tbody><tr><td><p><strong>LiDAR Payload (Standard)</strong> </p><ul><li>Purpose: 3D mapping and navigation </li><li>Use Case: Creating detailed 3D maps of indoor or underground spaces</li></ul></td><td><a href="/files/T7JKE3gcLzCnyd4uFbYY">/files/T7JKE3gcLzCnyd4uFbYY</a></td><td></td></tr><tr><td><p><strong>Radiation Sensor</strong> </p><ul><li>Purpose: Detects and measures ionizing radiation </li><li>Use Case: Nuclear plant inspections, radioactive site assessments</li></ul></td><td><a href="/files/DGgTb6WyyrVA6mBH6ZnX">/files/DGgTb6WyyrVA6mBH6ZnX</a></td><td><a href="/pages/cubgpztfrvXwdVkG10fQ">/pages/cubgpztfrvXwdVkG10fQ</a></td></tr><tr><td><p><strong>Gas Sensor</strong> </p><ul><li>Purpose: Detects gases like methane or CO2 </li><li>Use Case: Oil &#x26; gas industry, hazardous chemical environments</li></ul></td><td><a href="/files/GE30xaBjDxFDGu5xCy1X">/files/GE30xaBjDxFDGu5xCy1X</a></td><td><a href="/pages/kFRsVFdjJp2ANeBX8oM8">/pages/kFRsVFdjJp2ANeBX8oM8</a></td></tr><tr><td><p><strong>UT Payload</strong> </p><ul><li>Purpose: Metal Thickness measurement </li><li>Use Case: Structural Integrity Inspections with 3D data localization</li></ul></td><td><a href="/files/eY1nXIJ7u52xvzbFoeCs">/files/eY1nXIJ7u52xvzbFoeCs</a></td><td><a href="/pages/OpkmyWfhsh1FKVc8ktsf">/pages/OpkmyWfhsh1FKVc8ktsf</a></td></tr><tr><td><p><strong>Surveying Payload (LiDAR Rev7)</strong> </p><ul><li>Purpose: High resolution 3D mapping </li><li>Use Case: Creating detailed 3D maps of indoor or underground with survey grade accuracy</li></ul></td><td><a href="/files/erj7jVi2E65bsAcG5Lw6">/files/erj7jVi2E65bsAcG5Lw6</a></td><td><a href="/pages/WPQdh75v25xe0pmWbCgn">/pages/WPQdh75v25xe0pmWbCgn</a></td></tr><tr><td><p><strong>Range extender</strong></p><ul><li><strong>Purpose:</strong> Enhances drone communication range in complex or obstructed environments.</li><li><strong>Use Case:</strong> Ideal for inspecting hard-to-reach areas like underground tunnels, sewers or large industrial sites.</li></ul></td><td><a href="/files/sNExkpZbV05UQ2e3gUYQ">/files/sNExkpZbV05UQ2e3gUYQ</a></td><td><a href="/pages/kSRLWeS61eSCh8NpmhG8">/pages/kSRLWeS61eSCh8NpmhG8</a></td></tr></tbody></table>


# Start with UT payload

<figure><img src="/files/FKVsNurVAmitCCIAHCY2" alt=""><figcaption></figcaption></figure>

Developed in partnership with Cygnus Instrument, the UT Payload turns the Elios 3 into a fl ying UT gauge that can capture accurate A-scans in the most challenging areas. Equipped with the Elios 3 UT, industry professionals can perform regular integrity inspections in minutes - reducing the probability of unplanned downtimes.

| What's in the box      | Elios 3 UT Payload Light | Elios 3 UT Payload Full |
| ---------------------- | :----------------------: | :---------------------: |
| Core module            |             1            |            1            |
| Probe 2 MHz            |             -            |            1            |
| Probe 5 MHz            |             1            |            1            |
| Probe 7.5 MHz          |             -            |            1            |
| Cleaning module        |             -            |            1            |
| Interfaces kit         |             1            |            3            |
| Drone attachment kit   |             1            |            2            |
| Extension kit          |             1            |            2            |
| Gel kit                |             1            |            2            |
| Spare smart syring kit |             -            |            2            |

<div data-full-width="true"><figure><img src="/files/mMme9CgDELgJJnZE1YF0" alt=""><figcaption></figcaption></figure></div>

{% hint style="info" %}
We have an online training/tutorial to help you install the UT payload. We also share many tips and tricks on how to use the payload. To access the UT training course, simply scan the QR code on the UT Box.
{% endhint %}


# Start with Survey payload

<figure><img src="/files/xL4GGLRqN28MZ8RmM53V" alt=""><figcaption></figcaption></figure>

The Surveying Payload turns the Elios 3 into a fl ying mobile scanner that can fi t through openings as small as 50x50 cm, and create high-resolution scans beyond line of sight, to provide rapid insights that are not accessible with traditional tools or other UAV technologies. The high-resolution Ouster OS0-128 Rev 7 LiDAR sensor in combination with the world’s leading FARO Connect SLAM algorithm creates incredibly accurate 3D maps and digital twins of the most inaccessible spaces with centimeter precision.

| What's in the box                      | Elios 3 Surveying Payload |
| -------------------------------------- | :-----------------------: |
| Ouster OS0-128 Rev 7 LiDAR             |             1             |
| LiDAR Mount                            |             1             |
| Dedicated connection cable for Elios 3 |             1             |
| Reflective targets                     |             6             |

<figure><img src="/files/gPJKHv6G6injRe6nkC09" alt=""><figcaption></figcaption></figure>

{% hint style="info" %}
When you purchase the Survey payload, you gain access to online training for the Faro Connect software for two people. If you have not received your access code, please contact <training@flyability.com> with your name, email address, company name, and country.
{% endhint %}


# Start with Gas payload

<figure><img src="/files/dHhUOSZzKk6T3VKIj81n" alt=""><figcaption></figcaption></figure>

With the Flammable Gas Sensor mounted on the Elios 3, operators can reliably detect +14 fl ammable gases (including hydrogen), reducing risks during confi ned-space inspections. Factory-calibrated and equipped with built-in self-testing, the Flammable Gas Sensor requires no fi eld calibration, ensuring continuous, fail-safe operations in even the harshest industrial environments.

| What's in the box          | Elios 3 Flammable Gas Sensor Payload |
| -------------------------- | :----------------------------------: |
| Flammable Gas Sensor       |                   1                  |
| Sensor mount               |                   1                  |
| Bump test tool             |                   1                  |
| Silicon tube 400mm         |                   1                  |
| Dust filter for Gas Sensor |                   3                  |
| Transport case             |                   1                  |

***

{% content-ref url="/pages/rnjLAHqXBcNM24u2NfWM" %}
[Flammable Gas sensor](/aircraft/elios-3/elios-3-payload/flammable-gas-sensor)
{% endcontent-ref %}

<figure><img src="/files/JrnWp1jEbDAmxmJw9Lre" alt=""><figcaption></figcaption></figure>

<figure><img src="/files/jYD9jRPITuNi3rtvmOr1" alt=""><figcaption></figcaption></figure>

{% hint style="info" %}
We have an online training/tutorial to help you mount and understand how to use the gas sensor.

This training in on our Flyability Academy or can be reached directly via this [link](https://flyabilityacademy.thinkific.com/courses/Gassensor)
{% endhint %}


# Start with RAD payload

{% embed url="<https://youtu.be/s6PZalwtI2k>" %}
In this video, you will see how to mount the RAD sensors and how to use it. The last part of the video covers the limitation of the Rad sensor.
{% endembed %}

Perform fast and accurate radiation surveys of indoor spaces with the Elios 3 RAD Payload, powered by&#x20;Mirion Technologies. It provides in-flight and post-flight radiation readings, localization, and\
reporting, plus a detachable sensor for easy swapping with existing units.

<table><thead><tr><th>What's in the box</th><th align="center">Elios 3 RAD Payload</th><th data-hidden></th></tr></thead><tbody><tr><td>Mirion sensor RDS-32WR</td><td align="center">1</td><td></td></tr><tr><td>Sensor holder for Elios 3</td><td align="center">1</td><td></td></tr><tr><td>Dedicated connection cable for Elios 3</td><td align="center">1</td><td></td></tr></tbody></table>

<figure><img src="/files/eZn7XOQv9Su33eklmXxj" alt=""><figcaption></figcaption></figure>


# Start with Range extender

{% embed url="<https://youtu.be/E3AgGSFv2fI>" %}
This video will explain all the good practices and limitation of the Range extender.
{% endembed %}

In environments such as underground galleries, stacks, or mines, signal propagation can be limited by&#x20;the geometry of the place to inspect, and remotely operating a robot becomes difficult. By placing the&#x20;remote controller antennas in a better location, closer to the drone, it is possible to extend the range of&#x20;the drone. The Range Extender is an optional accessory that connects to Elios 3 ground control station,&#x20;providing an extended signal reach for beyond line-of-sight operation.

<table><thead><tr><th>What's in the box</th><th align="center">Range extender</th><th data-hidden></th></tr></thead><tbody><tr><td>Range extender module</td><td align="center">1</td><td></td></tr><tr><td>Range extender battery charger</td><td align="center">1</td><td></td></tr><tr><td>Ranger batteries</td><td align="center">3</td><td></td></tr></tbody></table>


# Start with Tether Power Unit

{% embed url="<https://www.youtube.com/watch?v=DkV8s740L-A>" %}

The Tether Unit provides continuous power for uninterrupted operations. Connected to a wall outlet,\
generator, or compatible portable power station, it converts 100–240 V AC into high-voltage DC and\
delivers it through a 50 m (164 ft) Kevlar®-reinforced cable, eliminating mid-mission battery changes.

<table><thead><tr><th>What's in the box</th><th align="center" valign="middle">Quantity</th></tr></thead><tbody><tr><td>Tether Ground Unit</td><td align="center" valign="middle">1</td></tr><tr><td>Tether Cable</td><td align="center" valign="middle">1</td></tr><tr><td>AC power cable</td><td align="center" valign="middle">1</td></tr><tr><td>Drone attachment swivel</td><td align="center" valign="middle">1</td></tr><tr><td>Air Unit </td><td align="center" valign="middle">1</td></tr><tr><td>Brackets for the Elios 3 cage</td><td align="center" valign="middle">2</td></tr><tr><td>Pouch with spare parts</td><td align="center" valign="middle">1</td></tr><tr><td>Safety gloves</td><td align="center" valign="middle">1</td></tr><tr><td>Original Instructions booklet</td><td align="center" valign="middle">1</td></tr><tr><td>Battery Heater</td><td align="center" valign="middle">1</td></tr></tbody></table>

***

### Technical Documentations

{% content-ref url="/pages/A5Xk2hWTAQM2ukPbZU1v" %}
[Tether Power Unit](/accessory/tether-power-unit)
{% endcontent-ref %}


# New articles and updates

### Releases

* Elios 3: [Firmware 2026.02](/aircraft/elios-3/elios-3-system-update) (Hotfix published August 2026)
* Elios 2: [Cockpit v2.8 and Avionic v1.7](/aircraft/elios-2/elios-2-system-update) (published January 2022)
* Elios 1: [Cockpit v2.8 and Avionic v1.4](/aircraft/elios-1/elios-1-system-update) (published January 2022)
* Inspector Online: [Release 26.04.0](/software/inspector-online/inspector-online-release-notes) (published February 2026)

***

### Articles

* New Elios 3 Cockpit App version: [2026.02.1 Hotfix](/aircraft/elios-3/elios-3-cockpit-app#download) (published August 2026)
* New product documentation: [Tether Power Unit](/accessory/tether-power-unit) (published June 2026)
* New article: [Range extender and Elios 1 battery storage](/complementary-information/spare-parts-and-maintenance/range-extender-and-elios-1-battery-storage) (published June 2026)
* New article: [FARO FAQ / Troubleshooting](/third-party-software/faro-connect/faro-faq-troubleshooting) (published June 2026)
* User Manual update: [Inspector 2026.01](/software/inspector/inspector-5#documentation) User manual (published May 2026)
* User Manual update: [Cockpit 2026.01](/aircraft/elios-3/elios-3-cockpit-app#documentation) User manual (published May 2026)
* New article: [Simplified sharing security: what organization administrators should know](https://knowledge.flyability.com/software/inspector-online/inspector-online-feature-details/simplified-sharing-security-what-organization-administrators-should-know) (published May 2026)
* New article: [2026.01.0 Downgrade to 2025.03.1](/aircraft/elios-3/elios-3-system-update/2026.01.0-downgrade-to-2025.03.1) (Published March 2026)
* New article: [Elios 3 Autonomous Repeat flight & Comparison over Time](/aircraft/elios-3/elios-3-feature-details/elios-3-autonomous-repeat-flight-and-comparison-over-time) (Published February 2026)


# Important Communication

### October 2025

{% content-ref url="/pages/lKNSWDtwK8ZjLyx6hzMs" %}
[Resolving Blocked Battery Issues for Elios 3 Drones with 2025.03 firmware](/important-communication/resolving-blocked-battery-issues-for-elios-3-drones-with-2025.03-firmware)
{% endcontent-ref %}

### October 2023

{% content-ref url="/pages/Wer5xfqpx34nyZILR6uz" %}
[Elios 3 battery charger replacement](/important-communication/elios-3-battery-charger-replacement)
{% endcontent-ref %}


# Resolving Blocked Battery Issues for Elios 3 Drones with 2025.03 firmware

Since the release of the Elios 3 firmware package 2025.03, we have noted an increase in customer reports of blocked batteries. These batteries exhibit a magenta status LED and fail to communicate with the drone.

To address this, we released a drone firmware hotfix, version 2025.03.1, on October 22nd. This hotfix prevents the battery firmware update, identified as the cause of the issue. We highly recommend updating your drone to this latest version.&#x20;

Note that the issue is not the battery firmware itself, but is due to the update process.

For customers with already blocked batteries, we also offer a method to revert them to a functional state, see below.

## How to revert blocked batteries

To recover blocked Elios 3 batteries showing a magenta status LED, you’ll temporarily downgrade the drone firmware to restore the batteries.\
Then update both the batteries and the drone to the latest hotfix version (2025.03.1) to prevent the issue from recurring.&#x20;

The process is described hereunder :

### Preparation

1. Download or locate Elios 3 drone firmware files, those files are downloaded by Inspector and stored at %localappdata%/Flyability/Inspector/firmwares. If you don't find them, please find links for each of them :
   1. [2024.07.1.swu](https://drive.google.com/open?id=1lWB9ngCbIUnI2sajlcYCXxIiKxiDVc57\&usp=drive_fs)
   2. [2025.02.swu](https://drive.google.com/open?id=1fXmgvE5wsCplDM_lkCVw6BsxTJFvW7m6\&usp=drive_fs)
   3. [2025.03.1.swu](https://drive.google.com/open?id=1KzNgFkniUes3YC62GXDTXH_AMNmpRlIK\&usp=drive_fs)

### Downgrading the drone firmware

1. Ensure you are running the latest version of Inspector (25.3.0.56)
2. Power on your drone and connect it to your computer
3. Ignore any message inviting you to update the drone, click on the Later button
4. From the Inspector Drone menu, click on Flash custom firmware
5. A file selection dialogue will show, navigate to the location of the **2024.07.1.swu** file and select it. The downgrade process will start
6. Wait until the drone fully downgrades and reboots
7. When the drone reboots, you will hear a beep, this beep confirms the battery has been flashed with a former battery firmware

### Recovering the batteries

1. For each battery displaying the magenta status LED, do the following :
   1. Power off the drone
   2. Place a magenta status LED battery in the drone
   3. Power on the drone
   4. When you hear the beep, the battery should be good again, power off, remove the battery and check its status LED. If the LED is still magenta, try once more.

### Upgrading the batteries

While you can proceed with updating the drone to the hotfix version directly, we highly recommend you do an additional step, which will bring the batteries to their latest stable firmware version 1.4.

1. Power on your drone and connect it to your computer
2. Ignore any message inviting you to update the drone, click on the Later button
3. From Inspector Drone menu, click on Flash custom firmware
4. A file selection dialogue will show, navigate to the location of the **2025.02.swu** file and select it. The upgrade process will start
5. Wait until the drone fully downgrades and reboots
6. When the drone reboots, you will hear a beep, this beep confirms the battery has been flashed with the battery firmware 1.4
7. Follow the Recovering the batteries process to update all your batteries

### Final drone upgrade

1. Power on your drone and connect it to your computer
2. Ignore any message inviting you to update the drone, click on the Later button
3. From Inspector Drone menu, verify that under "ELIOS 3", Inspector suggests updating your drone to **2025.03.1**. If it's the case, proceed with the update by clicking on Update now, if not, proceed to step 4
4. From Inspector Drone menu, click on Flash custom firmware
5. A file selection dialogue will show, navigate to the location of the **2025.03.1.swu** file and select it. The upgrade process will start
6. Wait until the drone fully downgrades and reboot

Your Elios 3 and batteries are now fully operational again and running the latest version


# Elios 3 battery charger replacement

Safety around battery manipulation is important ! Since our last communication on this topic in November 2022, about Elios 3 battery safety, we have heard back from customers with damaged battery charger connectors.&#x20;

Therefore, we have improved the battery charger connector design. This new design is now the only one being sent with our products.&#x20;

In order to increase safety with Elios 3 battery chargers, we offer free replacement of the old ones.

We strongly recommend only using this new charger design and dispose of the old one.

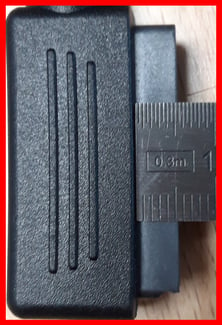
#### How to recognize and old design charger

**Looking at the charger connector**

The new charger connector has a shorter lip compared to the old connector.

| ![good-1](https://2602167.fs1.hubspotusercontent-na1.net/hub/2602167/hubfs/good-1.png?upscale=true\&upscale=true\&width=231\&height=327\&name=good-1.png) | <img src="https://2602167.fs1.hubspotusercontent-na1.net/hub/2602167/hubfs/bad.png?upscale=true&#x26;upscale=true&#x26;width=222&#x26;height=326&#x26;name=bad.png" alt="bad" data-size="original"> |
| --------------------------------------------------------------------------------------------------------------------------------------------------------- | --------------------------------------------------------------------------------------------------------------------------------------------------------------------------------------------------- |
| **New connector < 4 mm (1/8 in)**                                                                                                                         | **Old connector > 5 mm (3/16 in)**                                                                                                                                                                  |

#### How to request a replacement

We invite you to contact your reseller or Flyability support team directly, <support@flyability.com>\
Specifying the drone serial number linked to the chargers, the batch number of the chargers and the number of chargers needed.

#### Shipping

Your reseller or Flyability will ship the replacement charger, depending if you brought the Elios 3 drone from a reseller or directly from Flyability.\
Shipment will be done free of charge.

#### Battery safety

Battery safety information may be found in the battery safety guidelines (BSG) from [the documentation section](/aircraft/elios-3/elios-3-documentation#battery)


# Elios 3

<figure><img src="/files/bgjhI1zdD2kndNIl12Ad" alt="" width="563"><figcaption></figcaption></figure>

{% content-ref url="/pages/ONHXE5d4OQBYNF2DzKAR" %}
[Elios 3 Documentation](/aircraft/elios-3/elios-3-documentation)
{% endcontent-ref %}

{% content-ref url="/pages/NKD66fha0RUuQYprndjV" %}
[Elios 3 System update](/aircraft/elios-3/elios-3-system-update)
{% endcontent-ref %}

{% content-ref url="/pages/0De7JFaVnCzZ5WMZXZNq" %}
[Elios 3 Maintenance](/aircraft/elios-3/elios-3-maintenance)
{% endcontent-ref %}

{% content-ref url="/pages/prdtQp9gASBYiRqkgUmI" %}
[Elios 3 Feature details](/aircraft/elios-3/elios-3-feature-details)
{% endcontent-ref %}

***

{% tabs %}
{% tab title="Tablet App and Software" %}
{% content-ref url="/pages/n70rLNPvAzpIdyQjGekT" %}
[Elios 3 Cockpit App](/aircraft/elios-3/elios-3-cockpit-app)
{% endcontent-ref %}

{% content-ref url="/pages/xkvvOpxqr8KBBFrAFn02" %}
[Inspector 5](/software/inspector/inspector-5)
{% endcontent-ref %}
{% endtab %}
{% endtabs %}

***

{% tabs %}
{% tab title="Additional Payload" %}

<table><thead><tr><th></th><th></th><th data-hidden></th></tr></thead><tbody><tr><td><img src="/files/6miVdVD2WfZ8kt5ozn30" alt=""></td><td><a href="/pages/89ELLEinPsHPHQOXSCbR">Surveying Payload (LIDAR REV7)</a></td><td></td></tr><tr><td><img src="/files/bUI711tNXEj0jNdEj717" alt=""></td><td><a href="/pages/zvziT105FpoS45vH06VD">UT Payload</a></td><td></td></tr><tr><td><img src="/files/dHhUOSZzKk6T3VKIj81n" alt=""></td><td><a href="/pages/rnjLAHqXBcNM24u2NfWM">Gas sensor</a></td><td></td></tr><tr><td><img src="/files/IYRXdOkHvDpXuz5ZeCkt" alt="" data-size="original"></td><td><a href="/pages/3m5q5e9XGmdzcZYAadnd">Radiation sensor</a></td><td></td></tr></tbody></table>
{% endtab %}
{% endtabs %}


# Elios 3 Documentation

User manuals, technical specifications, MSDS

## General documentation&#x20;

{% tabs %}
{% tab title="Standard" %}
{% file src="/files/R4SW3WtN1a1IPBAS3L7F" %}

{% file src="/files/xkiKtlNXIuZZzxA2iaIT" %}

{% file src="/files/tR8Wh0UPDaFmzMKcMD2S" %}

{% file src="/files/qd0qhQaT2UgYD8ZJxlg2" %}
{% endtab %}
{% endtabs %}

***

### Standard battery and High-capacity battery

{% file src="/files/jhGTAjoLjgCdtXz0N4o5" %}

{% file src="/files/Xc301RIbRSt83DV3sDpw" %}

{% file src="/files/zSSrukvnFXG8AHDprt4n" %}

{% file src="/files/i7Y0bhQfEgHDhCfuRsLt" %}

***

### Material Safety Data Sheet & Test Report

{% tabs %}
{% tab title="Standard Battery" %}
{% file src="/files/AsflsaIRsk1l9G9VpeYK" %}

{% file src="/files/RzwZZIimGDsCoHwyCyFM" %}
{% endtab %}

{% tab title="High Capacity Battery" %}
{% file src="/files/E6XPZ1ls2G4OsMWkG37b" %}

{% file src="/files/Mgm75UcJkgztSWVKicej" %}
{% endtab %}

{% tab title="Remote controller Battery" %}
{% file src="/files/BhQxr3HlnzGV9tvwHWKB" %}

{% file src="/files/r7hz7VRk2op44gYpjDrx" %}
{% endtab %}
{% endtabs %}

***

### Certificate of conformity

{% content-ref url="/pages/hFH4jffGCaNvlW1kLsRC" %}
[Elios 3 Certificates](/aircraft/elios-3/elios-3-documentation/elios-3-certificates)
{% endcontent-ref %}


# Elios 3 Certificates

### Drone

{% tabs %}
{% tab title="CE" %}
{% file src="/files/dV1x1CYgzwG1h5IU7KJh" %}

{% file src="/files/qtNze8Dwejf4nSn8cGrz" %}

{% file src="/files/r1EsxgHM3fp6xnnHvqOk" %}
{% endtab %}

{% tab title="FCC" %}
{% file src="/files/NIVH1wkNfrkmERjbOt0l" %}
{% endtab %}

{% tab title="IC" %}
{% file src="/files/ANY8CDC58jy1VTpILzAi" %}
{% endtab %}

{% tab title="MIC" %}
{% file src="/files/cx7bTnnBKW74C8fRzq0C" %}
{% endtab %}

{% tab title="UKCA" %}
{% file src="/files/vje3oCrD7WyWIMJeVFPd" %}
{% endtab %}

{% tab title="KCC" %}
{% file src="/files/2fE8PnR7lgWg5YB2PMKr" %}
{% endtab %}
{% endtabs %}

### Remote controller

{% tabs %}
{% tab title="CE" %}
{% file src="/files/4VUtvpIaGEhxy5X7jimu" %}

{% file src="/files/NHqKMPQ1ueOPGNRY2JSy" %}
{% endtab %}

{% tab title="FCC" %}
{% file src="/files/jT3KOPOQWLFw9wLsIvB2" %}
{% endtab %}

{% tab title="IC" %}
{% file src="/files/OGpGkyph3YT48X7X0SYB" %}
{% endtab %}

{% tab title="MIC" %}
{% file src="/files/dzX7y16sHPYnb7F4zYRZ" %}
{% endtab %}

{% tab title="UKCA" %}
{% file src="/files/vZwUyE4Nty5CXXeQuSLd" %}
{% endtab %}
{% endtabs %}

### Standard Battery

{% tabs %}
{% tab title="CE" %}
{% file src="/files/6T5mkmztkMyE1haFg3s0" %}
{% endtab %}

{% tab title="FCC" %}
{% file src="/files/mXudtaDRqUJWFjjGcGlw" %}
{% endtab %}

{% tab title="TAIWAN" %}
{% file src="/files/NKHO6tE8nKyBAHIQQ7tG" %}
{% endtab %}
{% endtabs %}

### High Capacity Battery

{% tabs %}
{% tab title="CE" %}
{% file src="/files/Gvo6Gby2R2HBVslVIIFV" %}
{% endtab %}

{% tab title="FCC" %}
{% file src="/files/umV80GFAMhk8waOwvtrU" %}
{% endtab %}

{% tab title="TAIWAN" %}
{% file src="/files/wqkXm3wFTFP6ePY4fkxl" %}
{% endtab %}
{% endtabs %}

### Classification of Product

{% tabs %}
{% tab title="NON DUAL USE" %}
{% file src="/files/0VgPrRB1xpblnmLtRbHr" %}
{% endtab %}
{% endtabs %}

{% hint style="info" %}
Not finding the certificate you are looking for ? Contact us at <support@flyability.com>
{% endhint %}


# Elios 3 Activation Guide

This guide explains how to activate your Elios 3 directly from the Cockpit App and ensure a smooth setup.

**Prerequisites**

Before starting the activation process, make sure you have the following:

* **Internet Access**
  * Your tablet must be connected to Wi-Fi.
  * Ensure the network is open and does not include restrictions blocking the activation process. E.g. protected networks that could contain proxy servers, firewalls, and/or antivirus software. For more information: [Required Remote URLs and Ports](https://knowledge.flyability.com/software-and-cloud/inspector/complementary-information/required-remote-urls-and-ports)
* **Flyability Account**
  * You need a Flyability account to activate the drone.
  * If you do not have one, create it at cloud.flyability.com or by using the Register button inside the Cockpit App.

### Step-by-Step Activation Procedure <a href="#docs-internal-guid-dd9099fd-7fff-130a-575a-7a8420b1150c" id="docs-internal-guid-dd9099fd-7fff-130a-575a-7a8420b1150c"></a>

1. Turn on the tablet and confirm it is connected to a strong, open internet connection or Mobile Hotspot Wifi.
2. Connect the tablet to the Remote Controller using the USB-C cable provided:
3. Power on the Remote Controller.
4. Open the Cockpit App on the tablet.
5. Insert a fully charged battery into the Elios 3 and power on the drone.
6. Wait a few moments for the app to establish the connection.
7. When the registration pop-up appears, select LOGIN, then enter your Flyability email and password to complete the activation.

### Troubleshooting

* If **NO** activation has been completed, the user is limited to 20 flights.
* Error message: **“Drone not activated: Please activate the drone following the license activation process (error S35)**” — ensure that the correct email address is used when registering in Inspector.
* If the tablet’s **timezone** does not match the user’s actual location, the drone activation will fail.\
  To fix this, go to:\
  Settings → General management → Date and time → Enable “Automatic date and time.”
* The tablet must be connected to the **internet** (Wi-Fi or mobile hotspot) for the license activation to succeed.
* **Firmware mismatch:** If the drone, remote controller, and Cockpit app are running different firmware versions, the system may fail to connect or operate correctly. Ensure all firmware versions are aligned. For more information, refer to the [*System Versions Compatibility Chart*](https://knowledge.flyability.com/aircraft/elios-3/elios-3-system-update#system-versions-compatibility-chart).
* **Network restrictions:** Firewalls, VPNs, or strict IT security policies on the network can block communication with the activation servers. For more information, refer to the [*Required Remote URLs and Ports*](https://knowledge.flyability.com/software-and-cloud/inspector/complementary-information/required-remote-urls-and-ports)


# Elios 3 Battery Best Practices

This article highlights essential practices to ensure good performance, reduce risk, and maintain warranty validity of the Elios 3 batteries.

Should you experience any battery-related issues, please consult the [**Elios 3 Battery Troubleshooting**](/aircraft/elios-3/elios-3-troubleshooting/elios-3-battery-troubleshooting) article for structured guidance on identifying and resolving common battery concerns.

### Remove batteries from the drone after use <a href="#docs-internal-guid-857b4dca-7fff-9b4c-3b25-a1c3f9aaf367" id="docs-internal-guid-857b4dca-7fff-9b4c-3b25-a1c3f9aaf367"></a>

* A battery will continue to discharge slowly and can reach a deep-discharge state, resulting in irreversible damage, when left connected for extended periods.

### Store Batteries at a low State of Charge <a href="#docs-internal-guid-5b91046d-7fff-f396-7335-6061160cc5e3" id="docs-internal-guid-5b91046d-7fff-f396-7335-6061160cc5e3"></a>

* Batteries stored empty or near empty can degrade quickly, resulting in irreversible damage,
* After a mission:
  * When a battery is fully charged, manually set to Storage Mode in the battery menu, or allow the battery to set automatically (after 24hrs it will drop to 85%, then after 5 days it will start to discharge to 60%).&#x20;
  * When a battery is used. Recharge it fully before storing setting storage mode manually, or allow the battery to set automatically (after 24hrs).

### Cycle Batteries During Long Periods Without Use <a href="#docs-internal-guid-131c9a98-7fff-3230-e110-410f57914f18" id="docs-internal-guid-131c9a98-7fff-3230-e110-410f57914f18"></a>

* If batteries stay unused for months their stability drops, causing swelling or voltage issues, requiring a maintenance cycle every 3 months.
* Charge the battery fully, then activate Storage Mode, or allow the battery to set automatically(after 24hrs) to discharge it to 60%.

### Extreme Temperatures Can Affect Performance

* Cold environments increase internal resistance and hot environments accelerate chemical aging.
* Before flying, bring the battery back to a moderate temperature (around 20–25°C).
* Avoid long delays between conditioning and flight so the battery stays within a safe temperature range.

### Charging Considerations <a href="#docs-internal-guid-c70ecb1b-7fff-2293-dba6-e318278b385c" id="docs-internal-guid-c70ecb1b-7fff-2293-dba6-e318278b385c"></a>

* Always allow batteries to cool after flight before charging.
* Avoid charging batteries below 12°C or above 45°C.
* Charging should always be supervised in a safe area.

#### For all detailed recommendations, procedures, and safety information, please consult the official [Elios 3 Battery Safety Guidelines](https://drive.google.com/file/d/11zpJmSWA6jbbvezq3NMze5P8V67xMLnI/view)


# Elios 3 System update

## <mark style="color:$success;">Current release: 2026.02 (July 2026)</mark>

{% file src="/files/bMwIu24nOPzBFzbrPlu2" %}

<table><thead><tr><th width="262.7998046875">Component</th><th width="261.4000244140625" align="center">Current Compatible Version</th><th align="center">Download</th><th data-hidden></th></tr></thead><tbody><tr><td>Inspector Software</td><td align="center"><strong>26.2.0.50</strong></td><td align="center"><a href="/pages/xkvvOpxqr8KBBFrAFn02">Link</a> </td><td></td></tr><tr><td>Cockpit App</td><td align="center"><p><strong>2026.02.1</strong></p><p><strong>2026.02.0</strong></p></td><td align="center"><a href="/pages/n70rLNPvAzpIdyQjGekT#download">Link</a> </td><td></td></tr><tr><td>Avionic firmware</td><td align="center"><strong>2026.02.0</strong></td><td align="center">(through Inspector)</td><td></td></tr></tbody></table>

{% hint style="warning" %}
If the drone update process with Inspector remains **blocked for more than 10 minutes, disconnect the battery** to prevent a complete energy drain. Afterward, restart the update process with another battery.
{% endhint %}

{% hint style="info" %}
Before updating from 2023.12.2 or previous to 2024.02 or further version, please import all dataset present on the drone memory and erase the memory with Inspector 4

If you have updated your drone and did not import previous datasets, you can downgrade your drone. Please read [this article](/software/inspector/inspector-5/common-workflows/retrieve-previous-flight-data-from-your-elios-3-since-2024-april-update) or [contact support](mailto:support@flyability.com) if needed.
{% endhint %}

***

<details>

<summary>System Versions Compatibility Chart</summary>

| ![](/files/6byEaodMzOb3ADc0qGNF) | ![](/files/cZzLlJ1OewxL4S4CBt2B) | ![](/files/Z0OKL3rXRjw8Dp47QnAK) |
| :------------------------------: | :------------------------------: | :------------------------------: |
|             Inspector            |         Elios 3 Avionics         |              Cockpit             |
|          **26.02.0.47**          |           **2026.02.0**          |           **2026.02.0**          |
|      26.1.1.31 and 26.1.0.21     |             2026.01.1            |             2026.01.1            |
|      26.1.0.21 and 25.3.0.56     |             2025.03.1            |             2025.03.1            |
|             25.3.0.56            |              2025.03             |              2025.03             |
|            25.2.0.260            |              2025.02             |             2025.02.2            |
|            25.2.0.260            |              2025.02             |              2025.02             |
|            25.1.0.237            |              2025.01             |              2025.01             |
|            24.10.0.183           |             2024.10.1            |              2024.10             |

</details>

{% content-ref url="/pages/LkLJmjGMDSHAXsyNG1WX" %}
[Previous System Updates](/aircraft/elios-3/elios-3-system-update/previous-system-updates)
{% endcontent-ref %}

***

## How to update

### Important Pre-Update Notes

* Cockpit + Inspector + Drone must be up to date before the use and the same compatible version! If one of the component is not up to date, incompatibilities can result !&#x20;
  * Refer to the [compatibility compatibility chart](#system-versions-compatibility-chart)
* Before updating from 2023.12.2 or previous to 2024.02 or further version, please import all dataset present on the drone memory and erase the memory with Inspector 4. If you have updated your drone and did not import previous datasets, you can downgrade your drone. Please read [this article](/software/inspector/inspector-5/common-workflows/retrieve-previous-flight-data-from-your-elios-3-since-2024-april-update) or [contact support](mailto:support@flyability.com) if needed.

### What must be done

{% stepper %}
{% step %}

#### [Inspector software update](#id-1.-how-to-update-inspector)

Make sure the computer is connected to internet and launch Inspector software, a pop up notification will appear, follow the instruction.
{% endstep %}

{% step %}

#### [Elios 3 drone update via Inspector](#id-2.-how-to-update-the-drone)

Connect the drone to Inspector software, a pop up notification will appear, follow the instruction.
{% endstep %}

{% step %}

#### [Cockpit App update via the tablet](#id-3.-how-to-update-cockpit-app)

Make sure the tablet is connected to internet and launch Cockpit app, a pop up notification will appear, follow the instruction.
{% endstep %}
{% endstepper %}

<details>

<summary>Required Material</summary>

* Elios 3 drone + Remote controller + Tablet
* Elios 3 battery, fully charged
* USB 3.1 Gen 1 cable
* Inspector 5 (latest version available)

</details>

<details>

<summary>Preparation</summary>

* Fully charge one Elios 3 battery
* Leave the LiDAR connected to the drone.
* Export all flights from the drone, to avoid any loss of data

</details>

***

### 1. How to update Inspector

* Launch Inspector Software
* A pop-up message will propose a new update, click on download

<figure><img src="https://knowledge.flyability.com/hs-fs/hubfs/Knowledge%20Base%20Files/Images/Inspector/Inspector%204.1%20update/1.png?width=347&#x26;name=1.png" alt=""><figcaption></figcaption></figure>

**If you don't receive any update notification, please see** [**here**](https://knowledge.flyability.com/software-application)

* A loading bar will appear, displaying the status of the download

<figure><img src="https://knowledge.flyability.com/hs-fs/hubfs/Knowledge%20Base%20Files/Images/Inspector/Inspector%204.1%20update/2.png?width=310&#x26;name=2.png" alt=""><figcaption></figcaption></figure>

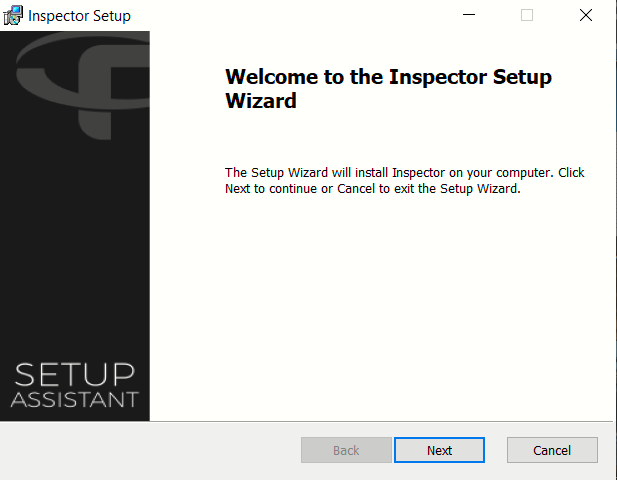
* Then the program will shut down and the Inspector Setup wizard will appear for the installation, click next and follow the instructions.

<figure><img src="https://knowledge.flyability.com/hs-fs/hubfs/Knowledge%20Base%20Files/Images/Inspector/Inspector%204.1%20update/3.png?width=617&#x26;name=3.png" alt="" width="375"><figcaption></figcaption></figure>

***

### 2. How to update the drone&#x20;

* Before attempting the update, make sure the computer is connected to the internet
* Turn on the Elios 3 with a fully charged battery
* Connect the Elios 3 to your computer with the USB3.1 Gen1 provided cable.
* Wait until the drone power button turns to a steady purple color.
* Once the drone is recognized by Inspector, a pop-up message will appear

<figure><img src="https://knowledge.flyability.com/hubfs/image-png-Nov-15-2022-09-11-57-4207-AM.png" alt=""><figcaption></figcaption></figure>

* Click the "Update my drone now" to start the update process.

{% hint style="info" %}
In case the update does not start within 5min after clicking ''Update my drone now'':

Please disconnect the drone, close Inspector, reopen the software then reconnect the drone.

The pop up message will be displayed again, then the update can be made
{% endhint %}

* Once you hit the Update button, the process will start
  * *If the drone update process in Inspector remains blocked for more than 10 minutes, disconnect the battery to prevent a complete energy drain.*
* When the drone is updated, you will get the following pop-up

<figure><img src="https://knowledge.flyability.com/hubfs/image-png-Nov-15-2022-10-46-21-0975-AM.png" alt=""><figcaption></figcaption></figure>

* Wait until the drone completely reboots
  * Power button must be purple
  * Inspector is connected to the drone

{% hint style="info" %}
**During the update** the Elios 3 power button LED will turn steady blue and then blinking blue. \
Be patient this process can take **up to 10 minutes** and during this time the drone might seem unresponsive.
{% endhint %}

***

### 3. How to update Cockpit App

{% content-ref url="/pages/CfhbEFMkxeABHvOLaPn2" %}
[Cockpit 3 How to update](/aircraft/elios-3/elios-3-cockpit-app/cockpit-3-how-to-update)
{% endcontent-ref %}

***

{% hint style="info" %}
If you need any help on the procedure, please contact <support@flyability.com>
{% endhint %}


# Previous System Updates

***

### 2026.02.1 Hotfix (August 2026)

* Cockpit App: 2026.02.1

Bug fix:

* "Probe gain recommended" for Single crystal probe
* Fix video issues when using Wifi Streaming on S11 tablets
* Add black border behind drone odometry (below the 3D map)
* Fix drone activation canceled when clicking on Cockpit screen after returning from browser

***

### 26.1.1.31 Inspector Patch (April 2026)

New features:&#x20;

* Support of Mixpanel API, old endpoint will be discontinued July 1st
* Support the rebranding by replacing Flyability Cloud with Inspector Online
* Support Japanese Language

Bug fix:

* Update of 3D viewer to fix downloaded meshes being tilted 90 degrees

***

### 2026.01.1 Release (April 2026)&#x20;

{% file src="/files/ZcAt92pLTtqruHyjUQIT" %}

* Cockpit App: 2026.01.1
* Avionic Firmware: 2026.01.1
* Inspector: 26.1.0.21

***

### 2025.03.1 Hotfix (November 2025)

{% file src="/files/mqxYSEOUD8blWeDd5XH0" %}

* Cockpit App: 2025.03.1
* Avionic Firmware: 2025.03.1

***

### 2025.03 Release (October 2025)

{% file src="/files/5dfyLhBBsjVS1TaHARhS" %}

* Cockpit App: 2025.03
* Avionic Firmware: 2025.03
* Inspector: 25.3.0.56
* Battery: v1.4

***

### 2025.02.2 'Erratic yaw fix' (July 2025)

* Cockpit App: 2025.02.2
* Avionic Firmware: 2025.02
* Inspector: 25.2.0.260
* Battery: v1.4

***

### 2025.02 Release (July 2025)

{% file src="/files/ElS9xpiPPu8pcKv06sf8" %}

* Cockpit: 2025.02
* Avionic: 2025.02
* Inspector: 25.2.0.260
* Battery: v1.4

***

### 2025.01.1 Hotfix (June 2025)

* Cockpit: 2025.01.1
* Avionic: 2025.01.1
* Inspector: 25.1.0.237
* Battery: 1.399

***

### 2025.01 Release (March 2025)

{% file src="/files/ncv5UMIH9kfPsQzCU3zc" %}

* Cockpit: 2025.01
* Avionic: 2025.01
* Inspector: 25.1.0.237
* Battery: 1.399

***

### 2024.10 Release (November 2024)

{% file src="/files/mhOehIT8CIry2AxdFM4x" %}

* Cockpit: 2024.10
* Avionic: 2024.10.1
* Inspector: 24.10.0.183
* Battery: 1.397

***

### 2024.07.1 Hotfix (September 2024)

* Cockpit: 2024.07
* Avionic: 2024.07.1
* Inspector: 24.7.1.137
* Battery: 1.397

***

### 2024.07 Release (August 2024)

{% file src="/files/a8qCQvz3QWASVmqBq0uB" %}

* Cockpit: 2024.07
* Avionic: 2024.07
* Inspector: 24.7.0.86
* Battery: 1.397

***

### 2024.05 Release (June 2024)

{% file src="/files/BfW9BRnBxJijEKAMq3r3" %}

* Cockpit: 2024.05
* Avionic: 2024.05
* Inspector: 24.5.0.675
* Battery: 1.397

***

### 2024.02 Hotfix (April 2024)

* Cockpit: 2024.02.1
* Avionic: 2024.02
* Inspector: 24.2.1.586
* Battery: 1.393

***

### 2024.02 Release (April 2024)

{% file src="/files/QxtwfcwGzlkhNhi9Q0vj" %}

* Cockpit: 2024.02
* Avionic: 2024.02
* Inspector: 24.2.0.551
* Battery: 1.393

***

### 2023.12 Hotfix (January 2024)

{% file src="/files/vjoTnYB9zkqd7yB9qJb6" %}

* Cockpit: 2023.12.2
* Avionic: 2023.12.2
* Inspector: 23.12.0.379
* Battery: 1.393

***

### 2023.12 Release (December 2023)

{% file src="/files/1FSSkRTGgWAPA3U3uCrO" %}

* Cockpit: 2023.12
* Avionic: 2023.12
* Inspector: 23.12.0.379
* Battery: 1.393

***

### 2023.09 Release (October 2023)

{% file src="/files/qvKlT7oXpvkeKKGFrIG6" %}

* Cockpit: 2023.09
* Avionic: 2023.09
* Inspector: 23.9.0.340
* Battery: 1.393

***

### 23-09 Hotfix (August 2023)

* Cockpit: 3.5.1.0-27
* Avionic: 23-09
* Inspector: 4.5.0.303
* Battery: 1.393

***

### 23-09 Release (July 2023)

{% file src="/files/AMuSZxGAjsQFSGQWUJ0n" %}

* Cockpit: 3.5.0.0-18
* Avionic: 23-09
* Inspector: 4.5.0.303
* Battery: 1.393

***

### 23-04 Release (April 2023)

{% file src="/files/MrJ7vKcyGTSoo05ZqTLZ" %}

* Cockpit: 3.4.0.0
* Avionic: 23-04
* Inspector: 4.4.0.276
* Battery: 1.393

***

### 22-24 Hotfix (March 2023)

{% file src="/files/eycOHq5MFEwcnNvRPZCz" %}

* Cockpit: 3.3.0.0-8
* Avionic: 22-24-1
* Inspector: 4.3.0.253
* Battery: 1.393

***

### 22-24 Release (January 2023)

{% file src="/files/0ITffqn2qbRZe1yD9ie0" %}

* Cockpit: 3.3.0.0-8
* Avionic: 22-24
* Inspector: 4.3.0.253
* Battery: 1.393

***

### 22-19 Release (November 2022)

{% file src="/files/1hV9fnkBgFzLXB8Rps8p" %}

* Cockpit: 3.2.0.0.22.19
* Avionic: 22-19
* Inspector: 4.2.0.215
* Battery: 1.393

***

### 22-15 Release (August 2022)

{% file src="/files/t99Y0UayE2ykNUNEQjuy" %}

* Cockpit: 3.1.0.22.15
* Avionic: 22-15
* Inspector: 4.1.0.177
* Battery: 1.393

***

### 22-11 Release&#x20;

* Cockpit: 3.0.22.11
* Avionic: 22-11
* Inspector: 4.0.0.160
* Battery: 1.393


# 2026.01.0 Downgrade to 2025.03.1

This guide describe the process of downgrading your Elios 3 to the version 2025.03.1

#### What you need <a href="#what-must-be-done" id="what-must-be-done"></a>

1. Elios 3 drone
2. USB cable and USB hub, both provided with the drone
3. Charged Elios 3 battery
4. Computer connected to the Internet with Inspector installed

#### What must be done <a href="#what-must-be-done" id="what-must-be-done"></a>

{% stepper %}
{% step %}

### Download necessary files

Download the drone firmware 2025.03.1 swu file and the Cockpit 2025.03.1 apk from [this link](https://flyability.sendsafely.com/receive/?thread=2G53-ZFPU\&packageCode=t2Ae0TwAqvgGE2QRV0MzYek70C9xH6Wp30upymftmQ8#keyCode=TS12vVT1hb5hWcyIXaKeq3zJrh0ppgT3UrpMzLxidSA)
{% endstep %}

{% step %}

### Elios 3 drone downgrade via Inspector

1. Import all data currently on the drone and delete all drone data. Flyability can't guarantee that data will be retrievable following the downgrade
2. From Inspector DRONE view, click on the "Flash customer firmware" button
3. Select the gaston\_2025.03.1.swu firmware file you just downloaded
4. Downgrade will start, wait until it finished
   {% endstep %}

{% step %}

### Cockpit application via the tablet

1. Connect the tablet to your computer with a USB cable
2. You will have to change USB mode from the notification pane, select "Transferring files / Android Auto", more information can be found in [this article](/aircraft/elios-3/elios-3-cockpit-app/cockpit-3-how-to-update#manual-update)
3. Copy the the downloaded 2025.03.1 Cockpit apk to your prefered tablet folder, we suggest using the Download folder on the tablet
4. Uninstall the current version of Cockpit on the tablet, by going to Android settings / Apps / Cockpit and tap the Uninstall button
5. Go back to the home screen of the tablet and open the My Files application, go into the Download folder, find the correct apk, Cockpit-2025.03.1-release.apk, and tap on it. Android system may require you to allow installation, please accept.
6. Once Cockpit is installed, ensure the tablet is connected to the Internet and launch Cockpit, proceed with the initial setup steps.
   {% endstep %}

{% step %}

### Inspector

Inspector does not need to be downgraded, you will be able to use the latest version 26.1.0.21 with the drone firmware 2025.03.1
{% endstep %}
{% endstepper %}


# Elios 3 Cockpit App

<figure><img src="/files/dAPKA9kCgzpJOPDtmVjI" alt=""><figcaption></figcaption></figure>

Cockpit 3 is the application designed for **Elios 3**.

In addition, of the previous version, the new application allows the visualization instantly of a high-density point cloud map, empowering pilots with exceptional locational awareness. A real-time 3D view of the drone’s trajectory and environment provides crucial data.

{% tabs %}
{% tab title="Download" %}
Latest release: "2026.02.1" (June Hotfix 2026)

{% file src="/files/rZnnN4kVzOi7yAjWcrRU" %}
{% endtab %}

{% tab title="Documentation" %}
{% file src="/files/1cIJruvUqN5CXcFc7UQk" %}
{% endtab %}

{% tab title="Previous version and Release note" %}
[Previous system update](/aircraft/elios-3/elios-3-system-update/previous-system-updates)
{% endtab %}
{% endtabs %}

{% hint style="info" %}
Cockpit require an Internet connection to retrieve license information and activate the drone&#x20;
{% endhint %}

{% hint style="success" %}
**Compatible tablets and Android versions**

Cockpit 3 for Elios 3 has been tested on the following tablets and Android versions

* Samsung S7 LTE (SM-T875) up to Android 13
* Samsung S8 WIFI (SM-X700) up to Android 16<sup>1</sup>&#x20;
* Samsung S9 WIFI (SM-X710) up to Android 16
* Samsung S11 (SM-X730) up to Android 16

<sup>1</sup>  *The Samsung S8 WIFI (SM-X700) is compatible with Android 16. If your tablet is running Android 15, please update. If you face connection trouble while using Android 15, please update to Android 16 or follow* [*these instructions*](https://knowledge.flyability.com/aircraft/elios-3/elios-3-cockpit-app/cockpit-3-troubleshooting#rc-to-cockpit-connectivity-issue-after-updating-to-android-15) *to have RC to Cockpit connectivity*
{% endhint %}


# Cockpit 3 How to update

{% hint style="warning" %}
**Important notice:**

Cockpit require an Internet connection to be activated!&#x20;
{% endhint %}

### Cockpit Automatic installation

Cockpit updates are made Over The Air, connect the tablet to an internet connection, then start Cockpit App.

The application will display a notification whenever a new version is available. Click on the update button and follow the instructions.

### **Manual update**

Download the latest version of the Cockpit APK.

Connect the tablet to your computer, through the USB cable. You will need to unlock the tablet, and set the USB mode to "Transferring files / Android Auto"

To change the USB mode, swipe down the notification bar, and tap twice on the Android System entry

<figure><img src="/files/kgJS1HRKzV5yr4ukApJh" alt=""><figcaption></figcaption></figure>

***

From the selection menu, select "Transferring files / Android Auto"&#x20;

![](/files/tJ4O3m8pR1V6MPL7aPKv)

***

Copy the Cockpit APK you just downloaded onto the tablet memory, to the location of you choice, we recommend the Download folder

![The shown version in the image above is for example only](/files/NyByqnowAXkSHsDGbCPp)

***

Once the APK has been copied. From the tablet screen, open the My Files application

![](/files/ZC0h3XjGbkAl4CuXseky)

Head to the location where you copied the apk, if you can't find it you may select the "Installation files" shortcut (Step 1) and then tap on the apk (Step 2)&#x20;

![](/files/NK0N6f6EoDMpsb4BE4Aa)

***

If you have not authorized installation from unknown sources you will get the following message, tap on "Settings"

![](/files/67GeE9Lbek9X9ipQAWYp)

Scroll down until you get to "My Files" and enable the setting entry&#x20;

<figure><img src="/files/RHTJWiZVnmRHKK3a8vI2" alt=""><figcaption></figcaption></figure>

Once you have enabled the setting, the installation pop-up will show directly, tap on "Update"&#x20;

![](/files/M2rsS5tUvX7y0Kt2ScPW)

***

Once Cockpit is fully installed, open it, follow the onscreen instructions and **accept all the permissions**

You have now installed Cockpit! Connect your remote control and power on the drone to confirm that everything is working as intended.

If you need to update your drone, please see [Elios 3 Updates](https://knowledge.flyability.com/aircraft/elios-3/elios-3-cockpit-app/pages/NKD66fha0RUuQYprndjV#id-2.-how-to-update-the-drone)

{% hint style="info" %}
If you need any help on the procedure, please contact <support@flyability.com>
{% endhint %}


# Cockpit 3 Troubleshooting

## RC to Cockpit connectivity issue after updating to Android 15

{% hint style="success" %}
**Please update your S8 tablet to Android 16**
{% endhint %}

If you recently updated your Samsung S8 WIFI (SM-X700) tablet to Android 15. Please follow these steps to activate connectivity between the RC and Cockpit.

1. Restart your tablet
2. Connect the tablet to the Internet
3. Open Cockpit, ensure you are running at least Cockpit 2025.01.1, if not you will receive an update notification, proceed with the update
4. Once the new Cockpit installed. Go to Android / Settings / Apps / Cockpit / Storage. From there, click Clear data
5. Restart the tablet
6. Open Cockpit and go through the first launch configuration steps
7. From the main Cockpit window, click on the green "Click here to check" next to the sentence "In order to connect the remote control...". This will open the tethering menu. From that menu, toggle Ethernet tethering On
8. Go back to Cockpit and connect the RC

Steps 7 and 8 need to be executed each time the tablet is restarted or powered off and on.

After clear data, a message that Cockpit is missing licence information will appear, the tablet needs to be connected to the internet, it will fetch the information and the message will disappear after a few seconds.

<br>


# Elios 3 Payload

<table data-view="cards"><thead><tr><th></th><th data-type="content-ref"></th><th data-hidden data-card-cover data-type="image">Cover image</th><th data-hidden data-card-target data-type="content-ref"></th></tr></thead><tbody><tr><td></td><td><a href="/pages/89ELLEinPsHPHQOXSCbR">/pages/89ELLEinPsHPHQOXSCbR</a></td><td><a href="/files/kRRh9JZTDza2sZFAOB40">/files/kRRh9JZTDza2sZFAOB40</a></td><td><a href="/pages/89ELLEinPsHPHQOXSCbR">/pages/89ELLEinPsHPHQOXSCbR</a></td></tr><tr><td></td><td><a href="/pages/zvziT105FpoS45vH06VD">/pages/zvziT105FpoS45vH06VD</a></td><td><a href="/files/HgoUDmVedwvAJzrkvzlU">/files/HgoUDmVedwvAJzrkvzlU</a></td><td><a href="/pages/zvziT105FpoS45vH06VD">/pages/zvziT105FpoS45vH06VD</a></td></tr><tr><td></td><td><a href="/pages/rnjLAHqXBcNM24u2NfWM">/pages/rnjLAHqXBcNM24u2NfWM</a></td><td><a href="/files/U8ED4w7gUzOcBoRXTTx0">/files/U8ED4w7gUzOcBoRXTTx0</a></td><td><a href="/pages/rnjLAHqXBcNM24u2NfWM">/pages/rnjLAHqXBcNM24u2NfWM</a></td></tr><tr><td></td><td><a href="/pages/3m5q5e9XGmdzcZYAadnd">/pages/3m5q5e9XGmdzcZYAadnd</a></td><td><a href="/files/IDNrsbMm6MB0yBgxmB93">/files/IDNrsbMm6MB0yBgxmB93</a></td><td><a href="/pages/3m5q5e9XGmdzcZYAadnd">/pages/3m5q5e9XGmdzcZYAadnd</a></td></tr></tbody></table>


# Surveying payload

<figure><img src="/files/6JXvWd4M5t0P6NBW5skm" alt=""><figcaption></figcaption></figure>

Since its release in 2022, the Elios 3 has become a key instrument in the surveyor toolbox for capturing LiDAR data in areas where it was never possible to capture data before. With the growing need for better and more efficient data capture, sectors like mining, construction, and infrastructure management are turning to the Elios 3 to conduct safer inspections and surveys with greater data coverage.

Now, with the introduction of the Elios 3’s new Surveying Payload, the capabilities of this drone have been augmented. This report will detail the results of testing the new payload’s accuracy and demonstrate exactly how it has added to the Elios 3’s data collection workflows.

{% content-ref url="/pages/DLXQKeQEUNM6fs1dnjDR" %}
[Surveying Payload Quick Start Guide](/aircraft/elios-3/elios-3-payload/surveying-payload/surveying-payload-quick-start-guide)
{% endcontent-ref %}

{% content-ref url="/pages/1KrNQ96WYyJ0YsUrYp6C" %}
[Surveying payload Technical specifications](/aircraft/elios-3/elios-3-payload/surveying-payload/surveying-payload-technical-specifications)
{% endcontent-ref %}

{% content-ref url="/pages/Z1xdgW8YQRfB8E7stiXQ" %}
[Surveying payload Accuracy report](/aircraft/elios-3/elios-3-payload/surveying-payload/surveying-payload-accuracy-report)
{% endcontent-ref %}


# Surveying Payload Quick Start Guide

Before starting

### **Unboxing the LiDAR package**

When you have received your new LiDAR, make sure that the package is not damaged externally. If any substantial damage can be seen on the package, make sure to contact our customer support before opening it. Although the LiDAR is protected by a thick layer of packing material, do not use something that could scratch the payload lens to open the package.

Once the package is open, you will find your new Ouster Rev 7 OS0 128 beam and a set of spare screws you may need to fix the LiDAR to the drone. Pay attention while managing the LiDAR not to pick it up and handle it directly from the lens and make sure not to place the lens in direct contact with any abrasive material that may risk damaging it.

**Visual inspection**

Now that you have removed the LiDAR from the package, conduct a first visual inspection of the product to make sure that it is not damaged. In particular check for any scratches or abrasion on the lens or any broken pieces on the casing.

![LiDAR lens](/files/BM9vsIjU3K7x1Bs3NdTz)

**Tech specs Rev 7 LiDAR**

For the latest and most accurate technical specifications of the Ouster Rev 7 OS0 128 beam, we suggest you visit the Ouster website at the following link: <https://ouster.com/downloads>.

**Tech specs Elios 3 drone for surveying**

All the information you may need regarding the Elios 3 Surveying Payload can be found at the following link: <https://www.flyability.com/elios-3-surveying-payload>.

Please be aware that the Rev 7 LiDAR is 53 grams (1.8 ounces) heavier than its predecessor, the Rev 6.2, and therefore the Elios 3 drone's technical specifications may vary when paired with the Rev 7 LiDAR. For the updated technical specifications please download the relevant document found [here](/aircraft/elios-3/elios-3-payload/surveying-payload/surveying-payload-technical-specifications).

The main differences we recommend keeping in mind are the following:

1. The maximum operating temperature has been updated to 48° C
2. The maximum operating height is now 2700m AMSL
3. The Elios 3 Surveying flight time has been updated to 9 minutes

**Check your Elios 3 and Inspector software versions**

To operate the Surveying Payload you will need a version of the October 2023 release (2023.09) of the E3 onboard software, Cockpit and Inspector, or any later update. See [here](/aircraft/elios-3/elios-3-system-update) all the information about the Elios 3 system updates. To install the updates, you should open Inspector with your computer connected to the Internet, where you will be prompted with a pop-up to upgrade. Then, when you connect the drone to Inspector, the software will prompt you to upgrade your drone. Finally, Cockpit will prompt you to upgrade itself when your tablet is connected to the Internet.&#x20;

After updating your Elios 3, when it is connected to Inspector, this is the version number you should see in the “drone” tab of Inspector (or any later release):&#x20;

![](/files/rqT9UtCuxrWPMAHk30sP)

In the Cockpit info tab, you should also see the following results (or later release):&#x20;

![](/files/9eCi7XqihPIf5Rql140X)

Once the LiDAR is plugged in and the system is updated, the drone will automatically detect the Rev 7 LiDAR and you will be ready to do your first flight. To check if the new Rev 7 LiDAR is correctly paired to the drone make sure that the LiDAR serial number found on the *info* page of the cockpit under *payload* corresponds to the serial number on the Rev 7 LiDAR you received.

**Testing the setup**&#x20;

Before performing your first mission with the Elios 3 Surveying Payload, we suggest that you conduct a flight and mapping test in a safe environment. This step is important to make sure that everything is working properly and that you can recover the drone safely in the case of any failures. Therefore, it is recommended that you pick an open room area where you cannot lose the drone.

***

## Mounting the Rev 7 LiDAR (if purchased separately)

### **Drone compatibility**

The Ouster Rev 7 is only compatible with the Elios 3. Elios 1 and Elios 2 drones cannot be equipped with this payload.

> **Tools and accessories needed**
>
> To replace the Rev 6.2 LiDAR with the Rev 7 LiDAR you will need a T8 torx screwdriver and a torque adjustable driver, adjusted at 0.4 Nm, which were previously provided to you in the Elios 3 standard toolbox. No additional tools will be needed for the replacement process. If for any reason you have lost the screws needed to mount the LiDAR payload to the drone an additional set of screws can be found in the package where you received your new LiDAR.

### **Step-by-step installation process**

**1. Removing the old LiDAR (Rev 6.2)**

Before removing the LiDAR assembly from the electronic body, we recommend you turn the Elios 3 upside down while securing the LiDAR with two fingers, as per the video instructions, that you can find [here](/aircraft/elios-3/elios-3-maintenance#lidar-playload-replacement).

Disconnect the LiDAR cable from the drone by pulling the connector ring. Please make sure not to remove the cable on the LiDAR side, as this connector is glued in place and removing it would break the LiDAR sensor. Please make sure that no dust or other material enters the connector while it is removed.

![](/files/IxNa5zBiibLP2vuvEHLo)

Remove the two outer screws that attach the LiDAR support to the drone with the Torx T8 screwdriver. The two inner screws should be left untouched since they fix the carbon frame to the central housing of the drone.

![](/files/i4IGuWbG4p5BACGgxuzp)

Now you can slide the LiDAR assembly out of the drone.

![](/files/se6IyAeJFH7zLJEqccHA)

**2. What to do with the old LiDAR (Rev 6.2)**

If you have both LiDAR payloads at your disposal, we suggest you use the Rev 7 LiDAR for missions where high-quality data, range, and 3D mapping are essential. On the other hand, we suggest using the Rev 6.2 LiDAR when performing very challenging inspection missions and risk losing the drone or when performing just visual inspections and can avoid collecting the big datasets created by the Rev 7.

Before storing the LiDAR payload, we suggest you clean it, remove any particles on the lens, and then place it in an area where it doesn’t risk getting damaged. Additionally, do not place it in a dusty environment where particles may enter the cable.

**3. Attaching the new LiDAR (Rev 7)**

Before inserting the LiDAR assembly, make sure that the slot in which you slide the LiDAR mount is free of dirt and dust, so you can slide it to the end. The same goes for the LiDAR mount, it should be clean prior to its installation. Then insert the LiDAR assembly by sliding it into place.

![](/files/t4qY7SWVhVkvSyjnOWaP)

After turning the drone upside down while securing the LiDAR with two fingers, as per the video instructions which you can find on our dedicated [Support Page](/aircraft/elios-3/elios-3-maintenance), tighten the 2 screws with the T8 screwdriver attached to the torque control driver adjusted at 0.4 Nm. Those 2 screws will maintain the whole structure, so it is important that you tighten them correctly.

![](/files/GIFrl1cdsIjuF5xWiKqB)

Once the LiDAR sensor has been fixed to the drone, you need to connect the cable to the “LiDAR” connector. To do this, align the dot on the rubber of the connector on the LiDAR side with the white dot of the connector on the drone side. You will know that the cable has been well connected once you hear a clear audible click. If you do not connect the LiDAR sensor properly you risk having an intermittent connection in flight, which can lead to problems with your data-gathering efforts.

![](/files/l4alF4G1z6GbewqMMyAk)

Please make sure not to try to remove the connector from the LiDAR directly, as this isn’t meant to be removed and will break the LiDAR if you do so. Also, please pay attention that no dust or other particles enter the cable and connector while the LiDAR is removed. For more information on how to remove and attach the LiDAR, please refer to this page: [Elios 3 Maintenance](/aircraft/elios-3/elios-3-maintenance)

***

## FARO Connect

To learn more on how to download FARO Connect or how to migrate from your GeoSLAM Connect account to a FARO Connect account please visit this page: [FARO Connect](/third-party-software/faro-connect)

***

## **Available Training**

To leverage the data collected during flights, Flyability has partnered with FARO Connect to provide you with a more efficient and high-quality data processing tool. Using FARO Connect may be unfamiliar at first so we have created some specific training material to assist you in this phase and help you take your processing skills to the next level. You can find all the available material from Flyability by visiting that page:

[FARO Connect training](/third-party-software/faro-connect/general-information/available-training)

***

## Maintenance and care

Please find all the general maintenance information about the Elios 3 [here](/aircraft/elios-3/elios-3-maintenance). For any concerns regarding the maintenance and care of the Ouster Rev 7 OS0 128 beam please refer to the [Ouster website](https://ouster.com/downloads).

### **Handling the LiDAR**

Avoid touching the lens of the Rev 7 LiDAR when possible and do not use equipment that may damage the LiDAR lens while handling the payload. Properly cleaning and storing the LiDAR will reduce the risks of damage and can extend the life span of the product. Be aware that strong collisions may also be harmful to the payload and therefore it is not suggested to store it at height.

### **Cleaning the LiDAR**

It is important to clean the LiDAR after every mission, especially in dusty conditions. Particles that fall on the LiDAR lens could end up scratching it and leading to a lower scanning quality in future inspections if not dealt with properly. It is therefore important to clean the payload once you have finished using it.

First of all, we suggest using compressed air cans to remove any dust or material from the lens and then using a clean microfiber cloth to wipe the lens. When working in particularly dusty environments we suggest doing this between flights. It is important, however, to avoid using any type of solvent to clean the lens, as this could potentially damage the LiDAR window, affecting its performance.

## **Storing the LiDAR**

It is suggested to store the LiDAR either in the Elios 3 case or in the original box in which it arrived (if you purchased the Rev 7 LiDAR separately from the drone). Although no damage should occur, we suggest storing the payload in a dark environment and at room temperature. Please pay attention that no dust or other material enters the LiDAR cable and connector.

***

## Guidelines for Different Environments

For all the information regarding how the Rev 7 LiDAR reacts to different environments please refer to the Accuracy Report which you view [here](/aircraft/elios-3/elios-3-payload/surveying-payload/surveying-payload-accuracy-report). Please be aware that the success rate provided for the payload is not guaranteed and that you should be particularly cautious about the mapping guidelines for the following scenarios:

* *Highly reflective environments* can cause noise in the scans as the Rev 7 LiDAR has a much higher sensitivity to reflective lights compared to the Rev 6.2.
* *Very challenging symmetrical environments*. A very challenging symmetrical environment is one with very few geometric features or texture in prolonged straight areas (greater than 30-50 meters), as well as a diameter of less than 2 meters. Examples of environments with these features could include narrow sewers like the one you can see below.<br>

  <figure><img src="/files/oHKUBq3Vsa9MIOOtthA5" alt=""><figcaption></figcaption></figure>
* *Very confined spaces* with a diameter lower than 1 meter.

We also recommend turning on the Elios 3 Surveying Payload just before the flight and turning it off as soon as the mission is complete because the Rev 7 LiDAR collects millions of points every second that it is turned on, even when not flying. For a more concrete idea of this, consider that each minute that the drone is turned on, the LiDAR will collect around 1 GB of data.


# Surveying payload Technical specifications

### **Aircraft with surveying payload mounted**&#x20;

MODIFICATION FROM NOMINAL SPECIFICATIONS

| Weight                                                                                                                                                                                                                                                                                                       | <p>2465g  +/-15g</p><p>5,45lbs +/- 0.53oz</p>                              |
| ------------------------------------------------------------------------------------------------------------------------------------------------------------------------------------------------------------------------------------------------------------------------------------------------------------ | -------------------------------------------------------------------------- |
| Flight time\*                                                                                                                                                                                                                                                                                                | 9 minutes                                                                  |
| Operating Temperature\*\*                                                                                                                                                                                                                                                                                    | <p>0º C to 48º C </p><p>32° F to 118° F</p>                                |
| Operating Altitude\*\*\*                                                                                                                                                                                                                                                                                     | <p>Min: -3000m, Max: +2700m AMSL</p><p>Min: -9850ft, Max: +8850ft AMSL</p> |
| Data Transfer Time                                                                                                                                                                                                                                                                                           | 6 minutes\*\*\*\* for a full-time flight including LiDAR data              |
| <p>\* In ideal flight conditions, with a new battery</p><p>\*\* Valid for batteries pre-condition between 10°C and 40°C; 50 °F to 104 °F</p><p>\*\*\* Additional payloads will further degrade this performance</p><p>\*\*\*\* When using USB3.0 cable and USB3.0 port on the computer running Inspector</p> |                                                                            |

Nominal specifications for the aircraft can be found [here](/aircraft/elios-3/elios-3-documentation#general-documentation).

### LiDAR Payload

| Accuracy                                                                                                                                                               | From 0.1% drift (more info below)                                                                                                                       |
| ---------------------------------------------------------------------------------------------------------------------------------------------------------------------- | ------------------------------------------------------------------------------------------------------------------------------------------------------- |
| Precision                                                                                                                                                              | <p>1σ +/- 6mm</p><p>2σ +/- 12mm</p>                                                                                                                     |
| Range                                                                                                                                                                  | Up to 100m                                                                                                                                              |
| Scanning rate                                                                                                                                                          | 1,310,720 pts/sec                                                                                                                                       |
| Photon sensitivity                                                                                                                                                     | 10x                                                                                                                                                     |
| Configuration                                                                                                                                                          | Ouster OS0 128 beams REV 7 sensor\*                                                                                                                     |
| Handheld scanning time\*\*                                                                                                                                             | 10 minutes                                                                                                                                              |
| *\*\* With 50°C ambient temperature and having the drone preconditioned beforehand at 20°C room temperature or with 40°C ambient temperature without preconditioning.* | *\* Specifications for the OSO 128 beams REV 7 sensor are provided by Ouster. Complete specifications of the sensor are available on Ouster’s website.* |

### **Accuracy in non-symmetrical & symmetrical environments**

The Surveying Payload offered by Flyability, takes advantage of the latest Ouster REV 7’s supercharged L3 chip and the unmatched capabilities of FARO Connect to offer users a new approach to mobile mapping. However, the accuracy of the scans may vary depending on the geometry of the mapping environment. Below you can find four types of environments we identified and the results you can expect to get.

|                                               | Environment                                                                                                                                                                       | Configuration 1                               | Configuration 2                                                       |
| --------------------------------------------- | --------------------------------------------------------------------------------------------------------------------------------------------------------------------------------- | --------------------------------------------- | --------------------------------------------------------------------- |
|                                               |                                                                                                                                                                                   | Elios 3 & FlyAware                            | Surveying Payload & FARO Connect                                      |
| **Structured environments**                   | <ul><li>Buildings, stockpiles, containment areas</li><li>Little to no symmetry</li><li>Geometric features</li><li>Diameter/distance between walls >2m meters (6.5 feet)</li></ul> | <p><strong>1x</strong></p><p>0.5-1% drift</p> | <p><strong>5-10x</strong></p><p>\~0.1-0.2%</p>                        |
| **Nominal symmetric environments**            | <ul><li>Tunnels, stacks, shafts</li><li>Diameter >2m (6.5 feet)</li><li>Regular geometric features</li></ul>                                                                      | <p><strong>1x</strong></p><p>\~2% drift</p>   | <p><strong>5-10x</strong></p><p>\~0.25-0.5%</p>                       |
| **Challenging symmetrical environments**      | <ul><li>Tunnels, stacks, shafts</li><li>Diameter >2m (6.5 feet)</li><li>Light geometric features</li></ul>                                                                        | <p><strong>1x</strong></p><p>2-5% drift</p>   | <p><strong>2-5x</strong></p><p>0.5-2%</p><p>(50-80% success rate)</p> |
| **Very challenging symmetrical environments** | <ul><li>Tunnels, pipes, stacks, shafts</li><li>Diameter <2m (6.5 feet)</li><li>Light geometric features</li></ul>                                                                 | <p><strong>1x</strong></p><p>5+% drift</p>    | <p><strong>1-2x</strong></p><p>2-5%</p><p>(50-80% success rate)</p>   |

Please find more information about these values in the [accuracy report](/aircraft/elios-3/elios-3-payload/surveying-payload/surveying-payload-accuracy-report).

&#x20;

Download or print the Surveying Payload Tech Specs:

{% file src="/files/5PXlCTFlyzqjHSRmnzK2" %}


# Surveying payload Accuracy report

Since its release, the Elios 3 has become a key instrument in the surveyor’s toolbox for capturing LiDAR data in areas&#x20;where it was previously impossible to do so. With the growing need for better and more efficient data capture, sectors&#x20;like mining, construction, and infrastructure management have turned to the Elios 3 to conduct safer inspections and&#x20;surveys with greater data coverage.

The accuracy of the Elios 3’s LiDAR scans is augmented by the Surveying Package, a combination of hardware and&#x20;software that is designed to produce highly accurate results. The Surveying Package is made up of the Elios 3’s Rev&#x20;7 LiDAR, FARO Connect software, and georeferencing targets that all combine to generate LiDAR point clouds that&#x20;are accurate to within 0.1% drift factor with a precision of +/- 6mm one sigma.

Over the course of this whitepaper, we will define how we measure the accuracy of the Elios 3 and its Surveying&#x20;Payload, as well as present concrete examples of different environments the drone has been deployed in and the&#x20;results achieved. In its conclusion, you should have a comprehensive understanding of the level of accuracy possible&#x20;with the Elios 3 Surveying Package.

{% hint style="info" %}
Please note that the reported accuracy levels were obtained using the FARO Connect \[2025.01] software release. To achieve similar&#x20;results, users should ensure they are running FARO Connect \[2025.01] or a more recent version.
{% endhint %}

## 1.0 **Defining Accuracy and Precision**

In this paper, we will assess the accuracy of the Elios 3’s Surveying Package, including FARO Connect. Before we&#x20;begin the analysis, it is important to differentiate between accuracy and precision.

Accuracy refers to the geographical precision of a tool. This measures how closely the LiDAR measurements match&#x20;real-world values. For example, imagine that you are scanning a wall. If your LiDAR point cloud (a digital version&#x20;of the wall) produces measurements and distances that match the real-world wall, then the accuracy is high. We measure accuracy in terms of distance errors, (i.e. centimeters or inches). This accuracy measurement is crucial for&#x20;applications that require measurements as close to reality as possible.

<div align="center"><figure><img src="/files/bt8HTNSqdfHOyryPISSO" alt=""><figcaption><p>In the high-accuracy versions on the left, you can see that the points match the location of the wall.</p></figcaption></figure></div>

On the other hand, precision refers to the replicable nature of a measurement. How consistently can it make a measurement, and how true-to-reality is that measurement? A ruler can measure 30 cm very precisely every time because its measurement is clearly defined. When it comes to LiDAR for drones, precision is defined by the thickness of the point cloud. In the example of scanning a wall, the point cloud for a precise laser scan will be very thin - matching the wall. If there are lots of scattered points (called “noise”), then that point cloud is not very precise.

<figure><img src="/files/QSo5x3XYVaYdTkMYzad2" alt=""><figcaption><p>A precise point cloud, as shown on the left, has little “noise” - the points closely match the shape of the real-world object</p></figcaption></figure>

So, to understand the relationship between accuracy and precision, you can refer to these 4 diagrams of a square below. When there is high accuracy (the points match the location of the wall) but precision is low (there is noise in the point cloud), you have the top left version, that loosely matches the real structure of the square. Alternatively, when the accuracy and precision are both close to reality, you can see that there is little noise in the point cloud, and the points all closely follow the outline of the square.

***Accuracy vs Precision:***

<figure><img src="/files/wr9gcl7zwP8cP85LOTOe" alt="" width="563"><figcaption></figcaption></figure>

<figure><img src="https://knowledge.flyability.com/hs-fs/hubfs/2.5.png?width=688&#x26;height=697&#x26;name=2.5.png" alt="" width="563"><figcaption></figcaption></figure>

## 2.0 **The Accuracy and Precision of the New Surveying Payload**

The LiDAR payload carried by the Elios 3 is the Ouster OS0 128 Rev 7. This version was launched in 2023 and has&#x20;greater accuracy and precision than previous iterations. The LiDAR sensor is part of the overall Surveying Package,&#x20;which includes FARO Connect, a leading LiDAR processing program, and retroreflective targets for georeferencing.&#x20;FARO released an update to Connect in 2025 (Version 2025.01), which enhances convergence and accuracy - we&#x20;will explain this during the testing section of this paper.

As part of our accuracy assessment for this paper, we plotted points captured with the Elios 3 on a bell curve, looking&#x20;at the standard deviation. This is used to quantify the level of noise or uncertainty of a LiDAR measurement on a&#x20;planar surface. A higher standard deviation indicates greater variability in the point cloud, and thus lower precision.&#x20;We have found that the precision of the Rev 7 payload is accurate to +/- 6 mm at 1 sigma and +/- 12mm at 2 sigma.&#x20;This means that 66% of the points measured are accurate to within 6 mm. 95% of the points are accurate to within 12mm (2 sigma). This means that almost all of the points in a point cloud are, on average, as accurate as 6mm, and thus&#x20;the Rev 7 payload is precise to within 1 centimeter of reality.

<figure><img src="/files/2SiQd8jlUxyXfYPzMbhw" alt=""><figcaption><p>On th<em>e</em> left, there is a wall that we scanned to get the points used for the standard deviation calculation. As you can see in the bull curve, 66% of points with the Surveying payload fall +/- 6mm of reality.</p></figcaption></figure>

***Global Accuracy Testing and Results for the Surveying Payload***

The way we test accuracy and precision in a point cloud is by determining the level of drift. Drift is a key metric used to express the accuracy of a mapping system. The term is used in 3D modeling to describe the cumulative decrease in accuracy over the duration of a capture. Accuracy cannot easily be expressed in absolute values unless you have a clear system of reference. This is why surveyors use ground control points or GNSS to tether their point clouds to real-world coordinate systems or reference points. Without GNSS or ground control points (GCPs), the absolute error of a point cloud typically expands as the asset/area being surveyed increases in size.&#x20;

To explain this with numbers, you can expect the error on a 30-meter (98-foot) measurement to be smaller than the error on a 300-meter (984-foot) distance measurement because a mobile scanner moving through the space will accumulate errors on top of previous errors. This accumulation of errors over distance is what we call drift, and represents a percentage of the traveled distance during data collection - for example, a 1% drift on a 300-meter distance corresponds to a 3-meter error compared to reality.&#x20;

**Understanding factors that can affect global accuracy**

Global accuracy is impacted by the size and characteristics of the area being surveyed, as well as surveying method.

When it comes to surveying complex, confined spaces where the Elios 3 is at work, there can be additional challenges(and factors that increase the drift) if an environment has little variation, which is also known as being homogenous. This&#x20;is typical in assets like pipes, chimneys, and tunnels. They can be incredibly complex to survey due to the homogenous&#x20;nature of the space. This is because LiDAR relies on detecting and measuring features on surfaces, such as corners,&#x20;edges, or texture variations, to create 3D point clouds. When an environment is symmetrical, there are fewer feature&#x20;points, making it more difficult for the LiDAR to identify and track reference points for accurate measurements. This\
paper will assess the changes in overall accuracy in environments that are progressively more challenging.

It should also be noted that the method of data collection affects the quality of results. For example, flying the drone too&#x20;fast can limit successful data capture, while slowly and carefully avoiding collisions optimizes data collection. Further&#x20;details on this are available via [Flyability](https://www.flyability.com/training) and FARO’s training resources.

<figure><img src="/files/L9QRAIToKuyeT48WV6Dx" alt="When there are fewer geometric features, as in highly symmetrical environments, it is harder for the LiDAR to detect key features of reference that enable it to correctly interpret its surroundings, causing it to accumulate drift."><figcaption><p>When there are fewer geometric features, as in highly symmetrical environments, it is harder for the LiDAR to detect key features of reference that enable it to correctly interpret its surroundings, causing it to accumulate drift.</p></figcaption></figure>

Bearing all of these factors in mind, we tested the Elios 3’s Surveying Payload in several environments with varying degrees of symmetry to assess how it handles these scenarios.

3.0 Defining the Workflow for the Elios 3 and\
FARO Connect Accuracy Assessments
---------------------------------

In this section of the whitepaper, we assess how the Elios 3 and FARO Connect perform in environments of varying&#x20;complexity. Each test features an explanation of the environment and an overview of the process from data collection&#x20;to processing, along with the results. Where possible, we offer comparisons with the original LiDAR payload, the Rev&#x20;6.2, to express the difference in results between the Surveying Payload and the standard LiDAR sensor.

### **3.1 Accuracy in Structured Environments**

Structured environments are ones with little to no symmetry as well as feature points - such as buildings, stockpiles, and containment areas. They also have a diameter or distance between walls that is over 2 meters wide (6.5 feet).&#x20;

![](/files/3aN49cATI28GI7ae6792)

In our test, the Flyability team flew around the basement of a factory. We used data from a Terrestrial Laser Scanner&#x20;(Reigl VZ400) to scan the entire area to produce a highly accurate and precise ground truth model of the test&#x20;environment. From this scan, we identified a 15x15 meter section that we used as the take-off and landing area. We&#x20;would use this area to align multiple point clouds through a processing setting called Iterative Closest Point (ICP). We&#x20;conducted multiple flights with the Elios 3 standard configuration (Rev 6.2) and the Elios 3 Surveying payload (Rev&#x20;7\). Each Elios 3 flight was aligned to the ICP area, and the computer transformation was then applied to each Elios&#x20;point cloud so that each flight was registered to the 15x15 meter ICP location. The reference centroids from the TLS\
data were recorded and compared to the registered Elios 3 detected target centroids from each flight, with the new&#x20;transformations applied.

![](/files/9X6TrTa4UpMbI31EG5MW)

The results, as shown in this table, demonstrated significant improvements in the Surveying payload. The previous LiDAR payload (The Rev 6.2) had 0.5% drift. The new Rev 7 model is 4x more accurate, with 4x less drift. The drift reduced to just 0.16%, showing a high degree of accuracy across the entire space (global accuracy).

<figure><img src="/files/B4oMVWotMrBlTTJTfnKL" alt=""><figcaption><p>This vertical cross-section through the floor and ceiling of the basement shows the Rev 7 and FARO Connect results closely matching the TLS point cloud (in red) compared to the Rev 6.2 results, shown in green. </p></figcaption></figure>

### **3.2 Accuracy in Nominally Symmetrical Environments**&#x20;

The next tests took place in a nominally symmetrical environment. These environments have more than 1.5 - 2 meters&#x20;of width and height and have regular geometric features or clear bends at intervals of max 30-50 meters.

In this case, we assessed the Elios 3’s performance in 2 different locations. The first was a bridge and the second&#x20;was a 200 meter sewer tunnel.

<figure><img src="/files/7CUfmwlQ3IN753s2MohJ" alt=""><figcaption><p>The variety of geometric features in this bridge section meant that drift was reduced.</p></figcaption></figure>

**Nominally Symmetrical Test 1: Bridge**

The first test took place in a section of a bridge, where various features helped the LiDAR scan reduce drift. These&#x20;features included pipes, racks, and an electrical conduit, along with the overall structure being over 2 meters in&#x20;diameter. After collecting and processing the data, our team found that there is a 5-10-times improvement in drift for&#x20;the new Rev 7 payload compared to the original Rev 6.2 payload. This highlights just how critical geometric features&#x20;are in reducing overall drift for 3D digitalization.&#x20;

<figure><img src="/files/D61nXy45gcGmEVBjUDty" alt=""><figcaption><p>Ground truth data and Elios 3 data ICP'd at the take-off location and drift calculated at 4 defined intervals.</p></figcaption></figure>

Overall, the accuracy of the Rev 7 LiDAR payload in this nominally symmetrical environment was found to be excellent&#x20;with a drift factor limited to just 0.3-0.4% in various sections of the tunnel, resulting in an 80 %+ convergence success rate.

<figure><img src="/files/EJmX4sxtvLQZjM27fX9U" alt=""><figcaption><p>Here you can see cross sections at various points along the bridge with distance measurements included.</p></figcaption></figure>

**Nominally Symmetrical Test 2: Sewer Tunnel**

The second accuracy test took place in the sewer tunnel. In this case, 3 scans were conducted with the Rev 7 LiDAR&#x20;payload and processed with FARO Connect. The data sets were aligned in their respective projects with the ICP&#x20;method using points around the entrance that had been ground-truth captured with a TLS, along with survey targets&#x20;every 25 meters inside the tunnel.

![](/files/Ejlo2l86esythC5KFIgs)

This cross-section (above) from the beginning of the tunnel shows colored point clouds from the LiDAR Surveying&#x20;Payload (Rev 7), the Terrestrial Laser Scanner as a control dataset, and the Rev 6.2. This was the area used to align&#x20;the different point clouds with the ICP settings in FARO Connect.

![](/files/LXLyV88U6CJFjmL2NSHv)

This is the sewer cross-section (above) at the end of the flight. As you can see, the green Rev 6.2 has significantlymore drift, reaching 1.4%, compared to the Surveying Payload Rev 7 and FARO Connect, which only have 0.19% drift.

Overall, the average 0.39% difference from reality by the Rev 7 payload highlights the improved robustness of the&#x20;payload in symmetrical environments. Its global accuracy in this project was 5-8 times better than the standard LiDAR&#x20;payload.

The clear superiority of the Rev 7 in these environments thus makes it the preferred payload for surveying environments&#x20;with nominal symmetry, providing a high level of accuracy and precision.

### **3.3 Accuracy in challenging symmetrical environments**

Next, the Surveying Payload was tested in increasingly challenging environments. We defined a challenging&#x20;symmetrical environment as one with light geometric features or texture in prolonged straight areas (greater than&#x20;50 - 80 meters), as well as a diameter greater than 2 meters. Examples of environments with these features, either&#x20;horizontal or vertical, could include tunnels, stacks, and shafts.

<figure><img src="/files/q3pOkbzb7LRh8Bn15chL" alt=""><figcaption><p>This tunnel has few clear geometric features to help reduce drift in a LiDAR scan.</p></figcaption></figure>

In this testing environment, the Rev 7 payload was flown in a sewer with a greater than 2-meter diameter. The only&#x20;geometric features were walkways, a gully, and shotcrete with textured surfaces.

All flight data was compared to high-accuracy TLS ground truth data, which was ICP’d at the entrance to the sewer&#x20;section. 4 reflective targets were placed at defined intervals in the tunnel and georeferenced with a total station. The&#x20;drift between the target’s absolute positions and the computed positions from FARO Connect was analyzed.

<figure><img src="/files/SfayGmCZScM3NCHg7ojZ" alt=""><figcaption><p>4 targets were mounted in the sewer and Elios data ICP'd to ground truth.</p></figcaption></figure>

All 3 scans captured in this test were successfully converged and showed an average drift of 0.5 - 1% across various&#x20;sections of the tunnel.

<figure><img src="/files/s6wdEr9IwxihAP6OVqdB" alt=""><figcaption><p>Over 250m of tunnel, just 0.63% drift was found.</p></figcaption></figure>

**SLAM Strength 1 - Tunnel Environment: Table of Results**

<figure><img src="/files/WVDqXHy1aLWI3lj7N3LN" alt=""><figcaption></figcaption></figure>

This table showcases the drift percentages at each target, showing how we find an overall result of 0.63%. The lowest&#x20;row shows the average offset measurement from the targets in the ground truth to the processed SLAM data on the&#x20;drone.

In environments with very few geometric features that make drift more likely, the Rev 7 payload is still achieving improved&#x20;results compared to Rev 6.2, thanks to the improved LiDAR capabilities as well as processing with FARO Connect.

### **3.4 Accuracy in very challenging symmetrical environments**

For a final test, the Rev 7 Surveying Payload was used to scan another symmetrical environment. It was considered&#x20;to be very challenging because the diameter was less than 2 meters and less than 1.2m in height, along with having a&#x20;very smooth, symmetrical shape. The total lack of geometric features or textures in straight sections alongside rapidly&#x20;flowing water adds to the difficulty of this surveying environment.

<figure><img src="/files/GQICJvsnMYoCr9i2nau5" alt=""><figcaption><p>A diameter of less than 2 meters and a smooth, symmetrical structure makes this space more challenging for LiDAR scans.</p></figcaption></figure>

The freshwater tunnel changed in geometric size from a box section to a curved roof; however the width and height&#x20;remained the same. The flowing water was clean, but there were lots of surface ripples. The flight was conducted at&#x20;approximately 1m per second speed in assist mode to try and maintain a clear flight without the drone bumping into&#x20;the tunnel surfaces.

Survey targets were placed on the surface, and two targets were inside the manhole. All targets were georeferenced&#x20;with an RTK GNSS with high accuracy.

<figure><img src="/files/LPaft6QqYcW73zW7zhpD" alt=""><figcaption><p>The target positions on site are placed at different angles as georeferencing points.</p></figcaption></figure>

The flight was georeferenced using 5 targets adjacent to the first manhole (called Manhole A). 2 targets were placed&#x20;in the next upstream access point (called Manhole B), 102m away for reference analysis of the drift factor. The targets&#x20;at the first manhole A act as an ICP, and the drift factor was analyzed based on changes from Manhole A->B.

The Surveying Payload and FARO Connect were still capable of acceptably accurate results, with a drift of 2-5 %. The&#x20;exact analysis was 4.1% drift over 102m of tunnel.

<figure><img src="/files/kr8mzERyQ8slW9Iar3ih" alt=""><figcaption><p>Top down view of the water tunnel process with targets at the start and inside of the next manhole.</p></figcaption></figure>

<figure><img src="/files/UmFkSzFqJ7owH9n2jlP5" alt=""><figcaption><p>Here, the Rev 7 data processed in FARO is shown in blue, compared to the Rev 7 and Flyaware in brown. There is 4-5% or more drift when comparing the FARO optimized processing and Flyaware with no global optimization.</p></figcaption></figure>

With greater geometrical features in a similar environment and also less flowing water, it may be possible to reduce the&#x20;drift. However, considering the challenges of this location, the Surveying Payload’s Rev 7 handled the survey very well.

***

## Conclusion: Summary of Findings and Analysis

*This table summarizes the findings of these accuracy tests, with comparisons between the standard Elios 3 6.2 Rev data and the Elios 3 Surveying Payload with FARO Connect.*

<table><thead><tr><th width="151.79998779296875"></th><th width="269.199951171875">Environment</th><th width="154.2000732421875">Configuration 1</th><th>Configuration 2</th></tr></thead><tbody><tr><td></td><td></td><td>Elios 3 &#x26; FlyAware</td><td>Surveying Payload &#x26; FARO Connect</td></tr><tr><td><strong>Structured environments</strong></td><td><ul><li>Buildings, stockpiles, containment areas</li><li>Little to no symmetry</li><li>Geometric features</li><li>Diameter/distance between walls >2m meters (6.5 feet)</li></ul></td><td><p><strong>1x</strong></p><p>0.5-1% drift</p></td><td><p><strong>5-10x</strong></p><p>~0.1-0.2%</p></td></tr><tr><td><strong>Nominal symmetric environments</strong></td><td><ul><li>Tunnels, stacks, shafts</li><li>Diameter >2m (6.5 feet)</li><li>Regular geometric features</li></ul></td><td><p><strong>1x</strong></p><p>~2% drift</p></td><td><p><strong>5-10x</strong></p><p>~0.25-0.5%</p></td></tr><tr><td><strong>Challenging symmetrical environments</strong></td><td><ul><li>Tunnels, stacks, shafts</li><li>Diameter >2m (6.5 feet)</li><li>Light geometric features and/or texture and/or and clear bends after 30-50 meters of smooth sections</li></ul></td><td><p><strong>1x</strong></p><p>2-5% drift</p></td><td><p>4<strong>-5x</strong></p><p>0.5-1%</p><p>(80% success rate)</p></td></tr><tr><td><strong>Very challenging symmetrical environments</strong></td><td><ul><li>Tunnels, pipes, stacks, shafts</li><li>Diameter &#x3C;2m (6.5 feet)</li><li>Light geometric features and/or texture and/or bends after 20 to 30 meters of<br>smooth sections</li></ul></td><td><p><strong>1x</strong></p><p>5+% drift</p></td><td><p><strong>1-2x</strong></p><p>2-5%</p><p>(50-80% success rate)</p></td></tr></tbody></table>

The new Rev 7 Surveying payload has achieved stunning results even in complex surveying environments. In combination with FARO Connect, it is capable of achieving sub-centimeter accuracy over large survey areas.

These results will appeal to surveyors and inspectors working not only in wastewater management but also in mining, manufacturing industries such as cement, and industry-standardizing bodies.

With overall precision to within +/- 6mm and replicable accuracy results, the new Surveying Payload for the Elios 3 is the ideal solution for those looking to gather data in complex and potentially hazardous environments - be they confined spaces or larger structures - that need an extra level of accuracy.

&#x20;

Download or print the Accuracy Report:

{% file src="/files/JqIlbrEXgEa05NgLmGE9" %}


# UT Payload

<figure><img src="/files/tVGbOmZovb2pRGP7CGsn" alt="" width="563"><figcaption></figcaption></figure>

“UT” stands for Ultrasonic Testing, an NDT technique used to inspect materials, detect flaws, or measure thickness using ultrasound without damaging the object being tested. The UT Payload is a module designed as a collaboration between Cygnus Instruments and Flyability. It is mounted on the Elios 3 drone and is used to perform ultrasonic testing. UT is not a simple technique and requires the correct training and understanding of the technology and its outputs.

Below you can find all the necessary material on how to use and correctly maintain the UT Payload by Flyability and how to manage and interpret the data collected by the Elios 3 UT drone.

{% content-ref url="/pages/U9Bn7qPoj2hkbco3kzeS" %}
[UT Payload Quick Start Guide](/aircraft/elios-3/elios-3-payload/ut-payload/ut-payload-quick-start-guide)
{% endcontent-ref %}

{% tabs %}
{% tab title="Documentation" %}
{% file src="/files/PU0CooUhyH58aPR6rB1Y" %}

{% file src="/files/ZsrPFjgm75GnvoWCCeM9" %}

{% file src="/files/IjblYX1KyLPTb3tS2UHr" %}

{% file src="/files/1rffSM7oPJPIl1uQL4Nd" %}

{% file src="/files/U91ZUMDAIII69VHCe4aF" %}

{% file src="/files/Zqhlu4aQXyd8IOmSjp9l" %}
{% endtab %}
{% endtabs %}


# UT Payload Quick Start Guide

Discover everything you need to know to get started with your Elios 3 UT Payload

## Before Starting&#x20;

### **Unboxing the Payload**

When you have received your new UT Payload, make sure that the package is not damaged externally. If any substantial damage can be seen on the package, contact our [customer support team](https://www.flyability.com/support-request) before opening it.

Although it is protected, please do not use something sharp that could damage the Payload while opening the package.&#x20;

### **Disclaimers**

Carefully read the Elios 3 UT Payload User Manual and Quick Start Guide before managing the equipment and performing a flight. We also highly suggest that you take the available training provided to you by Flyability. See more [here](/software/inspector/inspector-5/software-quick-start-guide/inspector-5-quick-start-guide) on how to update Inspector and [here](/aircraft/elios-3/elios-3-cockpit-app/cockpit-3-how-to-update) on how to update Cockpit. To update your drone simply connect it to your PC while connected to the internet and you will receive a pop-up prompting you to update your drone.

Pay attention. The Elios 3 UT Payload is a class 2 laser product. For more information please visit: <https://www.lasersafetyfacts.com/labels2.html>

***

### **Software requirements**

To operate the UT Payload you will need at least the ***2024.07*** update for the Elios 3 onboard software, Cockpit and Inspector, or any later update. To learn how to upgrade to the latest version click on this [link](/aircraft/elios-3/elios-3-system-update).

***Do not operate the Payload with any earlier version of the software!*** Only use the 2024.07 version or higher. This could otherwise corrupt your opened UT data.

Inspector is the software provided by Flyability to read and analyze the data collected by the Elios 3 UT drone. To smoothly download and work on Inspector 5 with the data captured from the UT Payload we suggest that you have a Desktop PC that matches the following requirements (or above):

| **Minimum**                          | **Recommended**               |
| ------------------------------------ | ----------------------------- |
| Windows 11 64-bit                    | Windows 11 64-bit             |
| Intel Core i5-1135 or AMD equivalent | i7-8750H @2.20GHz (6 cores)   |
| 16 GB RAM                            | 16+ GB RAM                    |
| Iris Xe Graphics (Minimum tested)    | Nvidia GTX 1050 or AMD RX 560 |
| 30 GB Storage                        | 250+ GB Storage               |

***

## Setting up your Elios 3 UT drone

### **Mounting the UT Payload**

The UT Payload is compatible ONLY with the Elios 3. Elios 1 and Elios 2 drones cannot be equipped with this Payload. You will need a Phillips screwdriver (not provided in the Elios 3 or UT box) and the Torque screwdriver supplied in the Elios 3 box (for motor replacements) to mount the UT Payload.

Watch this video to learn how you can mount your UT Payload on the Elios 3 drone:

{% embed url="<https://www.youtube.com/watch?v=nsrBo3-G-DM>" %}

{% hint style="warning" %}
**IMPORTANT!** Please check that the cables and tubes are correctly mounted ***outside the cage*** to avoid them falling into the propellers and make sure there is no dust before inserting the cable into the drone AUX port.
{% endhint %}

<figure><img src="/files/rPhiPuhTZRYqea2XV4xv" alt=""><figcaption></figcaption></figure>

### **Adding ultrasonic couplant**

Flyability provides you with a 25cl (8oz) bottle of couplant to get you started with UT inspections. The couplant is food-safe; you can find the datasheet [here](https://www.echoultrasonics.com/wp-content/uploads/2025/12/EchoPure-12-09-25.pdf). We do not guarantee the integrity of the equipment if you use other types of couplant. The couplant operating temperature is between -51°C (-60°F) and 176°C (350°F). Adding water to the couplant may change the usable temperature range and it could freeze under 5°C/41°F conditions and damage the Payload.

To learn how to add couplant, watch this video:

{% embed url="<https://www.youtube.com/watch?v=-OEgD1EDv0s>" %}

To dispense couplant press and hold for a few seconds the AUX button on the remote controller. As long as you keep pressing the couplant keeps flowing. Most of the time you need less than a second to dispense enough couplant.&#x20;

For safety concerns regarding the couplant provided to you by Flyability please refer to this [safety sheet](https://www.echoultrasonics.com/wp-content/uploads/2025/02/EchoPure-SDS-1.04.22.pdf).

{% hint style="info" %}
PLEASE NOTE: Repeated usage (normally >100 refills) or following a long storage period may block the smart syringe plunger. We recommend checking if the syringe functions correctly before each flight and changing it with a new one if necessary.
{% endhint %}

***

## Available training

### **Suggested training**

We highly suggest that you follow some UT measurement training. When purchasing the UT Payload, basic online training is included to take you through the different components of the UT Payload and some basic knowledge on how to use it. You can receive the free training by contacting your sales representative or by contacting us at <sales@flyability.com>.

<figure><img src="/files/SILCI5J9oIHE8sjOVBT0" alt=""><figcaption></figcaption></figure>

It is also possible to purchase an Advanced OEM training option that will be provided in person by the Flyability training team or one of its resellers. If you are interested in purchasing the Oem UT training please contact us at: <sales@flyability.com>.

{% hint style="info" %}
PLEASE NOTE: Additional factors that directly affect the use and accuracy of ultrasonic equipment are beyond the scope of the UT Payload basic online training, Flyability OEM UT training, Quick Start Guide, and User Manual, which instruct in the setup and operation of the UT Payload within the Elios 3 drone system. The operator of the UT Payload mounted on the Elios 3 must be a well-trained UT inspector qualified by either their organization or another outside agency to the appropriate level of both theory and practical application of ultrasonics. Any issues concerning the UT data capture or analysis cannot be attributed to Cygnus Instruments or Flyability.
{% endhint %}

### **Required training**

Cygnus Instruments has provided the UT technology within the UT Payload and recommends that users and operators of the UT Payload should have at least the following level of formal qualification:&#x20;

* a minimum of UT “Level 1” (ASNT or PCN), under the supervision of Level 2 or Level 3 personnel
* when using Manual Gates to take measurements, the operator should hold a UT “Level 2” qualification

(References: ISO 16809 Clause 5.6; ISO 9712 Clause 6.1, 6.2.)

***

## Getting ready for your first flight

### **Preparation**

Now that the UT Payload has been mounted, all the systems have been updated, you have read the user manual, you have taken the necessary training, and you have familiarized yourself with the new Cockpit interface you are ready for a test flight.

{% hint style="success" %}
Make sure that you are in a safe environment for flying the drone, that no one is close to the take-off point, and that you have the correct protective gear. Also, be aware that an Elios 3 equipped with a UT Payload is more likely to get stuck or crash. To understand the risks associated with performing contact inspections with the UT Payload, it is suggested that you train in an easy open space environment where you can retrieve the drone if necessary.
{% endhint %}

### **Checklist before flying**

Before you perform a UT flight, make sure you have done the following things:

1. Check that you have the correct probe and hood mounted on the drone
2. Make sure that the gauge is well-secured to the drone

   <figure><img src="/files/nw3sUQHS24AW7FmEFUpR" alt=""><figcaption></figcaption></figure>
3. Perform a probe gain compensation (watch [this video](https://youtu.be/vtv3o4L1pvo) to see how)
4. Perform probe zero (watch [this video](https://youtu.be/3bKnlG1bFiM) to see how)
5. Perform a calibration (watch [this video](https://youtu.be/fuhrGUPzrhA) to see how)
6. Take your first measurement not in flight by simply placing the probe in contact with a metallic surface. Make sure the A-scan appears clear on the screen
7. Adjust the arm in the correct position (watch [this video](https://youtu.be/ykwwGS8BDTM) to see how)

### **First test flight**

You are now ready for your first Elios 3 UT flight. Turn on the drone and the remote control, wait for the UT Payload to be detected, and take off.

To perform a UT measurement while in flight, get close to the surface you want to inspect until the UT Payload magnetically locks onto the surface. Then dispense the couplant by pressing the AUX button. A measurement should appear on the screen.

If you are happy with the measurement, detach and move on to the next spot that needs inspecting. To make it easier to identify the measured spots in post-processing we suggest taking points of interest (POIs) every time you take a measurement.

***

## Correct use

Correct use of the UT Payload requires an appropriately trained and qualified UT inspector (see [Required Training](#required-training)), identification of the correct equipment (UT Probe, Couplant, and test block) for the specific material, surface conditions and thickness range to be measured, and correct Calibration.

{% hint style="info" %}
PLEASE NOTE: The UT Payload offers features that enable an expert operator to manually adjust the A-scan signal displayed, creating options for different measurements. This means that inaccurate measurement data can easily arise if the operator does not understand the manual adjustments or settings or is unqualified or inexperienced in interpreting the displayed information. Incorrect use of the UT Payload, incorrect Calibration, and/or incorrect data interpretation can result in inaccurate measurements and/or readings and possible serious financial loss, damage to components, and facilities, personal injury, and even death.
{% endhint %}

**Neither Flyability, Cygnus Instruments Limited (Cygnus) nor any of its employees, suppliers, or representatives can be held responsible for improper use of the UT Payload, use of third-party probes, and/or inaccurate analysis and interpretation of data.** The following are all of critical importance when using the UT Payload for accurate ultrasonic thickness gauging:

* [Required Training](#required-training)
* A complete understanding of ultrasonic wave propagation
* Thorough reading and application of the User Manual and Quick Start Guide
* Proper UT Probe selection
* Good condition and correct zeroing of the UT Probe
* Proper cable length and Couplant selection
* Correct use of the appropriate test blocks for Calibration
* The process of complete and accurate Calibration of the UT Payload
* Correct sound velocity for the material being measured
* Assessment of environmental factors, which may affect the quality of contact between the UT Probe and the surface being tested, such as surface condition, sufficient Couplant, UT Probe stability, and surface contact time
* Proper storage and regular checks of all equipment
* Implementing all fixes and updates or upgrades prior to EACH use

The implementation of these factors is entirely outside the control of Cygnus Instruments and Flyability. It is the sole responsibility of the User to ensure that each and every one of these requirements is met to ensure proper use of the UT Payload.

**In the absence of any negligence or other breach of duty by Cygnus, the use of the UT Payload is entirely at your own risk. Any claim relating to any part of the Elios 3 drone system should be referred to Flyability or Flyability Resellers in the first instance.**

***

## **Resource**

### Testing Elios 3’s spot thickness measurements' accuracy vs. manual devices

Please find and download this white paper here:

{% file src="/files/A862DGNmYh2LTkBmCDOB" %}


# UT Probe Selection Guide

This guide explains how to select the appropriate UT probe for your Elios 3 based on inspection requirements, material type, thickness range, and application constraints.

{% file src="/files/rK1pgtXkx7wSPbWqonxb" %}


# Flammable Gas sensor

<figure><img src="/files/Ucfg4EYB4DKYUn9aC2gf" alt=""><figcaption></figcaption></figure>

The Flammable Gas Sensor Payload by Flyability is a type of sensor built to add an additional layer of safety to Elios 3 drone operations. It is used to detect and measure the concentration of combustible gases in the air, which may ignite or explode if exposed to an ignition source.

This Payload should not replace standard gas detection procedures and is not built as a tool to search for gas concentrations. If any level of gas is detected you should immediately exit the area with the drone and shut off the drone.

{% content-ref url="/pages/RYnQnlYhgQamZkOc9zwo" %}
[Flammable Gas Sensor Quick Start Guide](/aircraft/elios-3/elios-3-payload/flammable-gas-sensor/flammable-gas-sensor-quick-start-guide)
{% endcontent-ref %}

{% tabs %}
{% tab title="Documentation" %}
{% file src="/files/KKY6Rrf0EraJHyv5UYGQ" %}

{% file src="/files/M09HEgPGhq3ucATq6bQo" %}

{% file src="/files/4kJaJk39Hu3nlpSPQHDW" %}

{% file src="/files/tT5ZKldrXxvDrMtnWxJS" %}
{% endtab %}
{% endtabs %}


# Flammable Gas Sensor Quick Start Guide

Discover everything you need to know to get started with your Elios 3 Flammable Gas Sensor

## Before Starting&#x20;

### **Unboxing the Payload**

When you have received your new Flammable Gas Sensor, make sure that the package is not damaged externally. If any substantial damage can be seen, contact our customer support team (<support@flyability.com>) before opening it.

Although it is protected, please do not use something sharp that could damage the Payload while opening the package.&#x20;

**Disclaimers**

Carefully read the Elios 3 Flammable Gas Sensor User Manual and Quick Start Guide before managing the equipment and performing a flight.

{% hint style="warning" %}

### Important Safety Notice on the Use of the Flammable Gas Sensor

#### **1. Elios 3 is Not Intrinsically Safe**

This drone is **not safe for use in environments with known flammable gas**. Do not operate in areas with potential gas presence.

#### **2. Airflow Impact on Measurement**

The drone's airflow **can alter gas concentration**, affecting sensor accuracy. Readings should be considered approximate.

#### **3. Sensor as a Safety Aid**

The gas sensor is a **safety aid**, not a precise gas leak detection or quantification tool.

#### **4. Follow Safety Protocols**

The sensor does **not replace standard safety procedures**. Always follow proper protocols for flying in potentially hazardous environments.

\
By mounting and using the Flammable Gas Sensor by Flyability, you accept these limitations and full responsibility for the drone's operation and any resulting consequences. Flyability is not liable for any damage, injury, or loss incurred during use.
{% endhint %}

### **Software requirements**

To use your new Payload you must update Cockpit and your Elios 3 to the latest version (2024.10 or later). See more [here](/aircraft/elios-3/elios-3-cockpit-app/cockpit-3-how-to-update) on how to update Cockpit. To update your drone simply connect it to your PC while connected to the internet and you will receive a pop-up prompting you to update your drone.

***

## Setting up your Flammable Gas Sensor

### **Mounting the Flammable Gas Sensor**

The Flammable Gas Sensor is ONLY compatible with the Elios 3. The Elios 1 and Elios 2 drones cannot be equipped with this Payload.

To mount the Payload you will need a T8 screwdriver, a T6 screwdriver, the included mount, the Gas Sensor, the included M 2.5x10 screw, and the included M2 screws (3). Watch this video to learn more about how you can mount your new Flammable Gas Sensor on the Elios 3 drone:

{% embed url="<https://www.youtube.com/watch?v=iGxhMHAeEr8>" %}

***

&#x20;

## Getting ready for your first flight

### **Preparation**

Now that the Flammable Gas Sensor has been mounted, all the systems have been updated, you have performed a bump test, and you have read the user manual, it is time for you to familiarize yourself with the new Cockpit settings.

### **Initializing the flammable gas sensor**

The first thing you need to do is ***initialize the gas sensor***. To do so, click on the green button that is on the gas sensor gauge on Cockpit as shown in the photo below:

![Initialize gas sensor](/files/4HU6CmXU8p2ZsR5RGrui)

This process may take up to 90 seconds. Once complete the status will switch to ***OK***.

### **Setting the threshold limits**

The second thing you will need to do is set the ***threshold limits***. These thresholds (2) refer to the set levels at which the sensor triggers an alert on the Cockpit and Remote Controller based on the concentration of a detected gas. If these thresholds are met Cockpit will flash red, emit a warning sound, and the Remote Controller will start vibrating. You can set two thresholds, for warning and critical levels. To do so, open Settings on Cockpit and select the GAS tab.

![Setting the thresholds](/files/aZT3NJJI0lkK9GrkNpgr)

Please make sure the tablet is in ring mode to hear the alarms.

&#x20;

### **Performing a bump test**

A **bump test** is performed on a gas sensor to ensure that it is functioning properly and can accurately detect and respond to the presence of specific gases. It involves briefly exposing the sensor to a known concentration of test gas to confirm that it responds within the expected range. This test is a critical part of regular sensor maintenance and safety protocols and should be done before every inspection.

To perform a bump test you will need a Calibrated Bottle of the correct gases, the Elios 3 with the Flammable Gas Sensor plugged in, the provided bump test tool, and the Remote Controller of the drone. Watch this video to learn how you can perform a bump test on the Elios 3 Flammable Gas Sensor:

PLEASE NOTE! Make sure the Calibrated Bottle contains the gas most relevant for your application and that the LEL level of the calibrated gas is over the threshold you want to set. Readings may take up to 12 seconds to be displayed and 30 seconds to show the correct levels of LEL. Confirm that the alarms are triggered once the LEL levels go over the threshold.

&#x20;

Your Flammable Gas Sensor for Elios 3 is now ready.


# Radiation sensor

<figure><img src="/files/IuIsJxBmimDAizpOsOHR" alt=""><figcaption></figcaption></figure>

The Elios 3 RAD Payload is an advanced radiation detection system designed to integrate seamlessly with the Elios 3 drone. It provides real-time radiation mapping and measurement capabilities, enabling safe and efficient inspections in hazardous environments. This payload is ideal for applications in nuclear facilities, emergency response, and industrial inspections, combining precision, reliability, and ease of use to enhance operational safety and decision-making.

{% embed url="<https://www.youtube.com/watch?v=HCT868LedFs>" %}

{% tabs %}
{% tab title="Documentation" %}
{% file src="/files/3kVJMaEDA4irZPDxFl05" %}

{% file src="/files/YoikQVCI6xh3vMQ61vYp" %}
{% endtab %}
{% endtabs %}


# Elios 3 Maintenance

### General maintenance

Elios 3 requires basic user maintenance as per the following table

<table><thead><tr><th width="137">Element</th><th width="322">When</th><th>Additional information</th></tr></thead><tbody><tr><td>Cleaning</td><td>Every mission or every flight</td><td>Depending on the environment where the drone is flying more or less frequent cleaning is needed</td></tr><tr><td>Motors</td><td>Every 50 hours of flight</td><td></td></tr><tr><td>Propellers</td><td>Every 10 hours of flight</td><td>Replace propellers more often in harsh environments. Replace them immediately if they show wear, such as surface scratches or dented edges.</td></tr><tr><td>Batteries</td><td>Standard battery : Every 50 cycles or 12 months<br>High Capacity battery : Every 100 cycles or 12 months</td><td>More information can be found in the <a href="/pages/ONHXE5d4OQBYNF2DzKAR#standard-battery-and-high-capacity-battery">Battery Safety Guidelines</a></td></tr></tbody></table>

{% hint style="info" %}
If any damage is noticed on a component, it shall be changed, even if it doesn't reach its lifetime limit (e.g. damaged propeller tip).

If any doubt, please [contact the support](https://www.flyability.com/support-request?hsCtaTracking=6aa8ef40-efa3-4798-9e33-9deb6957fb87%7Cf561b818-9d5e-4be7-a69e-4460b78a9539)
{% endhint %}

***

### Cleaning the aircraft

<figure><img src="/files/t5Sx0rh1sHDI4FnhW35u" alt="" width="563"><figcaption></figcaption></figure>

Most of the drone and the cage can be cleaned with compressed air and Isopropanol alcohol with a soft plastic brush.

***

### Cage element replacement

{% embed url="<https://www.youtube.com/watch?v=3XuOwpIFJmk>" %}

{% hint style="info" %}
**Necessary:**

* Zip tie 2.5x100mm
* Mechanic plier and Cutting plier
* Cage elements
  {% endhint %}

***

### Propellers replacement

{% embed url="<https://www.youtube.com/watch?v=j82oCUc2lLA>" %}

{% hint style="info" %}
**Necessary:**

* Propellers
* 1.4 Nm Driver with 8mm socket
* Gloves (propellers can be sharp!)
  {% endhint %}

***

### Motors replacement

{% embed url="<https://www.youtube.com/watch?v=cGfRYSCtTLQ>" %}

{% hint style="info" %}
**Necessary:**

* Motor
* T8 Bit with 0.4 Nm driver
* Motor centering jig
  {% endhint %}

***

### LIDAR Playload replacement

{% embed url="<https://www.youtube.com/watch?v=bkkg-y9pOxo>" %}

{% hint style="info" %}
**Necessary:**

* T8 Bit with 0.4 Nm driver
* LIDAR cap
  {% endhint %}

***

### LED Panel replacement

{% embed url="<https://www.youtube.com/watch?v=eKTwEgeaaI4>" %}

{% hint style="info" %}
**Necessary:**

* LED panel
* T8 screwdriver
  {% endhint %}


# Elios 3 Feature details


# Elios 3 LED patterns

**⋅ ⋅ ⋅ ⋅ ⋅ ⋅ ⋅  Blinks green (Imminent takeoff)**

Drone is in arming delay state

&#x20;

**⋅ ⋅ ⋅ ⋅ ⋅ ⋅ ⋅  Blinks cyan (Firmware upgrade)**

Esc upgrading / Payload updating / obc update flags (herelink / lidar / vio)

&#x20;

**˗˗˗˗˗˗˗˗˗˗˗˗   Solid pink (USB Masstorage)**

USB powered enabled and USB Host is detected

&#x20;

**⋅ ⋅ ⋅ ⋅ ⋅ ⋅ ⋅  Blinks light blue (binding mode)**

Activated after holding button for 5-10s  then will stay in this mode for 10s

&#x20;

**⋅ ⋅ ⋅ ⋅ ⋅ ⋅ ⋅   Blinks yellow (Battery lever open)**

Battery lever not detected

&#x20;

**⋅ ⋅ ⋅ ⋅ ⋅ ⋅ ⋅   Blinks red (Battery critically low or error )**

If battery SoC < 10% or Battery Communication error

&#x20;

**--  --  -- --   Blinks light orange (Battery low)**

If battery state SoC < 20%

&#x20;

**⋅ ⋅ ⋅ ⋅ ⋅ ⋅ ⋅   Blinks light orange (Onboard transmission system overheating)**

CPU temperature above 90°C and not receiving remote controller commands

&#x20;

**--  --  -- --   Blinks lite blue (Transmission system not connecting)**

Aircraft does not receive remote controller signal or the latency is too big

&#x20;

**--  --  -- --   Blinks lite yellow (Arming sequence blocked)**

Arming sequence blocked, warning message should be displayed

&#x20;

**˗˗˗˗˗˗˗˗˗˗˗˗   Solid green (Drone OK)**

Drone Ok (default state - none of the above)


# Elios 3 Return To Signal - User Guide

### Introduction

With Return To Signal (RTS), one should not fear losing the drone after live video feed loss due to a weak radio signal. The Elios 3 automatically monitors the live video connection and as soon as the video is lost due to weak radio signal conditions, the drone will automatically fly back along the same trajectory it came until the video is re-established.

***

### Usage

In the top left corner of the Cockpit application, an RTS icon is shown. The icon will be green when RTS is available and red when RTS is unavailable. See limitations.

<div><img src="https://lh7-eu.googleusercontent.com/MqI67kZoUP-ZpZXtgZY7Uc8KK3IWCK9c82jU35NpjZMHeFqjbwipZ9k4acubGn447DARF-4Gdx88VSYSZLSuQ0OaxG3t2KVuTJt88C6VF8Wzzay-gV72OmrJ37-bXk5liUtpcpBLozEh_XJfGBgEkdU" alt="" height="29" width="94"> <img src="https://lh7-eu.googleusercontent.com/XLIhpWoRLc5MIQY46sIHCYDwIgF3-jd1urkQOrOsZ8JcFHjgVqv5UD_JNUrZc5i7YvWjfcY8RnzMH_6fwiPH5GwuDjonq_YOCN7Q1Ii5kawMz5NKDoirq6bt4Ju3ecfWQN9xHMIpLoOqNT9TxBOO6Oc" alt="" height="29" width="74"></div>

When a video feed loss is detected, RTS will start automatically. A button with a 5-second countdown will show in the top left corner of the Cockpit screen.&#x20;

The user can deactivate RTS by tapping on the button or pressing the ATTI-SPORT remote controller button.

![](/files/5Jv5l1FiTdf4HtS47Jap)

Once RTS is active, the flight mode will change to AUTO and a message will inform the pilot¨.

![](/files/gaV3c8oJx1tc9p00g2pC)

From there on, the drone will fly back its past trajectory until the video feed gets back and then automatically stop. See limitations.

The pilot can pause RTS by pressing once the ATTI-SPORT remote controller button. Pressing once again the button resumes RTS.

***

### Limitations

RTS functionality is based on the recorded trajectory of the drone. Bad trajectory data will block RTS functionality.

Reasons for bad trajectory data:

* Collisions
* Hooked, blocked in the environment
* Drone drift due to strong wind
* High speed flights
* Complex environments: high presence of dust, highly symmetrical

Other limitations

* Battery SoC needs to be above 10%. If the battery SoC falls below 10% while RTS is active, RTS will stop
* Not enough data, RTS needs at least 5 meters distance of good data
* Maximum return distance is 300 meters

RTS functionally is based on the video stream. Some loss of signal analog to a video stream loss will not activate RTS

* Cockpit application crash or closed
* Tablet to RC cable is disconnected
* 4K RGB camera is defective
* The transmission system is defective

### Q\&A

Q : My drone does not fly back until getting a signal again.

A : If the trajectory data is not good enough until getting back the signal again, RTS will stop. In this case a warning will inform the pilot.&#x20;

<img src="/files/Fp6JYUDtjVidi6ZgPUt7" alt="" width="452">

Q : My drone gets stuck while flying back.

A : As the drone follows the forward trajectory, backwards. It can happen that it collides or gets blocked in the environment. If this happens RTS will stop and the following warning will inform the pilot.

<img src="/files/WUuW8XaMHY1ccx0bqp3Y" alt="" width="375">


# Elios 3 How to connect the tablet on a computer

When extracting data from a tablet you will need first to allow the file transfers to access the internal memory.&#x20;

1. Connect the tablet to the computer with the UBS Cable
2. Swipe down the notification bar and double-tap on the Android System entry:&#x20;

   <figure><img src="/files/5nOCFBHuwGFJ3gpficT9" alt=""><figcaption></figcaption></figure>
3. Set the USB mode to "Transferring files / Android Auto"&#x20;

   <figure><img src="/files/KufFaCrYycKjd8lOttb3" alt=""><figcaption></figcaption></figure>
4. When connecting back the tablet to the remote controller, set back ''USB tethering mode''<br>


# Elios 3 Return To Home & Resume Inspection - User Guide

## Introduction

Smart Return-To-Home (Smart RTH) can autonomously return the Elios 3 back to the take-off location, using its knowledge of the 3D environment to find the shortest way home, even in complex geometries. After returning, it is possible to resume the inspection, returning the Elios 3 to where Smart RTH was previously initiated to continue an inspection.

### Prerequisites

The following is needed for access to Smart RTH & Resume Inspection.

| Item                          | Description                                                            |
| ----------------------------- | ---------------------------------------------------------------------- |
| Premium Software subscription | Smart RTH & Resume Inspection are available through paid subscription. |
| Updated Firmware version      | Cockpit and Elios 3 firmware versions to 2025.02 or newer.             |
| LiDAR payload                 | The Elios 3 needs to have a LiDAR payload equipped.                    |

### Important Considerations

The Smart Return-to-Home & Resume Inspection autonomous features are not intended for dynamic environments and care needs to be taken when using to avoid incidence.&#x20;

When using Smart RTH & Resume  Inspection:

* Always maintain visual contact and keep hands on the remote control.
* Smart RTH & Resume Inspection may not work in all environments or conditions.
* Thin obstacles may not be detected and could cause collisions.
* LiDAR blindspot - Smart RTH & Resume Inspection is unable to see the bottom front of the Elios 3 when traveling forward.
  * This limits the Elios 3’s ability to detect dynamic obstacles that are present when returning.

{% hint style="warning" %}
By tapping the Inspect button, you confirm you have read and accepted Flyability’s End User License Agreement (EULA), [Privacy Notice](https://www.flyability.com/privacy-policy), and Automation Disclaimer. All these documents are available directly from the Cockpit app.
{% endhint %}

<figure><img src="/files/JFg0Idgbxw8IlYVMuiZX" alt=""><figcaption></figcaption></figure>

***

## Smart Return-To-Home (RTH)

The Smart RTH feature can only be activated by the pilot. Once triggered, the Elios 3 will return to 1 meter (3.2 feet) above the take-off location or the closest safe position. It is important to monitor the return in case pilot intervention is needed.

### Interface

Smart RTH has additional elements available in Cockpit enabling its function. Refer to the screenshot and numbered descriptions:

<figure><img src="https://lh7-qw.googleusercontent.com/docsz/AD_4nXcOaq0O-WYZluNti2vDWxz1o5MUcFe3naYj6ZSEpHadqWFhnPy56mQINihSXV-Zr9JJGIDv_as3VxAv9DW9yw0ElsJVRyGgfx_02CgFSAsFbCkv8fgV5JfnFqW8ezZ0WY0nPxPzxu781pFPJqLILA?key=_YGlOiclyfkh4f2qZgYYs5O2" alt=""><figcaption></figcaption></figure>

### (1) Flight management gauge

The flight management gauge displayed in Cockpit provides a visual representation of the drone's remaining flight time. Each color represents each stage of the remaining flight time.

<table><thead><tr><th width="112.4000244140625">Status</th><th>Description</th></tr></thead><tbody><tr><td>Time (01:18)</td><td>Shows the estimated remaining flight time.  Calculated using the remaining energy of the battery and expected power consumption of the platform. Monitor available remaining flight time.</td></tr><tr><td>Green</td><td>Shows the estimated remaining time available for inspection before reaching the return threshold. Monitor time remaining before returning home</td></tr><tr><td>Yellow</td><td>The suggestion to return to home based on the selected safety buffer. (e.g. “Just in time: 20s” or “Play it safe: 1 min”). Suggested to select Smart RTH as needed.</td></tr><tr><td>H </td><td>The yellow  H  marker indicates the last possible moment to manually trigger the RTH before the drone no longer has enough battery to return safely. Suggested to activate the Smart Return-To-Home button if needed.</td></tr><tr><td>Red</td><td>The estimated time is not enough for the drone to return home. The system estimates there is not enough battery for the Elios 3 to return to the take-off point.</td></tr></tbody></table>

### (2) RTH Button

Tap the Return to Home button for the feature to engage. This can be initiated once the button is green or orange. Cockpit will also suggest its selection based on the safety buffer selected.

| Button                                                                                                                                                                                                                                                                                    | Status                                                                                       | Action                                                                                                                                         |
| ----------------------------------------------------------------------------------------------------------------------------------------------------------------------------------------------------------------------------------------------------------------------------------------- | -------------------------------------------------------------------------------------------- | ---------------------------------------------------------------------------------------------------------------------------------------------- |
| <p></p><p><img src="https://lh7-qw.googleusercontent.com/docsz/AD_4nXchcreVCZnnvoeFo7W0aw3sP7dBoGI74Zi3pWq5CSlyBqAjNmnEDi7Q9pj2T7r1j6qcACQ5TUgcXGyWhf7jaE0eiZaW5Rp5XfpOaGpt799PdcLUeYeYvyAbKmzUGfi5vyHdb0U61FszUq20jNUUU8Y?key=_YGlOiclyfkh4f2qZgYYs5O2" alt="" data-size="original"></p> | RTH is not available.                                                                        | Visible while the Elios 3 is within 1.5m of the take-off point, after RTH successfully completes, and without a premium software subscription. |
| ![](https://lh7-qw.googleusercontent.com/docsz/AD_4nXeY7HDqdbKrcfReXFEgb9uImAPljWaEAIOZbDdcKWrzhBdBane_WleSrOA4gZpwtWphpw7fs5gFbCaVbwmmo0fj_XiwIZFHkUEh9B-bojMx_tOGk1YdwaF9uE_zSxI6Su56oz5RzBcy8lxih9W4AV4?key=_YGlOiclyfkh4f2qZgYYs5O2)                                                  | RTH function is available                                                                    | Tap to initiate the RTH function. The pilot must monitor the RTH.                                                                              |
| ![](https://lh7-qw.googleusercontent.com/docsz/AD_4nXeMGgucERzAYICkGZ1e4UIM0hdFgUDUpVaW2dTJjxrKZsQWOXqiRNqGC2Nc6Q0XzAbRSTP4cK0mAdzQDtIec0a4kTmpQLISZjA2SrKrpmEn8MKuPDSQ7c9iuE0b3vmLmoXvVRUx19c1t81b-8zuoX4?key=_YGlOiclyfkh4f2qZgYYs5O2)                                                  | RTH function is available, but the quality of the map has degraded. Use with caution.        | Tap to initiate RTH function. The pilot must monitor the RTH.                                                                                  |
| ![](https://lh7-qw.googleusercontent.com/docsz/AD_4nXfRYiyvGyTtTxjkVZ5V4D9wadCU-f8Tgj5t8-VE62KAOkwE60oGV0HsrKabNR43mdIf-DbsikSDIgNQW2dr2Srj5Mkk_bkYnj5F_hqNz-0g3OXI3_Oe7ai5PSKTbA5jo1BdLZ1be56orsoLl1999kQ?key=_YGlOiclyfkh4f2qZgYYs5O2)                                                  | RTH function is not available.                                                               |                                                                                                                                                |
| <img src="https://lh7-qw.googleusercontent.com/docsz/AD_4nXcElI0k5FVRDl720IfFaBxxo9j7k0JAAMq-ipS0rwUae-AqUoEmU0MTGZ3MDh05nJjuXnJ-dhSJOR0cJu0aUxX4c1gWNPFmPVSGr70ZJkky-2vDVs_bSuQialAgaeH7as4qIibpIPqnt_JHg1-c8Js?key=_YGlOiclyfkh4f2qZgYYs5O2" alt="" data-size="original">               | RTH function suggested based on the safety time buffer selected.                             | Tap to initiate the Smart RTH function, and monitor return.                                                                                    |
| <img src="https://lh7-qw.googleusercontent.com/docsz/AD_4nXcKBuLLaxsr_-lisYlucYYNuIkWEM8pVuujZ_6R_zczdd9DfgxZZ_a2gZKQpUydK6lYyT0JYrsAFvvly3OqkR5EBxWZI1NwtuWu0pKxOiXm9lhWDzV3HIIh5qpSTdf6nLB2DfFBxYThpcBLSBz02Jc?key=_YGlOiclyfkh4f2qZgYYs5O2" alt="" data-size="original">               | RTH function suggested to select based on the safety time buffer selected. Use with caution. | Tap to initiate RTH function, and monitor closely.                                                                                             |
| <img src="https://lh7-qw.googleusercontent.com/docsz/AD_4nXehjiQyo1WmWJx_kLDS7CYdT887CguZfpXeekuzNle6JfDbsL1koH-yLzpPt3nNir2XrtDqg9E9CYI5Fa-hHoosc2UH7_DD9aLATSdzLC7qjHjNs1p0TUgr_seVh5z9b_yiU-lLXw4WImBx-WTiv6g?key=_YGlOiclyfkh4f2qZgYYs5O2" alt="" data-size="original">               | RTH in process. Elios 3 returning home.                                                      | Tap to Stop Smart Return-To-Home. Monitor to ensure safe return.                                                                               |
| ![](/files/Y5DYRZ8ABHnn8RMascBa)                                                                                                                                                                                                                                                          | Smart RTH engaged too late. The battery lacks sufficient charge to return to home.           | Take manual control and land in a safe place.                                                                                                  |

### (3) Path computation

The Smart RTH function continuously calculates and displays the shortest way to the take off point. This route is displayed in green for visibility.

The Elios 3 is capable of detecting obstacles along the trajectory of Smart Return-To-Home (RTH) features, and will automatically avoid them if an alternative obstacle-free (from drone’s perspective) path can be computed.

If no alternative path is found, the drone will continue along the original trajectory until it touches the obstacle. It will attempt to gently push through (e.g., a door), and if unsuccessful, it will stop, hover in place, and display the following cockpit warning: RTH function is disabled because the drone is stuck. Move the drone and restart RTH. \[T08]

### (4) Take-off point

The yellow H-icon on the live map indicates the take-off location.

***

### Set the safety buffer

Select the amount of buffer for calculating the Smart RTH suggested time. This feature is accessible in the General Settings menu:

<figure><img src="/files/X9FdzYbtqtCsPBYBU3ks" alt=""><figcaption></figcaption></figure>

### (1) There are three options:

| **Selection**         | **Description**                                                                  |
| --------------------- | -------------------------------------------------------------------------------- |
| Just in time: 20s     | Uses a 20 second buffer when calculating the time for the  suggested RTH button. |
| Play it safe: 1 min   | Uses a 60 second buffer when calculating the time for the suggested RTH button.  |
| Automation Disclaimer | Link to the Automation Disclaimer                                                |

***

### How to use Smart RTH

Steps to activate the Smart RTH feature:

1. Read the EULA, Privacy Notice, Automation Disclaimer. By tapping the Inspect button, you confirm you have read and accepted Flyability’s End User License Agreement (EULA), Privacy Notice, and Automation Disclaimer.

{% hint style="warning" %}
The EULA, Privacy Notice, Automation Disclaimer are presented on the PRE-FLIGHT CHECKLIST, before taking-off and starting the inspection. The Automation Disclaimer is also present in the Settings menu.
{% endhint %}

2. Take off and commence the flight. Smart RTH will not be available/visible until the feature has finished initializing.

{% hint style="info" %}
A Smart RTH button will appear indicating that the Smart RTH is available for use. In parallel, the flight management gauge will appear to indicate flight time remaining, and suggested activation window. Smart RTH will be suggested as indicated by the safety buffer selected in settings.
{% endhint %}

3. Tap the Smart RTH button to initiate the Smart Return-To-Home function. Maintain constant observation, and readiness to take control if needed.

{% hint style="info" %}
Smart RTH can be stopped by: tapping the stop button in Cockpit, pushing any stick to its extreme position for +1 second, or pressing the ATTI-SPORT button on the remote control.
{% endhint %}

{% hint style="info" %}
The drone will navigate back to the take-off location, visible as a big H-icon in the live map. The camera will automatically align with the direction of movement for a continuous view of the path. Flight speed adjusts based on the environment. If the Elios 3 is unable to return to the take-off point it will hover in the nearest safe place it can determine.
{% endhint %}

{% hint style="warning" %}
The LiDAR is unable to detect clear water, transparent objects and other objects in its blind spot. It is important to maintain visual contact to avoid landing in unsafe conditions, or colliding with moving/moved obstacles/persons.
{% endhint %}

{% hint style="danger" %}
Smart RTH trusts a trajectory it has already flown and may return at maximum speed when following these trajectories. New obstacles/persons presented are exposed to the danger of collision.
{% endhint %}

4. Smart RTH will return control to the pilot to land once 1m (3.2 feet) above the take-off location.

{% hint style="info" %}
If there is no collision-free position 1m (3.2 feet) above the take-off location, then the Elios 3 takes the next closest position that meets the criteria of being close to the take-off position and being collision free.
{% endhint %}

***

## Resume Inspection

Proceeding an initiated Smart RTH flight, the Resume Inspection option appears after successful relocalization and take-off. The pilot can initiate this feature using the Return button or cancel by flying 10 meters (32 feet) from the take off location.

### Interface

The Resume Inspection feature has additional elements available in Cockpit enabling its function. Refer to the screenshot and numbered descriptions:

<figure><img src="/files/29wEBAHfoBAVCsMmesoP" alt=""><figcaption></figcaption></figure>

### **(1) Resume Inspection buttons**

Tap the Return button to engage, or Stop button to pause the Resume Inspection feature.

| Alert                            | Status                                          | Action                                                              |
| -------------------------------- | ----------------------------------------------- | ------------------------------------------------------------------- |
| ![](/files/Ax0jT95zpIGHbza486Qx) | Resume Inspection function is available.        | Tap to initiate the Resume Inspection function, and monitor flight. |
| ![](/files/Kfn5BYXtNbZr02IOM91A) | Drone returning to RTH start point.             | Monitor flight. Tap to Stop the return to the RTH start point.      |
| ![](/files/X3Ohyth66nBCDSUQ2xIj) | Drone has returned to the last RTH start point. | Take control.                                                       |

### **(2) RTH start point**

The orange saucer on the live map indicates the RTH start point location.

### **(3) Path computation**

The Resume Inspection function has the same object avoidance behavior as Smart RTH, and uses previously stored graph data to autonomously navigate back to the RTH start point. This route is displayed in yellow/green for visibility.

***

## Limitations

Limitations to be aware of for safe Smart Return-To-Home operation:

| Blind spot                                                                                                | The LiDAR scanner can’t see in the front bottom part of the Elios 3.                                                                                                                                                        |
| --------------------------------------------------------------------------------------------------------- | --------------------------------------------------------------------------------------------------------------------------------------------------------------------------------------------------------------------------- |
| Dynamic obstacles may not be seen by the Elios 3.                                                         | The field of view is limited and could miss moving features. Return to Home is not supported in dynamic environments.                                                                                                       |
| Appearance of new obstacles in previously flown flight path. e.g. door closes, someone stands in the way. | RTH trusts the trajectory it has already flown and may return at maximum speed when following these trajectories. New obstacles/persons presented are exposed to the danger of collision.                                   |
| Transparent objects                                                                                       | LiDAR can’t see glass or other transparent materials. The Elios 3 may think the space is traversable and try to go through, which could lead to a crash                                                                     |
| Water                                                                                                     | Clear water is not detected by LiDAR, and not considered in the RTH path, which could lead to crashes. Same when emergency landing, water will not be detected and should be avoided by the pilot.                          |
| Thin objects                                                                                              | LiDAR can’t detect thin probes and wires, leading to collision risks                                                                                                                                                        |
| Dust                                                                                                      | Dust may be misinterpreted as obstacles, leading to repeated path replanning. Performance may be affected in environments with high density of dust.                                                                        |
| “No-fly zone”                                                                                             | Any asset with an "excluded" area, such as dangerous zones in a nuclear plant or the side of a bridge with active traffic, should be considered carefully. The RTH optimal path may suggest flying over an "excluded" area. |
| Strong Wind                                                                                               | When strong airflow halts the Elios 3’s progress, this will be detected as obstruction and deactivate RTH.                                                                                                                  |
| Drone may slow down unexpectedly outdoors or when a shortcut is found.                                    | The velocity in AUTO mode is linked to the amount of data collected in the immediate vicinity. Velocity increases/decreases where the Elios 3 knows the environment better/less.                                            |

***

Download this article in PDF:

{% file src="/files/gT0EryXpVy03tDJfh5WT" %}


# Elios 3 Remote controller stick calibration

The Elios 3 remote controller sticks are factory calibrated, meaning calibration is normally not required.\
However, the calibration procedure can be performed if needed to troubleshoot specific control issues.

#### **When Calibration May Be Needed :**

* Difficulties to make the **arming or disarming** sequence
* Gimbal sticks or camera tilt knob do not reach their full range of control on the aircraft

### Required Material

Charged Remote controller

### Procedure

1. Power on the remote controller.

<figure><img src="/files/AOD0XFLwoX1XAaL5BfwI" alt="" width="563"><figcaption></figcaption></figure>

2. Press simultaneously and keep pressed the **Power** and **Aux   &#x20;buttons**, until the power **led turn blue** and a beep is heard.

<figure><img src="/files/Ol4b95A8yWYpQnMI3ZDZ" alt="" width="563"><figcaption></figcaption></figure>

3. Move the **left stick up, down, left and right all the range**,   &#x20;repeat 3 times, the second led of the battery level indicator will   &#x20;blink. Leave the stick in the center the led should stay fixed.

<figure><img src="/files/W7p2nuT2cnETRYwvkLCJ" alt="" width="563"><figcaption></figcaption></figure>

4. Move the **right stick up, down, left and right all the range**,   &#x20;repeat 3 times, the third led of the battery level indicator will   &#x20;blink leave the stick in the center the led should stay fixed.

<figure><img src="/files/jwjuykZ71nioZSelafCh" alt="" width="563"><figcaption></figcaption></figure>

5. Move the **camera tilt knob up and down all the range**, repeat   &#x20;3 times, the first led of the battery level indicator will blink, place   &#x20;the knob in the horizontal position, the led should stay fixed.

<figure><img src="/files/ck3kaV9Vi7nxSyXSoU2S" alt="" width="563"><figcaption></figcaption></figure>

6. Leave the remote control for 5s without moving any sticks or   &#x20;knob, the blue power led will start to blink, wait an additional 3   &#x20;seconds
7. Power off to save the new calibration


# Elios 3 - How to Relocalize

Relocalization is a premium feature to align multiple flights of the same Inspection into one point cloud. This article can help guide through this process.

The following is needed for access to the relocalization feature.

| Item                          | Description                                             |
| ----------------------------- | ------------------------------------------------------- |
| Premium Software subscription | Relocalization is available through paid subscription.  |
| Updated Firmware version      | Cockpit and Elios 3 firmware versions 2024.02 or newer. |
| LiDAR payload                 | The Elios 3 needs to have a LiDAR payload equipped.     |

The initial flight of an Asset creates a reference for subsequent flights to align to. Each additional flight should take off from the reference area for automatic alignment. Relocalization is available for both aerial and handheld scans, and can be viewed in Inspector 5 and Flyability cloud. Relocalizing flights is done through the Cockpit app. Pop up alerts will guide through the appropriate steps to relocalize. The Cockpit preflight window provides visual references as well.

## Preflight

The preflight window displays information related to the asset selected. Before each flight it is possible to see a list of all the flights on the Elios 3 and their relocalization status.

<figure><img src="/files/0ZTPJxUEguG86bVVANKO" alt=""><figcaption></figcaption></figure>

### (1) Relocalization reference

The cyan points of the reference point cloud indicate the relocalization reference. The first flight of each asset automatically creates a relocalization reference for the Asset. When relocalizing additional flights, they should take off and relocalize within 1.5m/5ft of the original take off point for best results.

{% hint style="info" %}
The relocalization reference is saved and accessed at Asset level. All flights and Inspections in the asset will relocalize using the same reference.
{% endhint %}

### (2) Asset flight list

Displays a list of flights on the Elios 3 for the selected asset. Flights that have been relocalized will be indicated with a green RELOC icon.  Flights where the relocalization failed, and/or was cancelled will not contain an icon.

## Create the Relocalization Reference

The relocalization reference is created automatically on the first flight for each Asset. It is important for the future success of relocalizing to choose a region with unique and permanent features, and the adequate initial scanning of it. Avoid relocalizing in very symmetrical environments.

Before arming the Elios 3 on the first flight, a Set Relocalization reference alert will remind the pilot to adequately scan the takeoff area as this will define the reference for future relocalization.

<figure><img src="/files/pQh0bwJMPwUxyiQkxptk" alt=""><figcaption></figcaption></figure>

Complete a slow and steady 360° circle or figure 8 2m/6.5ft above takeoff for at least 5 seconds. It is important to scan the takeoff area well. This scan will be used for all subsequent flights to relocalize off of.&#x20;

Complete the flight to create the reference.  A green RELOC icon will indicate success in the preflight Asset Dashboard.

{% hint style="info" %}
You must fly 3m/10ft from the original takeoff. If the 3m/10ft threshold is not crossed during the first flight in a new asset, the relocalization reference is not saved, and no relocalization procedure will be available.
{% endhint %}

## Relocalize Additional Flights

After tapping Start Flight and/or Handheld mapping for subsequent flights, follow the instructions provided in the preflight alert:

<figure><img src="/files/Y2ByRxQ7ZEflw6cV9Va7" alt=""><figcaption></figcaption></figure>

1. Stand near the original takeoff point (within 1.5m /5ft).
2. Hold the drone overhead and slowly rotate (\~5sec).&#x20;
3. Place the Elios 3 on the ground, then tap Continue to relocalize.
   1. A green banner will alert to a successful relocalization. Arm the drone and conduct the flight. It will be automatically aligned to the previous relocalized flights.
   2. A red banner will alert the pilot to a failed relocalization. Click Retry Scan to try again, click Proceed Without to skip relocalizing.&#x20;

{% hint style="info" %}
When relocalizing the drone should remain absolutely still to include excessive motion around it.
{% endhint %}

{% hint style="info" %}
If the flight is unable to relocalize it is possible to try again. Ensure the Elios 3 is being relocalized in the correct location and that there has not been a large change in the local geometry. If the flight is unable to relocalize it will be possible to manually align in Inspector 5.
{% endhint %}

## Reimport Previous Relocalization References

It is possible to reimport previous relocalization references to the Elios 3 to build upon an Inspection at a later date/time. This is done via Inspector 5.

Connect the Elios 3 to Inspector 5 with the workspace containing the asset with the relocalization reference selected.

<figure><img src="/files/W6KHwV44syasXc4ZHP1U" alt=""><figcaption></figcaption></figure>

&#x20;Go to the Elios 3 tab in the Export screen.

1. Select the checkbox/es of the asset/s to upload onto the drone.
2. Select Export.

{% hint style="info" %}
Only light files such as maps, trajectories, and POIs, and not heavy data such as video, image, and .mcap files are exported back onto the Elios 3. When re-importing the data, only the new flights and/or inspections can be imported into Inspector. The historical data can only be deleted from the Elios 3.
{% endhint %}

For more information: Export data - Elios 3 chapter of the [Inspector 5 User manual](https://drive.google.com/file/d/1LNksSZ4UOgZ4f7u_Ay_SuvQoOzRQdZFl/view?usp=drive_link).


# Elios 3 - Autonomous Repeat Flight & Comparison over Time

Autonomous Repeat Flight (Repeat Flight) & Comparison Over Time allows you to replay a specific flight trajectory and POIs/snapshots with high precision.

### User Manual

Complete user manual for download and further information:

{% file src="/files/MtgHpy54kRdxJgg7B3hm" %}

### Prerequisites

The following is needed for access to Autonomous Repeat Flight & Comparison Over Time.

| Item                                                | Description                                                                                            |
| --------------------------------------------------- | ------------------------------------------------------------------------------------------------------ |
| Premium Software and Inspector Online Subscriptions | Repeat Flight is  available through paid subscription. Comparison over time requires Inspector Online. |
| Updated Firmware version                            | Cockpit and Elios 3 firmware versions to 2025.03.1 or newer.                                           |
| LiDAR payload                                       | The Elios 3 needs to have a LiDAR payload equipped.                                                    |
| Relocalized reference                               | Initial flight needs to have been relocalized successfully.                                            |

## Important Considerations

The Repeat Flight feature is not intended for dynamic environments and care needs to be taken when using to avoid incidents.&#x20;

When using Repeat Flight:

* Always maintain visual contact and keep hands on the remote control.
* Repeat Flight may not work in all environments or conditions.
* Thin obstacles may not be detected and could cause collisions.
* LiDAR blindspot - Autonomous Repeat Flight is unable to see the bottom front of the Elios 3 when traveling forward. This limits the Elios 3’s ability to detect new and/or dynamic obstacles in flight.

By tapping the Inspect button, you confirm you have read and accepted Flyability’s End User License Agreement (EULA), [Privacy Notice](https://www.flyability.com/privacy-policy), and Automation Disclaimer. All these documents are available directly from the Cockpit app.

**Battery Safety - PILOT RESPONSIBILITY**

* Pre-Flight Check: If the estimated battery range is less than the reference flight duration, the system will warn with an alert. The pilot can choose REPEAT ANYWAY, but they accept full responsibility for the energy management.
* **In-Flight Behavior (CRITICAL)**:
  * **No Auto-Abort:** The Repeat Flight system DOES NOT automatically Return-To-Home (RTH) based on battery levels. The drone will continue the mission until the battery is exhausted unless the pilot intervenes.
  * **Pilots Role:** The pilot must continuously monitor the Smart RTH battery gauge. If the battery level enters the Red Zone, they must manually trigger Return-to-Home or take control immediately to ensure a safe landing.

## Repeat Flight

Repeat Flight can only be activated by the pilot. Once triggered, the Elios 3 will replay a specific flight trajectory, to include POIs/snapshots with high precision returning to .5 meter (1.6 feet) from the take-off location or the closest safe position. It is important to monitor the entire flight in case pilot intervention is needed.

To repeat a flight autonomously, there needs to be a flight completed with a valid relocalization reference.

{% hint style="info" %}
NB - The Repeat Flight function is available for flights recorded from Elios 3 Avionics firmware version 2025.03.1. Flights recorded with previous versions  will not have this option.
{% endhint %}

If there are no previous flights one will need to be created or imported.

### Initial flight planning

Planning for any initial flight is important, with several considerations to be taken. The Repeat Flight function will replay the exact flight highlighting the importance of this planning. In addition to identifying the route and snapshots necessary. Other important aspects are:

* Image Resolution - Consider the number of POIs/snapshots needed. If there is potential for more than 40 POIs/snapshots for the flight, select the FHD (1080p) setting. Use 4K only if the mission requires fewer than 40 snapshots. These options are selectable from the Cockpit Settings - Flight Settings menu.
* Relocalization reference - The Repeat Flight function requires a relocalization reference to function. It is important to choose a region with unique and permanent features, to include the adequate initial scanning of it.  Avoid relocalizing in very symmetrical environments. The Elios 3 must fly 5m/16ft from takeoff to create the reference.

Consider the limitations of the feature and incorporate as needed: [Limitations](#limitations)

### Create a reference flight

After planning the flight to be repeated:&#x20;

* Create a new asset and Inspection. The Relocalization reference is saved/accessed at Asset level.
* Before arming the Elios 3 on the first flight, the Set Relocalization reference alert will remind the pilot to adequately scan the takeoff area as this will define the reference for future relocalization. Complete the flight to create the reference. A green RELOC icon will indicate success in the preflight Asset Dashboard.

{% hint style="info" %}

### It is important for the future success of relocalizing to choose a region with unique and permanent features, and the adequate initial scanning of it. Avoid relocalizing in very symmetrical environments.

{% endhint %}

### Import reference flight

Previously recorded reference flights collected with firmware 2025.03.1 and newer can be imported back onto the Elios 3 via Inspector 5 desktop.&#x20;

<figure><img src="/files/h2WjjNV4Z72lOZXVXKPc" alt=""><figcaption></figcaption></figure>

Open Inspector desktop with the Workspace containing the flight to be repeated.

* Select the Export tab in the left sidebar menu.
* Select the checkbox of the Inspection to be repeated. The Asset should have a green Reloc tab.
* Click the Export button to add the Inspection. Export All to add all.

With a valid reference flight recorded and/or imported it will be possible to select this feature.

{% hint style="info" %}
NB - Export an original reference flight, and not a repeated flight. Drift/inaccuracy can build when repeating repeated flights.
{% endhint %}

### Select a flight to repeat

With a valid Inspection on the Elios 3 a circular repeat flight radio button (1) will be available for selection from the Asset list in the preflight dashboard.

<figure><img src="/files/1o9mLGK7me4tZ6SMiwDn" alt=""><figcaption></figcaption></figure>

* Tap the circular repeat flight radio button **(1)**. After this selection the related button&#x73;**(3)**, POIs and trajector&#x79;**(4)** will turn purple.

{% hint style="info" %}
NB - When selecting Repeat Flight **(1)**, avoid selecting a repeated flight by selecting a flight without the purple Repeat tab **(2)**. e.g. Flight 1 in the above reference.
{% endhint %}

* Tap the **Repeat Flight** button **(3)** to continue.

### **Preflight Alerts / Checks:**

Before each Repeat flight, the system checks the battery level and payload configuration and will alert potential discrepancies.&#x20;

* If the payload installed on the drone differs from the one used during the reference flight, the system will issue a warning. While the flight can still be replayed, behavior varies significantly depending on the sensor type.
* If the estimated battery range is less than the reference flight duration, the system will warn with an alert. The pilot can choose REPEAT ANYWAY, but accepts full responsibility for the energy management.
* **In-Flight Behavior (CRITICAL):**
  * **No Auto-Abort:** The Repeat Flight system DOES NOT automatically Return-To-Home (RTH) based on battery levels. The drone will continue the mission until the battery is exhausted unless the pilot intervenes.
  * **Your Role:** The pilot must continuously monitor the Smart RTH battery gauge. If the battery level enters the Red Zone, they must manually trigger Return-to-Home or take control immediately to ensure a safe landing.

### Start Autonomous Repeat Flight

<figure><img src="/files/F2kctXOwBaAjcOx0ZN55" alt=""><figcaption></figcaption></figure>

* With the alert to manually spin the drone, take the Elios 3, and scan the take off area as illustrated. Once completed, place the Elios 3 back down on the take off point.&#x20;
* Tap the **Continue to Repeat Flight** button. The system will localize the Elios 3 to the relocalization reference. Once completed a green banner indicating a successful localization will appear at the top of the screen.
* Arm the Elios 3. After manually arming the drone, there are two options for the pilot:

<figure><img src="/files/EzChqqRvk8HRPpAJJ19P" alt=""><figcaption></figcaption></figure>

* Immediately activate the function, as repeat flight includes the entire trajectory from takeoff to landing. Tap the **Repeat** button to start Repeat Flight.
* There is flexibility to allow for manual navigation to assist in difficult or risky entry points. e.g. tight access, busy areas, new obstacles, etc. Fly manually through the challenging section and return to 5M / 16ft of the original flight path. Tap the **Repeat** button to start Repeat Flight.

<figure><img src="/files/DzciQOX1cuAxtOWPmMjy" alt=""><figcaption></figcaption></figure>

**Monitor the flight.** The Repeat Flight tab **(1)** will update depending on the state of the flight. Use this tab to initialize the function as well as monitor and take back control as needed.&#x20;

Available functionality and information:

* Circular completion indicator - Visual and numerical estimate of repeat flight completed.
* Estimated time of repeat flight remaining.
* Action button - Stop or start the repeat flight.

The 3D map has additional features to assist the pilot with a repeat flight. The pilot can select POV or 3D map view based on preference:

* Trajectory - The trajectory will become purple to indicate the repeat flight function has been selected. It will turn white as the portion is completed. Should there be reason to venture from the original path, a suggested path will appear to help guide the pilot back to resume repeat flight as needed. For more information: [Advanced Features](#advanced-features)
* POIs - POIs to be repeated are indicated in purple once the feature has been selected. POIs repeated are indicated in green.

Once the Elios 3 returns to the take off point an alert is provided to inform the pilot to take control to land.

{% hint style="info" %}
If the Elios 3 loses signal to the GCS during repeat flight, it will automatically stop the repeat flight to initiate a standard return to signal(RTS). Once the signal has been restored, the Elios 3 will hover, ready for the pilot to take manual control.
{% endhint %}

### Advanced Features

For more information of the advanced features: [Autonomous Repeat Flight & Comparison Over Time - User Manual](#user-manual).

## Comparison Over Time

Easily compare and analyze repeated POIs / snapshots from an Inspection, over time, and side by side, using the Comparison over time with Inspector Online (FlyaCloud).

### Import / Upload / Sync flight data

<figure><img src="/files/acO4vlq7mm5SecYzQ5a8" alt=""><figcaption></figcaption></figure>

* Import - Connect the Elios 3 to a computer and import flights.
* Upload - Select the repeat/repeated Inspection and upload the dataset to Flyability Inspector Online (FlyaCloud). Navigate to the Inspection **(1)**, click the 3dot dropdown menu **(2)**, Click Upload to cloud **(3)**.
* Sync - Once uploaded select the Sync with Cloud checkbox **(4)**.

### POIs / Snapshots - Comparison over time

With the Inspections uploaded to Inspector Online (FlyaCloud) the Comparison Over Time function will be available.

Open Inspector Online and select a repeated Inspection. Click the Start Comparison button **(1)** to compare the POIs / Snapshots for the selected Inspection.

<figure><img src="/files/AJmlTiI7btjM8033wka0" alt=""><figcaption></figcaption></figure>

### Comparison Over Time - POIs / Snapshots view

The Comparison Over Time user interface contains a list of POIs / Snapshots collected with the 3D map and comparison window for viewing and editing the compared snapshots.&#x20;

Windows and tools available in the editing suite:

<figure><img src="/files/kFOCxuDcQlELrgOZalbu" alt=""><figcaption></figcaption></figure>

**(1)** List of POIs - The list of POIs in the selected asset. Click on a POI to compare the current across the other repeated inspections. The POI name, latest criticality, snapshot count, and description are listed.

**(2)** Comparison window - Visualize the snapshots corresponding with the POI selected. Each snapshot has the Inspection name, date/time, criticality, and edit button. It is possible to annotate with points and lines using the tools in the toolbar:

{% columns %}
{% column %}

* Add a point.
* Synchronize views \[Shift].
* Copy to clipboard.
  {% endcolumn %}

{% column %}

* Add a line.
* Reset views.
* Download.
* Full screen view.
  {% endcolumn %}
  {% endcolumns %}

**(2a)** A list of all repeated snapshots aligning to the chosen POI are listed in chronological order. Snapshots visualized are highlighted with a green border. Click to add or remove a snapshot from comparison over time.\
**(3)** 3D viewer - See the snapshot/s taken in the 3D view.\
**(4)** Collapse / open windows - Click the arrows to open and close windows to customize the interface.

### Limitations

Limitations to be aware of for Autonomous Repeat Flight operation:

| Risk / Limitation                         | Description                                                                                                                                                                                     | Mitigation / Warning                                                                                                                                                                                                                                                                  |
| ----------------------------------------- | ----------------------------------------------------------------------------------------------------------------------------------------------------------------------------------------------- | ------------------------------------------------------------------------------------------------------------------------------------------------------------------------------------------------------------------------------------------------------------------------------------- |
| Symmetrical Environments                  | Featureless assets (Tanks, Silos, Sewers, Tunnels, Chimneys, etc.) lack unique features, which can cause SLAM drift.                                                                            | Fly off-center (stay near walls) for texture. Use external lights.                                                                                                                                                                                                                    |
| Static Environments Only                  | Presence of moving machinery or people.                                                                                                                                                         | Repeat Flight is for static environments only. Blind spots apply. Do not use Repeat Flight if people or moving machinery are present.                                                                                                                                                 |
| Water & Glass                             | Presence of transparent surfaces or water.                                                                                                                                                      | Avoid transparent surfaces and water.                                                                                                                                                                                                                                                 |
| Proximity to walls or ceilings            | Maintain a minimum clearance of 10cm/4in from obstacles during standard navigation. This safety margin may be reduced to 6cm/ 2.5in only when capturing snapshots or during slow-speed flight.  | <p>Attempting to repeat a flight violating these margins, the Elios 3 could collide with the surface and fail with error \[A07].</p><p>Move the drone away from the surface, skip the affected segment, and restart the repeat flight from the following segment</p>                  |
| Cumulative Turbulence                     | Repeat flights reproduce the specific motion of the reference flight, including original turbulence, plus any new turbulence. This can lead to erratic motion or "overshoots".                  | Flying very close to surfaces/pipes increases turbulence. While snapshots remain precise, the flight path may appear rougher than the original manual flight due to the addition of tracking errors and environmental turbulence.                                                     |
| Daisy-Chaining Flights (Repeated Flights) | Repeating a flight that was a repeat flight (e.g., flight C repeats flight B, which is a repeated flight of the original flight A).                                                             | <p>Repeating a repeated flight increases accumulated drift. The system will warn against this behaviour: Repeated flight detected. Repeating it again may lead to accumulated drift.</p><p>Use Inspector desktop (Export tab) to push the original reference flight to the drone.</p> |
| Extended Flight Time (Snapshots)          | The drone stops to stabilize at every POI to ensure sharp images. If the reference flight used "slide mode" (moving while capturing), this adds \~2 seconds per snapshot.                       | <p>To match flight times precisely, stop completely before capturing POIs during the reference flight.</p><p>Ensure battery capacity is sufficient.</p>                                                                                                                               |
| LiDAR Data Continuity                     | Repeat Flight relies on continuous LiDAR data. If Temporary loss of lidar data \[A02] or Lidar communication timeout \[A03] occurs, the Repeat flight functionality will be unavailable \[A12]. | <p>If these errors occur, Repeat flight functionality is currently unavailable \[A12]. The pilot must fly manually.</p><p><br></p><p>Contact Flyability Support if the LiDAR issue persists</p>                                                                                       |
| Dusty Environments                        | Large dust clouds can be detected by the LiDAR as obstacles. This may cause the drone to stop, hover, or attempt to avoid the cloud, resulting in deviations.                                   | Avoid dusty places in flight. Stay alert when the drone initiates maneuvers to avoid the dust cloud.                                                                                                                                                                                  |
| 4K vs. FHD POI/Snapshot                   | 4K mode supports a maximum of 40 snapshots. Excess images are extracted from video with a different field of view, appearing misaligned.                                                        | Select FHD instead of 4K. In FHD mode, there is no snapshot limit, and all POIs are captured as true snapshots with consistent framing across repeated flights.                                                                                                                       |
| Thermal Camera                            | The thermal display can not be triggered autonomously.                                                                                                                                          | Manual Action: The pilot can manually toggle the thermal display during the autonomous flight itself if required.                                                                                                                                                                     |

For more information download the complete user manual: [Autonomous Repeat Flight & Comparison Over Time - User Manual](#user-manual).


# Elios 3 Troubleshooting


# Elios 3 Battery Troubleshooting

Before starting any troubleshooting, we recommend reviewing our [**Battery Best Practices**](/aircraft/elios-3/elios-3-documentation/elios-3-battery-best-practices) article to ensure proper handling, storage, and usage, as many battery issues can be prevented by following these guidelines.

### Common Battery LED colors and their meaning

#### <mark style="color:red;">Red</mark> (Solid or Blinking) <a href="#docs-internal-guid-4571617a-7fff-75e2-a57d-1ea077de8eb7" id="docs-internal-guid-4571617a-7fff-75e2-a57d-1ea077de8eb7"></a>

This often occurs when the battery has been deeply discharged (voltage below 18V) or when the cells are heavily imbalanced.\
In most cases, these batteries cannot be recovered and must be replaced.

#### <mark style="color:yellow;">Yellow</mark> (Solid or Blinking)

Possible causes include charging outside the temperature range, temporary cell imbalance, or overcurrent protection.\
In most cases the warning state is recoverable.\
\
Temperature - Action to take: Bring the battery back to room temperature (10°C–40°C). Charging will not start while the LED remains yellow.

Cell imbalance - Action to take: Perform one complete charge and discharge cycle. This may rebalance the cells and clear the warning.

#### <mark style="color:blue;">Blue</mark> (Blinking)

The battery is in Storage Mode and is discharging to around 50% for safe storage.

#### <mark style="color:purple;">Magenta</mark> (Blinking)

The battery is in Transport Mode and is discharging to around 30% to comply with air-travel regulations.

Action to take for <mark style="color:blue;">Blue</mark>/<mark style="color:purple;">Magenta</mark> leds:&#x20;

1. Press and hold the battery button for two seconds to open the menu.
2. Press and hold again to exit the mode.

#### Led multicolor (rainbow)

Users report that batteries cycling through colors (<mark style="color:red;">Red</mark>, <mark style="color:green;">Green</mark>, <mark style="color:blue;">Blue</mark>) or flashing all colors accompanied by beeping are usually unresponsive and unable to hold or accept a charg, battery is permanently damaged and cannot be recovered\
\
Action to take: If the battery is within the warranty period (1 year or 50 cycles for Elios 3), it is typically replaced; otherwise, it must be recycled.<br>

### Troubleshooting Common Battery Problems

**Battery Won't Charge / No LEDs:**

Causes:

1. **Improper Storage**\
   Leaving a battery in the drone (even turned off) or plugged into a charger for days will slowly drain it below recovery level.   \
   If the battery is completely unresponsive, it is no longer safe to use and must be replaced.<br>
2. **Deep Discharge Over Time**\
   Long-term zero-charge storage causes permanent chemical damage.<br>
3. **Age & Number of Cycles**\
   The expected lifespan is approximately 12 months or 50 cycles.   \
   After this, internal resistance increases and voltage drops during flight become more common (+ error messages in cockpit)<br>

**How to avoid this?**

* After using the drone, remove the battery and recharge it if needed. If no flights are planned, place the battery in storage mode.
* When batteries are not in use, perform **1 charging cycle every 3 months**
* Consider replacing batteries that have reached the end of their lifespan.

### Charger-related Troubleshooting

**Charger LED stays green when connecting the battery (and battery is not full)**

Possible reasons:

* The battery is too hot or too cold. Allow it to reach room temperature before retrying.
* The battery is permanently damaged (red LED). Contact Flyability Support.

**Charger or Cable Damage**

Do not use a charger with:

* Cracked casing
* Damaged connector
* Pinched or exposed cable

Replace the charger before attempting to charge a battery.

### Critical Battery Cases

**Unusual Battery Behavior**

If the battery:

* Gets unusually hot
* Emits smell or noise
* Shows swelling\
  Keep it away from other batteries and heat sources, and contact Support.

**Battery Exposure to Moisture or Liquids**

Do not use or charge the battery. Dispose of it safely or reach out to Support.

**Battery was involved in an aircraft incident that caused damage to the battery, its connector, or its casing**

Never use or charge the battery and reach out for Flyability support.

#### **Contact Flyability Support**

If you need to contact support, please ensure you provide all relevant information about the faulty battery.(see [this article](https://knowledge.flyability.com/aircraft/elios-3/elios-3-troubleshooting/elios-3-battery-report-requirements))\
\
\
**Disclaimer:**\
Even when all recommended best practices are respected, other factors may still cause battery issues. Natural wear, environmental conditions, or unexpected hardware faults can impact battery performance over time. If any problems persist despite proper handling, please contact Flyability Support for further assistance.


# Elios 3 Battery Issue Report

When reporting a battery-related issue to Flyability Support, providing complete and accurate information allows us to investigate the issue efficiently and offer the best possible assistance.

### Basic Information <a href="#docs-internal-guid-9329377f-7fff-9609-faaf-a87afc39cf9d" id="docs-internal-guid-9329377f-7fff-9609-faaf-a87afc39cf9d"></a>

Please include the following details:

* Battery type: Specify whether it is an Elios 2 or Elios 3 battery.
* Battery serial number (SN): Include the full serial number as printed on the battery label. e.g. P0-12-00001234
* Number of batteries affected: Indicate how many batteries are experiencing the same issue.
* Drone serial number (SN): in case of an active care package coverage
* Drone firmware and Cockpit firmware versions

### Description of the issue <a href="#docs-internal-guid-9329377f-7fff-9609-faaf-a87afc39cf9d" id="docs-internal-guid-9329377f-7fff-9609-faaf-a87afc39cf9d"></a>

Provide a clear and detailed description, including:

* Detailed behavior: Describe what happens when using or charging the battery.
* When it occurs: For example, during charging, in flight, after storage, etc.
* Error codes or warnings (Cockpit): Mention any messages or warnings displayed on the Cockpit tablet.
* Visible damages: Indicate if there are any physical signs such as swelling, cracks, leaks, or burn mark

### Visual Evidence <a href="#docs-internal-guid-6a68596f-7fff-3d72-88fd-d367a2327ef6" id="docs-internal-guid-6a68596f-7fff-3d72-88fd-d367a2327ef6"></a>

Attach files or media that help us understand the situation:

* Screenshots or videos: Capture LED behavior, warning messages, or any abnormal indication.

**Tip**: A short video of the LEDs when connecting the battery to the charger can be extremely useful for diagnosis.

### Usage and Storage Conditions <a href="#docs-internal-guid-457bb23c-7fff-5162-263c-831394890675" id="docs-internal-guid-457bb23c-7fff-5162-263c-831394890675"></a>

Please describe how the battery has been used and stored:

* Approximate charge/discharge cycles.
* Typical storage conditions: Temperature, location, and whether the battery was stored inside the drone or separately.
* Storage duration: How long the battery has been stored without use.
* Last successful use: Date of last known proper operation.

### Actions Already Taken <a href="#docs-internal-guid-6922d19e-7fff-040b-eef3-dafea87adc80" id="docs-internal-guid-6922d19e-7fff-040b-eef3-dafea87adc80"></a>

List any troubleshooting or tests already performed, for example:

* Tried with another charger or power cable.
* Tested the faulty battery on another drone, and tested a working battery on he affected drone.
* Cleaned connectors.
* Checked for firmware updates.
* Performed discharge/recharge cycles.

### Example of a Complete Report <a href="#docs-internal-guid-a6432638-7fff-62fc-e6c4-17a667bacb2b" id="docs-internal-guid-a6432638-7fff-62fc-e6c4-17a667bacb2b"></a>

*Elios 3 Standard Battery SN: **P0-04-00 0000234** + **Drone SN**: **XXXXXXXXX***

***Issue**: The battery does not charge. When connected to the charger, LEDs flash once and then turn off.*

***Troubleshooting**: Tried two different chargers and power cables with the same result.*

***Storage**: Stored for 2 months at 22°C, not inside the drone.*

***Attachments**: Video showing LED behavior, and pictures.*


# Elios 3 Warning messages

## Warning types

Multiple levels of importance are given to different warning messages, expressed using different colors.

<table data-header-hidden><thead><tr><th width="89.79998779296875"></th><th></th><th></th></tr></thead><tbody><tr><td>COLOR   </td><td>SEVERITY</td><td>EXPLANATION</td></tr><tr><td><mark style="color:blue;">Blue</mark></td><td><mark style="color:blue;">Information</mark></td><td>Advice for improving the user experience of the Elios system; gives recommended actions which are good for most cases but can be ignored depending on the pilot skill level.</td></tr><tr><td><mark style="color:yellow;">Yellow</mark></td><td><mark style="color:yellow;">Warning</mark></td><td>Point that requires attention.</td></tr><tr><td><mark style="color:red;">Red</mark></td><td><mark style="color:red;">Critical / Error</mark></td><td>Point that requires immediate action. Safety of Elios 3, people, and/or property can be impacted, or flight can be made impossible.</td></tr></tbody></table>

## Audible/Vibrating warnings

Low battery warnings trigger a flashing frame around the screen and an audible tone.

Make sure the System sound level of the tablet is raised so that the alarm tone can be heard, especially if flights take place in a noisy environment.

Low battery, switch to Forced ATTI mode, drone shutting down automatically after 5min Idle time, RTS/RTH disengaging will trigger the tablet to vibrate.

***

## Error Messages

Following is a list of actions that should be taken for a particular error or warning message.

{% hint style="info" %}
Use command Ctrl+f or the search bar above to find a specific warning message
{% endhint %}

### **Control and Avionics \[Axx]**

<table data-header-hidden><thead><tr><th width="69.800048828125"></th><th></th><th></th></tr></thead><tbody><tr><td>Error Code</td><td>MESSAGE</td><td>REQUIRED ACTION / EXPLANATION</td></tr><tr><td><mark style="color:yellow;">A01</mark></td><td><mark style="color:yellow;">Stabilization system disabled automatically - Fly with caution [A01].</mark></td><td><p>One or more stability sensors are not responding. The stability of the Elios 3 in ASSIST mode in dark environments might diminish drastically. If the issue persists after restarting the aircraft, the sensor must be changed.</p><p>Access the maintenance tab in Cockpit for further diagnosis. Contact Flyability support for further assistance.</p></td></tr><tr><td><mark style="color:yellow;">A02</mark></td><td><mark style="color:yellow;">Temporary loss of lidar data [A02]</mark></td><td><p>LiDAR data has not been received for one second. Ensure cables are well connected and have not sustained damage. </p><p>Access the maintenance tab in Cockpit for further diagnosis. Contact Flyability support for further assistance.</p></td></tr><tr><td><mark style="color:yellow;">A03</mark></td><td><mark style="color:yellow;">Lidar communication timeout - Contact Flyability Support if problem persists [A03]</mark></td><td><p>OBC loses Ethernet connection with the Lidar. </p><p>Access the maintenance tab in Cockpit for further diagnosis. Contact Flyability support for further assistance.</p></td></tr><tr><td><mark style="color:blue;">A04</mark></td><td><mark style="color:blue;">Issue with VIO camera - Please restart the drone [A04]</mark></td><td>Please restart the system. Access the maintenance tab in Cockpit for further diagnosis. Contact Flyability support for further assistance if the issue persists.</td></tr><tr><td><mark style="color:red;">A05</mark></td><td><mark style="color:red;">Issue with multiple VIO cameras, stability performance may be diminished - Contact Flyability Support if problem persists [A05]</mark></td><td><p>Significantly increased likelihood of FORCED ATTI due to only one camera image being available.</p><p>Please restart the system. Access the maintenance tab in Cockpit for further diagnosis. Contact Flyability support for further assistance if the issue persists.</p></td></tr><tr><td><mark style="color:red;">A06</mark></td><td><mark style="color:red;">VIO camera calibrations are missing, please contact support [A06]</mark></td><td>Please restart the system. Access the maintenance tab in Cockpit for further diagnosis. Contact Flyability support for further assistance if the issue persists.</td></tr></tbody></table>

### **Battery \[Bxx]**

<table data-header-hidden><thead><tr><th width="69.800048828125"></th><th></th><th></th></tr></thead><tbody><tr><td>Error Code</td><td>MESSAGE</td><td>REQUIRED ACTION / EXPLANATION</td></tr><tr><td><mark style="color:red;">B01</mark></td><td><mark style="color:red;">Critically low battery - Land now [B01]</mark></td><td>The battery has reached a very low level &#x3C;10%. This is critical; immediately land the Elios 3 in safe conditions and replace the battery with a fully charged one to continue flying. Discharging a battery to a too low voltage can damage it irreversibly</td></tr><tr><td><mark style="color:yellow;">B02</mark></td><td><mark style="color:yellow;">Low battery [B02]</mark></td><td>Low battery, a reminder that you only have 20% remaining charge. </td></tr><tr><td><mark style="color:red;">B03</mark></td><td><mark style="color:red;">Battery communication error - Please restart the drone [B03]</mark></td><td><p>The battery management system is unresponsive, reconnect and try again. If the problem persists use a different battery.</p><p>Contact Flyability support for further assistance.</p></td></tr><tr><td><mark style="color:red;">B04</mark></td><td><mark style="color:red;">Battery is permanently damaged - Contact Flyability Support [B04]</mark></td><td>Access the maintenance tab in Cockpit for further diagnosis. Contact Flyability support for further assistance. Do not use the battery until further notice.</td></tr><tr><td><mark style="color:red;">B05</mark></td><td><mark style="color:red;">Battery not attached properly - Check that the lever is closed [B05]</mark></td><td>Battery not attached properly. Check that the lever is closed.</td></tr><tr><td><mark style="color:red;">B06</mark></td><td><mark style="color:red;">Too cold battery - Cannot fly [B06]</mark></td><td>Warm battery in cold conditions.</td></tr><tr><td><mark style="color:red;">B07</mark></td><td><mark style="color:red;">Too warm battery - Cannot fly [B07]</mark> </td><td>Battery temperature measured >80°C. Allow the battery to cool.</td></tr><tr><td><mark style="color:yellow;">B08</mark></td><td><mark style="color:yellow;">Remote control battery low [B08]</mark></td><td>Low battery, a reminder that 10% charge remains.</td></tr><tr><td><mark style="color:yellow;">B09</mark></td><td><mark style="color:yellow;">Tablet battery low [B09]</mark></td><td>Low battery, a reminder that 10% charge remains.</td></tr><tr><td><mark style="color:yellow;">B10</mark></td><td><mark style="color:yellow;">Battery is getting old - Contact Flyability Support to buy a new one [B10]</mark></td><td>The battery is reaching the maximum number of cycles and should be replaced soon.</td></tr><tr><td><mark style="color:red;">B11</mark></td><td><mark style="color:red;">Your battery reached 50 cycles. It is not recommended to fly with a battery above 50 cycles. The reliability and flight performance are not guaranteed and might result in an incident. Flying with this battery will void the warranty in case of battery-related issues.</mark></td><td>The battery has reached 50 or more cycles and should be replaced.</td></tr><tr><td><mark style="color:yellow;">B12</mark></td><td><mark style="color:yellow;">Battery temperature sensor error - replug battery and restart drone. Contact Flyability Support if the problem persists. [B12]</mark></td><td>Please restart the system. Access the maintenance tab in Cockpit for further diagnosis. Contact Flyability support for further assistance if the issue persists.</td></tr><tr><td><mark style="color:red;">B13</mark></td><td><mark style="color:red;">Land now - the battery is unhealthy. Contact Flyability support and don't use this battery again [B13]</mark></td><td>A battery cell imbalance has been detected. Land in a safe place. Use another battery, and contact Flyability support for further assistance.</td></tr></tbody></table>

### **Control \[Cxx]**

<table data-header-hidden><thead><tr><th width="69.79998779296875"></th><th></th><th></th></tr></thead><tbody><tr><td>Error Code</td><td>MESSAGE</td><td>REQUIRED ACTION / EXPLANATION</td></tr><tr><td><mark style="color:blue;">C01</mark></td><td><mark style="color:blue;">Manual thrust engaged - Move switch UP to arm or enable altitude hold again  [C01]</mark></td><td>Manual thrust flight mode selected via the corresponding switch on the remote controller.</td></tr><tr><td><mark style="color:blue;">C02</mark></td><td><mark style="color:blue;">Sport mode engaged - Fly with caution, switch to ASSIST to limit the drone speed [C02]</mark></td><td>Sport flight mode selected via the corresponding switch on the remote controller.</td></tr><tr><td><mark style="color:blue;">C03</mark></td><td><mark style="color:blue;">Not in ASSIST mode - Move the switch to ASSIST to be able to arm the drone [C03]</mark></td><td>The Elios 3 is not in the ASSIST flight mode when arming the drone. ASSIST flight mode must be selected in order to arm the drone.</td></tr><tr><td><mark style="color:red;">C04</mark></td><td><mark style="color:red;">Motion detected during arming delay - Aborting [C04]</mark></td><td>An angular speed of more than 0,1 rad/s has been detected on one of the axes of the DSM imu.</td></tr></tbody></table>

### **Camera \[CAxx]**

<table data-header-hidden><thead><tr><th width="69.79998779296875"></th><th></th><th></th></tr></thead><tbody><tr><td>Error Code</td><td>MESSAGE</td><td>REQUIRED ACTION / EXPLANATION</td></tr><tr><td><mark style="color:red;">CA01</mark></td><td><mark style="color:red;">Camera error -  Please restart the drone [CA01].</mark></td><td>One or more stability sensors are not responding. The stability of the Elios 3 in ASSIST mode in dark environments might diminish drastically. If the issue persists after restarting the system, the sensor must be changed. Access the maintenance tab in Cockpit for further diagnosis. Contact Flyability support for further assistance.</td></tr><tr><td><mark style="color:red;">CA02</mark></td><td><mark style="color:red;">No communication with the Camera payload, please restart the drone. If problem persists contact Flyability Support [CA02]</mark></td><td>Triggered when the camera payload does not respond. Restart system. If the issue persists, contact Flyability support for further assistance.</td></tr></tbody></table>

### **Environment \[Exx]**

<table data-header-hidden><thead><tr><th width="69.800048828125"></th><th></th><th></th></tr></thead><tbody><tr><td>Error Code</td><td>MESSAGE</td><td>REQUIRED ACTION / EXPLANATION</td></tr><tr><td><mark style="color:red;">E01</mark></td><td><mark style="color:red;">Environment too warm, drone might overheat [E01]</mark></td><td>Ambient temperature > 50°C</td></tr><tr><td><mark style="color:blue;">E02</mark></td><td><mark style="color:blue;">Cold environment fly with caution [E02]</mark></td><td>Ambient temperature &#x3C; 10°C</td></tr><tr><td><mark style="color:red;">E03</mark></td><td><mark style="color:red;">The drone is flying beyond the operating range of the barometer. [E03]</mark></td><td>ATTI-mode is not available anymore. When the drone loses ASSIST, it will automatically switch to MANUAL THRUST mode. Please fly with extreme caution and read the manual for further information.</td></tr><tr><td><mark style="color:red;">E04</mark></td><td><mark style="color:red;">You reached the Radiation threshold [E04]</mark></td><td>Shown after 10s of threshold exceeded.</td></tr><tr><td><mark style="color:yellow;">E05</mark></td><td><mark style="color:yellow;">No radiation measurement received, check the MIRION sensor or contact Support for further assistance [E05]</mark></td><td>Triggered when sensor is connected, but no measurement is received for 3s</td></tr><tr><td><mark style="color:red;">E06</mark></td><td><mark style="color:red;">No communication with the barometer, please restart the drone. If problem persists contact Flyability Support [E06]</mark></td><td>Restart system. If the issue persists, contact Flyability support for further assistance.</td></tr><tr><td><mark style="color:yellow;">E07</mark></td><td><mark style="color:yellow;">The drone is flying above the maximum allowed altitude - fly with caution [E07]</mark></td><td>With low air density, altitude stability can be disturbed. Use manual thrust for better control.</td></tr></tbody></table>

### **Storage \[Gxx]**

<table data-header-hidden><thead><tr><th width="69.79998779296875"></th><th></th><th></th></tr></thead><tbody><tr><td>Error Code</td><td>MESSAGE</td><td>REQUIRED ACTION / EXPLANATION</td></tr><tr><td><mark style="color:yellow;">G01</mark></td><td><mark style="color:yellow;">Camera SD card almost full - Free up 10GB to do a flight [G01]</mark></td><td>Less than 10GB available on the camera SD card. Free space on card by importing/saving/deleting previous data collected.</td></tr><tr><td><mark style="color:red;">G02</mark></td><td><mark style="color:red;">Camera SD card error - contact Flyability Support if the problem persists [G02]</mark></td><td>The camera driver reports an error with the sd card. Restart system. If the issue persists, contact Flyability support for further assistance.</td></tr><tr><td><mark style="color:yellow;">G03</mark></td><td><mark style="color:yellow;">Camera SD card missing - contact Flyability support if the problem persists [G03]</mark></td><td><p>No SD card detected. Restart system. If the issue persists, contact Flyability support for further assistance.</p><p><br></p></td></tr><tr><td><mark style="color:yellow;">G04</mark></td><td><mark style="color:yellow;">OBC storage getting low [G04]</mark></td><td>Warning the available OBC SSD storage space is low with less than 60 GB available. </td></tr><tr><td><mark style="color:red;">G05</mark></td><td><mark style="color:red;">OBC storage almost full - Free up 40 GB to do a flight [G05]</mark></td><td>OBC storage is almost full with less than 40 GB available. Free space on drive by importing/saving/deleting previous data collected.</td></tr><tr><td><mark style="color:yellow;">G06</mark></td><td><mark style="color:yellow;">OBC storage full - Data won't be recorded [G06]</mark></td><td>OBC storage is full with less than 10 GB available. Data will not be recorded. Free space on drive by importing/saving/deleting previous data collected.</td></tr><tr><td><mark style="color:red;">G07</mark></td><td><mark style="color:red;">Camera SD card full - Flight will not be recorded [G07]</mark></td><td>The camera SD card is full. Data will not be recorded. Free space on drive by importing/saving/deleting previous data collected.</td></tr><tr><td></td><td></td><td></td></tr></tbody></table>

### **IMU \[Ixx]**

<table data-header-hidden><thead><tr><th width="69.79998779296875"></th><th></th><th></th></tr></thead><tbody><tr><td>Error Code</td><td>MESSAGE</td><td>REQUIRED ACTION / EXPLANATION</td></tr><tr><td><mark style="color:yellow;">I01</mark></td><td><mark style="color:yellow;">Calibration needs to be updated - Please restart the drone [I01]</mark></td><td>Warning when the calibration files have been updated, and the loaded calibration for rigid IMU is different from the one stored on OBC. It will be updated after a restart.</td></tr><tr><td><mark style="color:yellow;">I02</mark></td><td><mark style="color:yellow;">Calibration communication error - Stability performance may be diminished. Contact Flyability Support if the problem persists [I02]</mark></td><td>Unable to check the imu calibration through starnet for rigid imu. If the issue persists, contact Flyability support for further assistance.</td></tr><tr><td><mark style="color:yellow;">I03</mark></td><td><mark style="color:yellow;">Calibration error - Stability performance may be diminished. Contact Flyability Support if the problem persists [I03]</mark></td><td>Unexpected error during the calibration check of the rigid imu. If the issue persists, contact Flyability support for further assistance.</td></tr><tr><td><mark style="color:yellow;">I04</mark></td><td><mark style="color:yellow;">Calibration error - Stability performance may be diminished. Contact Flyability Support if the problem persists [I04]</mark></td><td>The calibration file of the rigid imu stored on the OBC is missing or in the wrong format. If the issue persists, contact Flyability support for further assistance.</td></tr><tr><td><mark style="color:yellow;">I05</mark></td><td><mark style="color:yellow;">Calibration SN mismatch - Stability performance may be diminished. Contact Flyability Support if the problem persists [I05]</mark></td><td>The serial number of the calibration file for the body imu stored on OBC does not match the serial number of the avionics MCU. If the issue persists, contact Flyability support for further assistance.</td></tr><tr><td><mark style="color:yellow;">I06</mark></td><td><mark style="color:yellow;">Calibration needs to be updated - Please restart the drone [I06]</mark></td><td>Warning when the files calibration files have been updated, and the loaded calibration for body (damped sensing module) IMU is different from the one stored on OBC. It will be updated after a restart.</td></tr><tr><td><mark style="color:yellow;">I07</mark></td><td><mark style="color:yellow;">Calibration communication error - Stability performance may be diminished. Contact Flyability Support if the problem persists [I07]</mark></td><td>Unable to check the imu calibration through starnet for body imu. If the issue persists, contact Flyability support for further assistance.</td></tr><tr><td><mark style="color:yellow;">I08</mark></td><td><mark style="color:yellow;">Calibration error - Stability performance may be diminished. Contact Flyability Support if the problem persists [I08]</mark></td><td>Unexpected error during the calibration check of the damped IMU. If the issue persists, contact Flyability support for further assistance.</td></tr><tr><td><mark style="color:yellow;">I09</mark></td><td><mark style="color:yellow;">Calibration error - Stability performance may be diminished. Contact Flyability Support if the problem persists [I09]</mark></td><td>The calibration file of the damped imu stored on the OBC is missing or in the wrong format. If the issue persists, contact Flyability support for further assistance.</td></tr><tr><td><mark style="color:yellow;">I10</mark></td><td><mark style="color:yellow;">Calibration SN mismatch - Stability performance may be diminished. Contact Flyability Support if the problem persists [I10]</mark></td><td>The serial number of the calibration file for the rigid imu stored on OBC does not match the serial number of the avionics MCU. If the issue persists, contact Flyability support for further assistance.</td></tr><tr><td><mark style="color:yellow;">I11</mark></td><td><mark style="color:yellow;">Calibration needs to be updated - Please restart the drone [I11]</mark></td><td>Warning when the calibration files have been updated, and the loaded calibration for vio IMU is different from the one stored on OBC. It will be updated after a restart.</td></tr><tr><td><mark style="color:yellow;">I12</mark></td><td><mark style="color:yellow;">Calibration communication error - Stability performance may be diminished. Contact Flyability Support if the problem persists [I12]</mark></td><td>Unable to check the imu calibration through starnet for VIO imu. If the issue persists, contact Flyability support for further assistance.</td></tr><tr><td><mark style="color:yellow;">I13</mark></td><td><mark style="color:yellow;">Calibration error - Stability performance may be diminished. Contact Flyability Support if the problem persists [I13]</mark></td><td>Unexpected error during the calibration check of the vio imu. If the issue persists, contact Flyability support for further assistance.</td></tr><tr><td><mark style="color:yellow;">I14</mark></td><td><mark style="color:yellow;">Calibration error - Stability performance may be diminished. Contact Flyability Support if the problem persists [I14]</mark></td><td>The calibration file of the vio imu stored on the OBC is missing or in the wrong format. If the issue persists, contact Flyability support for further assistance.</td></tr><tr><td><mark style="color:yellow;">I15</mark></td><td><mark style="color:yellow;">Calibration SN mismatch - Stability performance may be diminished. Contact Flyability Support if the problem persists [I15]</mark></td><td>Warning when the payload had been changed but not the calibration, and the serial number of the calibration file for the vio imu stored on OBC does not match the serial number of the VIO MCU. If the issue persists, contact Flyability support for further assistance.</td></tr><tr><td><mark style="color:red;">I16</mark></td><td><mark style="color:red;">IMU error - Cannot fly, please restart the drone. If problem persists contact Flyability Support [I16]</mark></td><td>Selftest failure, DSM IMU. Restart system. If the issue persists, contact Flyability support for further assistance.</td></tr><tr><td><mark style="color:red;">I17</mark></td><td><mark style="color:red;">IMU error - Cannot fly, please restart the drone. If problem persists contact Flyability Support [I17]</mark></td><td>Selftest failure, FC IMU. Restart system. If the issue persists, contact Flyability support for further assistance.</td></tr><tr><td><mark style="color:red;">I18</mark></td><td><mark style="color:red;">IMU error - Cannot fly, please restart the drone. If problem persists contact Flyability Support [I18]</mark></td><td>Selftest failure, VIO IMU. Restart system. If the issue persists, contact Flyability support for further assistance.</td></tr><tr><td><mark style="color:red;">I19</mark></td><td><mark style="color:red;">In-flight IMU error - Fail safe activated. Please end flight asap and contact Flyability Support. [I19]</mark></td><td>In-flight failure, DSM IMU. Contact Flyability support for further assistance.</td></tr></tbody></table>

### **LiDAR \[Lxx]**

<table data-header-hidden><thead><tr><th width="69.79998779296875"></th><th></th><th></th></tr></thead><tbody><tr><td>Error Code</td><td>MESSAGE</td><td>REQUIRED ACTION / EXPLANATION</td></tr><tr><td><mark style="color:yellow;">L01</mark></td><td><mark style="color:yellow;">Lidar internal error - Please restart the drone, contact Flyability Support if the problem persists [L01]</mark></td><td><p>Restart system. If the issue persists, contact Flyability support for further assistance.</p><p>.</p></td></tr><tr><td><mark style="color:yellow;">L02</mark></td><td><mark style="color:yellow;">Lidar stopped working because it is too hot [L02]</mark></td><td>Allow the Elios 3 to cool. Do not fly in environments that are too hot.</td></tr><tr><td><mark style="color:blue;">L03</mark></td><td><mark style="color:blue;">Lidar is getting hot [L03]</mark></td><td><br><br></td></tr><tr><td><mark style="color:yellow;">L04</mark></td><td><mark style="color:yellow;">Lidar too hot - Performance may be reduced [L04]</mark></td><td><br></td></tr><tr><td><mark style="color:yellow;">L05</mark></td><td><mark style="color:yellow;">Lidar too hot - Performance is reduced [L05]</mark></td><td><br></td></tr></tbody></table>

### **Propulsion \[Pxx]**

<table data-header-hidden><thead><tr><th width="69.79998779296875"></th><th></th><th></th></tr></thead><tbody><tr><td>Error Code</td><td>MESSAGE</td><td>REQUIRED ACTION / EXPLANATION</td></tr><tr><td><mark style="color:red;">P01</mark></td><td><mark style="color:red;">Motor communication error - Please restart the drone [P01]</mark></td><td>Unable to communicate with at least one motor. Restart system. If the issue persists, contact Flyability support for further assistance.</td></tr><tr><td><mark style="color:yellow;">P02</mark></td><td><mark style="color:yellow;">Motor telemetry communication timeout - Please restart the drone. Contact Flyability Support if the problem persists [P02]</mark></td><td>Avionics did not receive response from the motor. Restart system. If the issue persists, contact Flyability support for further assistance.</td></tr><tr><td><mark style="color:yellow;">P03</mark></td><td><mark style="color:yellow;">Motor overheating - Please land now [P03]</mark></td><td>A motor reports that it is overheating. Thermal throttling starts from when the coils are 120°C or the mcu is 95°C. When this happens during hovering, the drone loses stability and crashes. Land in a safe place. If the issue persists, contact Flyability support for further assistance.</td></tr><tr><td><mark style="color:yellow;">P04</mark></td><td><mark style="color:yellow;">Motor is getting old - Contact Flyability Support to buy a new one [P04]</mark></td><td>Motor reliability and performance is guaranteed for 50 flight hours. This time will soon be exceeded by one or more motors.</td></tr><tr><td><mark style="color:red;">P05</mark></td><td><mark style="color:red;">Your motor reached 50 h. It is not recommended to fly with a motor above 50 h. The reliability and flight performance are not guaranteed and might result in an incident. Flying with this motor will void the warranty in case of motor-related issues.</mark></td><td>Warning: recommended flight hours have been exceeded. This condition voids warranty in case of motor failure. Replace motors as soon as possible.</td></tr><tr><td><mark style="color:yellow;">P06</mark></td><td><mark style="color:yellow;">Motor degradation detected - Please contact Support to replace the motor [P06]</mark></td><td>One of the motors failed a health check. Ensure the motor/propeller can spin freely. Access the maintenance tab in Cockpit for further diagnosis. Contact Flyability support for further assistance.</td></tr><tr><td><mark style="color:red;">P07</mark></td><td><mark style="color:red;">Motor did not power up correctly - Please restart your drone and contact Flyability support if the problem persists [P07]</mark></td><td>Restart system. If the issue persists, contact Flyability support for further assistance.</td></tr></tbody></table>

### **Software \[Sxx]**

<table data-header-hidden><thead><tr><th width="77.79998779296875"></th><th></th><th></th></tr></thead><tbody><tr><td>Error Code</td><td>MESSAGE</td><td>REQUIRED ACTION / EXPLANATION</td></tr><tr><td><mark style="color:yellow;">S01</mark></td><td><mark style="color:yellow;">Drone didn't shut down correctly - Check for a CRD file on the Avionics SD card and contact Flyability Support [S01]</mark></td><td>Avionics has detected that it has started from a fault reset or an unknown state. Restart system. If the issue persists, contact Flyability support for further assistance.</td></tr><tr><td><mark style="color:yellow;">S02</mark></td><td><mark style="color:yellow;">Communication protocol version mismatch - Please update both Cockpit and the drone to the latest release [S02]</mark></td><td>Update drone and/or cockpit to compatible versions. For more information: <a href="https://knowledge.flyability.com/elios-3-system-updates">Elios 3 - System updates</a>.</td></tr><tr><td><mark style="color:yellow;">S03</mark></td><td><mark style="color:yellow;">Transmission FW version mismatch between ground and air unit  - Please update both Cockpit, the remote control and the drone to the latest release [S03]</mark></td><td>Update drone and cockpit to the latest versions. For more information: <a href="/pages/NKD66fha0RUuQYprndjV">Elios 3 - System updates</a>.</td></tr><tr><td><mark style="color:yellow;">S04</mark></td><td><mark style="color:yellow;">Cockpit version not compatible with the drone. Please make sure that both systems are up to date [S04]</mark></td><td>Update drone and/or cockpit to compatible versions. For more information: <a href="/pages/NKD66fha0RUuQYprndjV#system-versions-compatibility-chart">Elios 3 - System updates</a>.</td></tr><tr><td><mark style="color:yellow;">S05</mark></td><td><mark style="color:yellow;">Avionics stopped logging - restart the drone and contact Flyability Customer Support if the problem persists. [S05]</mark></td><td>Avionics detects the SD card but the logging stream is closed. Logging not working. Restart system. If the issue persists, contact Flyability support for further assistance.</td></tr><tr><td><mark style="color:blue;">S06</mark></td><td><mark style="color:blue;">OBC is initializing - Please wait [S06]</mark></td><td><br></td></tr><tr><td><mark style="color:yellow;">S07</mark></td><td><mark style="color:yellow;">OBC did not initialize properly - Please restart the drone [S07]</mark></td><td>Restart system. If the issue persists, contact Flyability support for further assistance.</td></tr><tr><td><mark style="color:red;">S08</mark></td><td><mark style="color:red;">OBC logging failure - Please restart the drone [S08]</mark></td><td>Restart system. If the issue persists, contact Flyability support for further assistance.</td></tr><tr><td><mark style="color:red;">S09</mark></td><td><mark style="color:red;">Drone cannot be armed in current state - Please restart it, contact Flyability support if problem persists [S09]</mark></td><td>Restart system. If the issue persists, contact Flyability support for further assistance.</td></tr><tr><td><mark style="color:yellow;">S10</mark></td><td><mark style="color:yellow;">Internal communication error - restart the drone. Contact Flyability Customer support if the problem persists. [S10]</mark></td><td>Restart system. If the issue persists, contact Flyability support for further assistance.</td></tr><tr><td><mark style="color:yellow;">S11</mark></td><td><mark style="color:yellow;">Internal communication error. Contact Flyability Customer support if the problem persists. [S11]</mark></td><td>Restart system. If the issue persists, contact Flyability support for further assistance.</td></tr><tr><td><mark style="color:yellow;">S12</mark></td><td><mark style="color:yellow;">Internal communication error with lidar - verify that the lidar connector is fully plugged. Contact Flyability Customer Support if the problem persists. [S12]</mark></td><td>Confirm LiDAR connections, and restart the system. If the issue persists, contact Flyability support for further assistance.</td></tr><tr><td><mark style="color:red;">S13</mark></td><td><mark style="color:red;">Barometer error, drone cannot be armed in current state - Please restart it [S13]</mark></td><td>Barometer communication error and/or barometer not coherent. Restart system. If the issue persists, contact Flyability support for further assistance.</td></tr><tr><td><mark style="color:blue;">S14</mark></td><td><mark style="color:blue;">USB Connected - Drone cannot be armed [S14]</mark></td><td>The drone is connected via USB.</td></tr><tr><td><mark style="color:red;">S15</mark></td><td><mark style="color:red;">Drone is not activated - Please activate the drone following license activation process or contact Support for further assistance [S15]</mark></td><td><p>Restart the system with open internet connection. If the issue persists, contact Flyability support for further assistance.</p><p><br><br></p></td></tr><tr><td><mark style="color:yellow;">S16</mark></td><td><mark style="color:yellow;">Lighting Panel error -  Please restart the drone [S16]</mark></td><td>No communication or bad data coming from a lighting panel. Restart system. If the issue persists, contact Flyability support for further assistance.</td></tr><tr><td><mark style="color:red;">S18</mark></td><td><mark style="color:red;">Radiation license is not activated [S18]</mark></td><td><br></td></tr><tr><td><mark style="color:red;">S19</mark></td><td><mark style="color:red;">Remote ID error. Cannot fly, please restart the drone. If problem persists contact Flyability Support [S19]</mark></td><td>Restart system. If the issue persists, contact Flyability support for further assistance.</td></tr><tr><td><mark style="color:red;">S20</mark></td><td><mark style="color:red;">Remote ID error. Please return the drone and land. Flying without broadcasting required Remote Id messages may violate local regulations [S20]</mark></td><td><p>Not broadcasting remote id messages potentially violating local regulation. In this case return and land. </p><p><br></p><p>Restart system. If the issue persists, contact Flyability support for further assistance.</p></td></tr><tr><td><mark style="color:yellow;">S21</mark></td><td><mark style="color:yellow;">Please connect the tablet to internet to update license information [S21]</mark></td><td>Loss of internet, reconnect, or connect to a mobile hotspot.</td></tr><tr><td><mark style="color:yellow;">S22</mark></td><td><mark style="color:yellow;">Failed to load inspection. Please select another inspection or create a new one. [S22]</mark></td><td><br></td></tr><tr><td><mark style="color:yellow;">S23</mark></td><td><mark style="color:yellow;">Failed to load asset map for this asset. The next flight will extend the asset map.[S23]</mark></td><td><br></td></tr><tr><td><mark style="color:yellow;">S24</mark></td><td><mark style="color:yellow;">Failed to load relocalization data for this asset. Relocalization will not be available. [S24]</mark></td><td><br></td></tr><tr><td><mark style="color:yellow;">S25</mark></td><td><mark style="color:yellow;">Failed to save asset map. It may not be possible to initialize the next flight with an asset map. [S25]</mark></td><td><br><br></td></tr><tr><td><mark style="color:yellow;">S26</mark></td><td><mark style="color:yellow;">Failed to restore asset map from previous flight. The asset might have been corrupted. [S26]</mark></td><td><br></td></tr><tr><td><mark style="color:yellow;">S27</mark></td><td><mark style="color:yellow;">Failed to save relocalization data. Relocalization might not be available at the next flight. [S27]</mark></td><td><br></td></tr><tr><td><mark style="color:yellow;">S28</mark></td><td><mark style="color:yellow;">Your license has expired. Premium features are disabled. [S28]</mark></td><td><br></td></tr><tr><td><mark style="color:yellow;">S29</mark></td><td><mark style="color:yellow;">Time tampering detected. Premium features are disabled. [S29]</mark></td><td><br></td></tr><tr><td><mark style="color:yellow;">S30</mark></td><td><mark style="color:yellow;">Issues communicating with the drone. Please restart the tablet, the remote and the drone. Contact Flyability if the problem persists. [S30]</mark></td><td><p>Restart system and reboot the tablet.</p><p>If the issue persists, contact Flyability support for further assistance.</p></td></tr><tr><td><mark style="color:yellow;">S31</mark></td><td><mark style="color:yellow;">Your license is about to expire. Please check your inbox for communication about the renewal. [S31]</mark></td><td><br></td></tr><tr><td><mark style="color:yellow;">S32</mark></td><td><mark style="color:yellow;">Issues communicating with the drone. Please restart the tablet, the remote and the drone. Contact Flyability if the problem persists. [S32]</mark></td><td><p>Restart system and reboot the tablet.</p><p>If the issue persists, contact Flyability support for further assistance.</p></td></tr><tr><td><mark style="color:yellow;">S33</mark></td><td><mark style="color:yellow;">Could not fetch license information, premium features won’t be available. Try restarting the app or connecting to a different network. Contact Flyability if the problem persists. [S33]</mark></td><td><p>Ensure the tablet is connected to the Internet. Use a different or unrestricted network</p><p><br></p><p>Restart system. If the issue persists, contact Flyability support for further assistance.</p></td></tr></tbody></table>

### **Transmission \[Txx]**

<table data-header-hidden><thead><tr><th width="69.79998779296875"></th><th></th><th></th></tr></thead><tbody><tr><td>Error Code</td><td>MESSAGE</td><td>REQUIRED ACTION / EXPLANATION</td></tr><tr><td><mark style="color:yellow;">T01</mark></td><td><mark style="color:yellow;">Weak radio signal - Fly closer to the remote control to not lose connection [T01]</mark></td><td>Radio signal is too low, drone and rc must be closer.</td></tr><tr><td><mark style="color:yellow;">T02</mark></td><td><mark style="color:yellow;">Return to Signal interrupted because drone is blocked. Pilot is back in control [T02]</mark></td><td>Function is interrupted, control is returned to the pilot.</td></tr><tr><td><mark style="color:yellow;">T03</mark></td><td><mark style="color:yellow;">Return to Signal cannot be activated: no historical trajectory available [T03]</mark></td><td>RTS is not available as past trajectory is not available</td></tr><tr><td><mark style="color:yellow;">T04</mark></td><td><mark style="color:yellow;">Return to Signal interrupted because drone stability system is disabled. Pilot is back in control [T04]</mark></td><td>Function is interrupted, control is returned to the pilot.</td></tr><tr><td><mark style="color:blue;">T05</mark></td><td><mark style="color:blue;">Return to Signal sequence has been activated - Click the ATTI-SPORT button once if you wish to pause [T05]</mark></td><td>Displayed when Return to Signal is active.</td></tr></tbody></table>

<br>


# Elios 3 Retrieve data for support

When encountering unexpected behaviour, sharing the right data is important for fast and efficient solutions. This article can help identify what info is needed and how to share it.

## Table of Contents

* [What data is helpful for my issue?](#what-data-is-needed-for-my-issue)
  * [When the Elios 3 has been armed and/or reviewing flights in Inspector.](#when-the-elios-3-has-been-armed-and-or-reviewing-flights-in-inspector)
  * [When the Elios 3 was not armed/no flight.](#when-the-drone-is-disarmed-no-flight)
  * [When there is issue with the Cockpit app.](#when-there-is-issue-with-cockpit-app)
  * [How to identify the correct file name](#how-to-identify-the-correct-file-name)
* [Collecting Elios 3 flights/logs.](#collecting-elios-3-flights-logs)
  * [Import flights with debug logs from the Elios 3.](#import-flights-with-debug-logs-from-the-elios-3)
  * [Export flights with debug log files.](#export-flights-with-debug-log-files)
  * [How to retrieve an avdebug.LOG if not selected during import.](#how-to-retrieve-an-avdebug.log-if-not-selected-during-import)
  * [Retrieve Idle files.](#retrieve-idle-files)
* [Collecting tablet/Cockpit data.](#collecting-tablet-cockpit-data)
  * [Cockpit video recording with STN files.](#cockpit-video-recording-with-stn-files)
  * [Cockpit logs.](#cockpit-logs)
* [When using Inspector 4.](#when-using-inspector-4)
  * [Import project folder with debug file Inspector 4.](#import-project-folder-with-debug-file-inspector-4)
  * [Import Idle files Inspector 4.](#import-idle-files-inspector-4)
* [How to zip files.](#how-to-zip-files)
* [Sending data to support.](#sending-data-to-support)

{% hint style="success" %}
Any data shared to the support are stored on strictly confidential folders and only used for support investigation purpose.
{% endhint %}

## What data is needed for my issue?&#x20;

For fast resolutions, it is important to share the right information. A good description of what occurred and the steps taken to try to rectify is a good place to start. Depending where and when the error occurs there are different logs and files to share.

#### **When the Elios 3 had been armed and/or when reviewing flights in Inspector**

* [Inspector flight folder](/software/inspector/inspector-5/common-workflows/inspector-5-how-to-share-flight-data#share-flight-data-to-open-in-inspector-5).
* [avdebug.LOG file](#how-to-retrieve-an-avdebug.log-if-not-selected-during-import).
* [Cockpit recording](#cockpit-video-recording-with-stn-files).

#### **When the drone is disarmed/no flight**

The Elios 3 starts logging data as soon as it is powered on. If an issue occurs before arming, or if the drone is unable to arm, log data will be stored in the idle files.

* [Idle files](#retrieve-idle-files).

#### **When there is issue with the Cockpit app**

* [Cockpit recording with STN files](#cockpit-video-recording-with-stn-files).
* [Cockpit logs](#cockpit-logs).

#### How to identify the correct file name

Each flight has a unique session and flight number to identify it.  A file name contains the: drone S/N\_session #\_flight #\_status\_file type. e.g. E3RDAB1234567\_01106\_563\_1flight\_syslog.txt&#x20;

It is possible to identify the session and flight numbers in a few ways:

**Cockpit recording / Cockpit**&#x20;

<figure><img src="/files/H1r1apaXll3yRSYDIOEq" alt=""><figcaption></figcaption></figure>

When looking at the cockpit recording and/or cockpit. Notate the S and F numbers in the green status tab. These are the session and flight number for that flight.&#x20;

**Inspector**&#x20;

<figure><img src="/files/eZerRvkatZ0FGxUsD1Um" alt=""><figcaption></figcaption></figure>

(1) - Click on the flight tab to open the info window.

(2) - Note the session and flight number for that flight.

{% hint style="info" %}
When retrieving the avdebug.LOG file, only the session number is needed.
{% endhint %}

***

## Collecting Elios 3 flights/logs

It is most efficient to share flights with the avdebug.LOG file included. If the log was not imported with the flight initially it can be [retrieved from the AV drive on the Elios 3](#how-to-retrieve-an-avdebug.log-if-not-selected-during-import).

### How to Import flights with avdebug.Logs from the Elios 3

Select the Import debug checkbox to include the avdebug.LOG file in the flight folder when importing flights. If this selection is not made the avdebug.LOG will remain on the Elios 3.&#x20;

<figure><img src="/files/0uL0KwlXqlkiYnwX4h9q" alt=""><figcaption></figcaption></figure>

* Connect the Elios 3 to Inspector, then go to the **(1)** Import tab.
* Identify and click the corresponding **(2)** check box to select the flight/s concerned by the issue.
* Select the **(3)** checkbox to Import debug files, to include relevant Idle files.
* Click the **(4)** Import button.
* [Zip the folder with 0 compression](#how-to-zip-files) before uploading folder to share with Support.

### How to Export flights from Inspector with debug log files

Export flights and/or Inspections with issues to include debug logs. If the Import debug checkbox had not been selected at import, there will be no debug logs exported in this process. If this is the case go to [How to retrieve an avdebug.LOG if not selected during import](#how-to-retrieve-an-avdebug.log-if-not-selected-during-import).&#x20;

<figure><img src="/files/CoRut8Oji3Kw80hLIzRe" alt=""><figcaption></figcaption></figure>

* Open Inspector Desktop, then go to the **(1)** Export tab.
* Click the **(2)** Browse button to create and/or select a destination folder.
* Identify and click the cooresponding **(3)** check box to select the flight/s concerned by the issue.
* Select the **(4)** checkbox to export debug files to include relevant Idle files.
* Click the **(5)** Export button.
* [Zip the folder with 0 compression](#how-to-zip-files) before uploading folder to share with Support.

### How to retrieve an avdebug.LOG if not selected during import

If the debug log checkbox was not selected during import, it is possible to retrieve this file with Windows File Explorer. The flight avdebug.LOG files are obtainable and stored on the AV SD card on the Elios 3. [Identify the session number](#how-to-identify-the-correct-file-name) beforehand to know which files to copy.

#### How to Retrieve the avdebug.Log file:

<figure><img src="/files/1yY0vxoF0W5WqXXygqBp" alt=""><figcaption><p>AV drive containing debug files on the Elios 3</p></figcaption></figure>

* Connect the Elios 3 to the computer and power it on.
* Select the AV drive.
* Identify and share the avdebug.LOG file or folder that concerns the flight/s at issue.

{% hint style="info" %}
The AV SD card stores the last 40 files. An avdebug.LOG file will be created each time the Elios 3 is powered on.
{% endhint %}

### Retrieve Idle files

Idle files are created and begin logging once the Elios 3 has been powered on. The Idle files are stored on the Elios 3 and can be found via the Debug files on the Import and Export screens. Selecting the Import Debug checkbox when importing flights will include all idle files. Selecting the Export debug checkbox when exporting a flight and/or Inspection will include all of the idle files from import. Note: The files need to be imported from the drone to be available for export from Inspector Desktop. If not previously imported, they can be retrieved from the Elios 3:&#x20;

<figure><img src="/files/Dzmhf4GraoN1P1CpdrcI" alt=""><figcaption><p>Importing Idle files from the Elios 3</p></figcaption></figure>

* Connect the Elios 3 to Inspector, then go to the Import tab.
* Click to expand the Debug files. Identify and select the flight/s concerned by the issue.
  * Hover over files for more information to assist in locating the correct files.
* Select the checkbox/es for the needed files.
* Click Import. Files are saved in a flight folder in the Workspace.
  * Navigate to the Workspace flight folder and sort by Date modified. The files can be verified by opening and seeing idle in the file naming.

<figure><img src="/files/tLWaqcAnMRx65H2z5vSh" alt="" width="563"><figcaption><p>Example of Idle files imported from the Elios 3</p></figcaption></figure>

***

## Collecting tablet/Cockpit data

When retrieving data from the tablet it is necessary to have the Transferring files option selected in the Developer options settings.&#x20;

Connect the tablet to the computer and access the tablets internal storage using Windows explorer.\
![Internal storage](/files/HkRWtHlgOYcG8Goy1v6j)

*Read more about the connection of the tablet to a computer here:*

{% content-ref url="/pages/eDRpXb3n28lcYh0Uryhj" %}
[Elios 3 How to connect the tablet on a computer](/aircraft/elios-3/elios-3-feature-details/elios-3-how-to-connect-the-tablet-on-a-computer)
{% endcontent-ref %}

### Cockpit video recording with STN files

[Connect the tablet to a computer](/aircraft/elios-3/elios-3-feature-details/elios-3-how-to-connect-the-tablet-on-a-computer)

All the video recordings with their corresponding STN file are stored in this location. If the selection was not made to record the flight in cockpit there will only be the .STN file and no corresponding .MP4:&#x20;

![Flyability Cockpit recordings folder containing Cockpit recordings with their STN files](/files/IeiYHDN0zqRxwDGJJ5WN)

In some case, the support team might ask a copy of the **hidden STN files**, they are stored in the following location:

![](/files/QgQNIeQhO0ahX3hxIZKp)

### Cockpit logs

[Connect the tablet to a computer](/aircraft/elios-3/elios-3-feature-details/elios-3-how-to-connect-the-tablet-on-a-computer)

All the Cockpit logs are stored in this location:  Files > Internal Storage > Flyability > Cockpit > Logs.

<figure><img src="/files/CTBx133Yr0Ucfnfa7D33" alt=""><figcaption></figcaption></figure>

***

## When using Inspector 4

When using Inspector 4 the process and files can be slightly different.

### Import project folder with debug file Inspector 4

Connect the aircraft to Inspector, then go to the Import tab.

Identify and select the flight concerned by the issue&#x20;

Select the option Import debug files

![](/files/IyXPDNkT068nZ5a45QRg)

Choose the location of the project folder then click Import

![](/files/Dwwu4pPY2optFlrm9DsZ)

### Import Idle files Inspector 4

Idle file can be shown in the Import tab when the option is selected, they can be downloaded directly from this tab by clicking on the download logo on the right side.

![](/files/v5fmT1J010UdiwUw7Fgl)

If the issue occurred after the flight, the corresponding idle file will be the one above the flight (e.g. for the flight 393-1 the idle file will be 394-1)

In case the issue occurred before the flight, the corresponding idle file will be the one below (e.g. for the flight 393-1 the idle file will be 393-undefined)

***

## How to zip files

<figure><img src="/files/ySCW3EigRrQZlDqPJ74J" alt=""><figcaption></figcaption></figure>

* Right-click the folder to zip.
* Select Compress to..., and select ZIP File.

***

### Sending data to support

It is possible to [create a ticket](https://www.flyability.com/support-request) from the Flyability website or by sending an email to <support@flyability.com>. When a ticket is created, you will received an automatic reply which will include a Send Safely link for uploading related data.

Data can be also shared via the platform of your choice. When doing so, ensure the link allows access to the support team.


# Elios 3 Training simulator

<figure><img src="/files/EPErF6auvqnAfOuukdBO" alt=""><figcaption></figcaption></figure>

We have created a training simulator solution that recreates the flying experience inside industrial assets.

The [Elios 3 flight simulator](https://www.flyability.com/flyability-training-simulator) help pilots build and maintain their skills. This application runs with the Elios 3 tablet and remote controller. It can be used to familiarize yourself with the flight controls in a realistic setting.&#x20;

{% tabs %}
{% tab title="Download" %}
[Download page](https://www.flyability.com/training-simulator-download?hsCtaTracking=3e1d24a6-3adc-4a22-9367-4a0150c835db%7C347ceeb1-5e41-45c1-8191-b991aa60e9f2)
{% endtab %}
{% endtabs %}

### Installation instruction:&#x20;

1. Download the file fom the link above

2. Connect the tablet to your computer then access to the USB options   \ <br>

   <figure><img src="/files/ZsK3DCzQ69n20rQT2eVL" alt=""><figcaption></figcaption></figure>

3. Select: Transferring files / Android Auto\
   \ <br>

   <figure><img src="/files/N1JQtXRkimvJMWQ2U7rR" alt=""><figcaption></figcaption></figure>

4. Copy paste the APK file into the tablet internal memory\ <br>

5. Open ''My files''

   <figure><img src="/files/RW8fA7hFtoGqFXH2eWdP" alt=""><figcaption></figcaption></figure>

6. Go to ''Installation files'' then tap on the EliosTraining-2.0.4-release.apk<br>

   <figure><img src="/files/9BeNiJQtgGNfXrryhM5K" alt=""><figcaption></figcaption></figure>

7. Select ''Install'' \ <br>

   <figure><img src="/files/dPS4pMWudbadOorUYkjE" alt=""><figcaption></figcaption></figure>

   <figure><img src="/files/81x6nhBooMYjFKoFZ8t8" alt=""><figcaption></figcaption></figure>

8. Open the app once installation process is finished<br>

   <figure><img src="/files/RlsYwaRatS9x7WRl5CsY" alt=""><figcaption></figcaption></figure>

9. Turn ON the Elios 3 remote controller, connect the remote controller to the tablet and verify the USB option is USB tethering<br>

   <figure><img src="/files/wYrJX5jOf7fn6lYsuqEN" alt=""><figcaption></figcaption></figure>

10. Launch the app<br>

    <figure><img src="/files/Hv4O0xSK106rQQIPTeUA" alt=""><figcaption></figcaption></figure>

11. Sign In with your Flyability credentials to access the simulator <br>

    <figure><img src="/files/2hGC89jjcDcJiFNoMAA7" alt=""><figcaption></figcaption></figure>

{% embed url="<https://www.youtube.com/watch?v=2oJG88Tg6-M>" %}


# Elios 2

<figure><img src="/files/WQ9iqWFR1DK9e1fidJCP" alt="" width="375"><figcaption></figcaption></figure>

{% content-ref url="/pages/f6CkVINAjGq2nhlHDpaW" %}
[Elios 2 Documentation](/aircraft/elios-2/elios-2-documentation)
{% endcontent-ref %}

{% content-ref url="/pages/tzf4TVdH6b6PTcSUNUzo" %}
[Elios 2 System update](/aircraft/elios-2/elios-2-system-update)
{% endcontent-ref %}

{% content-ref url="/pages/J2RKM8vyo2aQOhwQkDDQ" %}
[Elios 2 Maintenance](/aircraft/elios-2/elios-2-maintenance)
{% endcontent-ref %}

{% content-ref url="/pages/v2HSitQUtFEfip70FtlX" %}
[Elios 2 Feature details](/aircraft/elios-2/elios-2-feature-details)
{% endcontent-ref %}

{% tabs %}
{% tab title="Tablet App and Software" %}
{% content-ref url="/pages/0AmGpruQaIOOudZB80vU" %}
[Elios 2 Cockpit App](/aircraft/elios-2/elios-2-cockpit-app)
{% endcontent-ref %}

{% content-ref url="/pages/2yYbRdgTzV0d1PoY0x8P" %}
[Inspector 3/4](/software/inspector/inspector-3-4)
{% endcontent-ref %}
{% endtab %}
{% endtabs %}

{% content-ref url="/pages/yb8bpd9aUIT46VFMpYtf" %}
[Elios 2 Troubleshooting](/aircraft/elios-2/elios-2-troubleshooting)
{% endcontent-ref %}


# Elios 2 Documentation

### General Documentation&#x20;

{% tabs %}
{% tab title="Standard" %}
{% file src="/files/t9lX53aVXrPiThVbIXeA" %}

{% file src="/files/jrNhdDIUVYfnDTzsloVD" %}

{% file src="/files/k55anhsfooGgI9t6RnwU" %}
{% endtab %}

{% tab title="GOV" %}
{% file src="/files/QkRKfAt3wtEfXYrLlzAH" %}

{% file src="/files/ff4DOgcttt9wWpwVdwTd" %}
{% endtab %}

{% tab title="RAD" %}
{% file src="/files/V2bnYFVyjWrBBcBhtyUe" %}
{% endtab %}
{% endtabs %}

### Battery

{% file src="/files/bK8u24fMiVQ4ZLXSWAlz" %}

### Material Safety Datasheet & Test Report

{% file src="/files/lC3efuhY8Yhlgk9tk8R4" %}

{% file src="/files/2U9OAspe8iSI3n7cMwt9" %}

{% file src="/files/A2G4GyQWlfKsh79xi23N" %}

{% file src="/files/bJDmjC6UBMzx8qfsAZiF" %}


# Elios 2 System update

## <mark style="color:green;">Latest firmware:</mark> <mark style="color:green;"></mark><mark style="color:green;">**v1.7 (January 2022)**</mark>

[<mark style="color:green;">**Release note**</mark>](/aircraft/elios-2/elios-2-system-update/elios-2-release-note)

{% tabs %}
{% tab title="" %}
**Avionic firmware v1 .7**

{% file src="/files/uc2COm5GpnjSQTYkbfFm" %}
*MD5: 18078F09CB3E426BEF9F5B717A7BB963*
{% endfile %}

**Camera v0.72a**&#x20;

{% file src="/files/SFT9teRXe7e49V2sBs0c" %}
*MD5: 1C324AA8656AE88749E627A1B09F4D47*
{% endfile %}

**Cockpit v2.8**

{% file src="/files/PDNAj3NUOGlp9hzU0QYd" %}
MD5: 246B3780217526A71D5A6993B938F080
{% endfile %}
{% endtab %}
{% endtabs %}

## **What's must to be done**

{% hint style="success" %}

1. Cockpit update via the tablet
2. Avionic update via SD card
3. Camera update via SD card *(not needed if already up to date)*

**Cockpit + Drone must be up to date before the use!**

If one of the component is not up to date, incompatibilities and bugs can result!
{% endhint %}

## **Important notice**

{% hint style="info" %}

* Don't rename firmware files
* Test flight must be done after firmware updates
* The firmware of the controller unit does not change and should remain at v1.2.10
  {% endhint %}

## Updating the Avionic firmware

1. Connect a PC to you drone using via the **USB cable,** or, remove the **LOG SD card**

<figure><img src="/files/tTBVXu1unYAo2XURQKsn" alt="" width="375"><figcaption></figcaption></figure>

1. Download and copy the [Avionics firmware binary file (ELIOS2\_Vxxxxx.BIN)](#latest-firmware-v1.7-january-2022) to the root of the Payload LOG SD card

{% hint style="info" %}
Make sure that no battery is connected to the drone while uploading the file via the USB cable.
{% endhint %}

2. Power up the drone with a fully charged battery
3. The firmware process will begin and the 4 arm sensors LED will blink quickly, in a yellowish color

   The drone may reboot several times, you will hear the start up chime.

{% hint style="warning" %}
Do not unplug the battery until the update process is completed. This can take up to 5 minutes

When the arms LEDs blink one after the other and slower in a yellowish color, the update is done, you can unplug the battery.
{% endhint %}

4. Plug back the battery and connect the GCS, go to Cockpit 'About' tab and verify the avionics firmware version

***

## Updating the Camera Firmware

1. Connect a PC to you drone using via the **USB cable,** or, remove the **LOG SD card.**

<figure><img src="/files/tTBVXu1unYAo2XURQKsn" alt="" width="375"><figcaption></figcaption></figure>

2. Download the [camera binary file (firmware.bin)](#latest-firmware-v1.7-january-2022) and copy the file to the root of the Camera SD Card
3. Power up the drone with a fully charged battery
4. The firmware process will begin&#x20;

{% hint style="info" %}
The LEDs will blink normally, please wait 2 minutes with the drone powered, then unplug it
{% endhint %}

5. Plug back the battery and connect the GCS, go to Cockpit 'About' tab and verify the camera firmware version.

***

## Update the Avionic firmware with Avionic SD card

1. Remove the Avionic SD card&#x20;

{% embed url="<https://www.youtube.com/watch?v=hYxQ9Wd2eGg>" %}

2. Place the SD card into you computer, download and copy the [Avionics firmware binary file (ELIOS2\_Vxxxxx.BIN)](#latest-firmware-v1.7-january-2022)  to the root of the avionics SD card
3. Power up the drone with a fully charged battery
4. The firmware process will begin and the 4 arm sensors LED will blink quickly, in a yellowish color&#x20;

{% hint style="info" %}
The drone may reboot several times, you will hear the startup chime, do not unplug the battery until the update process is completed. This can take up to 5 minutes

When the arms LEDs blink one after the other and slower in a yellowish color, the update is done, you can unplug the battery
{% endhint %}

5. Plug back the battery with GCS connected, go to Cockpit 'About' tab and confirm new Avionics firmware


# Elios 2 Release note

### **v1.7 January 2022**

New features:

* Compatibility with new E2RAD sensor payloads (LOW, MID, HIGH level)
* When a battery error is detected the drone goes into Autoland mode and the tablet  vibrates for 3 seconds to warn the pilot.
* LED blink patterns updated, they will now blink red in case of a battery warning or a critically low battery.

Bug fixes

* Wifi streaming reliability improved
* Transmission status logging fixed
* Maintenance panel information no longer gets stuck in 'loading' status

&#x20;

### **v1.6 August 2021**

New features:

* New Signal Strength indication - The two indicators on the top left corner now indicate downlink and uplink RSSI instead of a quality indicator as it’s more gradual and could prevent incidents in tricky environments such as sewers.
* Battery SoC displayed up to 60 cycles instead of 40
* Cockpit is now available in French, Spanish, German and Russian. Error codes added to warning messages.

Bug fixes

* Distance Lock controls fixed for Mode 1
* Big warning appearing in Cockpit about exceeded number of cycles of batteries also for new batteries fixed

&#x20;

### **v1.5 August 2021**

New features:

* Integration with Elios 2 RAD Radiation detector payload

Bug fixes

* Drone is no longer disarmed when performing the arming sequence when already armed

&#x20;

### **v1.4 November 2020**

New features:

* Photogrammetry flight mode now has grid lines overlaid to help with managing overlap during flight.
* Failsafe: After loss of signal the drone maintains altitude for 15 seconds, then starts the auto descent.
* Firmware update is only possible if drone battery voltage is higher than 16V\
  New warnings to communicate about hardware issues in the transmission system.
* Added warnings to communicate that motors are approaching or have exceeded the maximum recommended replacement interval of 25 flight hours.
* Added warnings to communicate that the battery is approaching or has exceeded the maximum recommended lifetime of 40 discharge cycles.
* Battery SoC estimation is shown only if battery cycles < 40\
  Warning to detect defective battery through high cells imbalance
* General improvements in vertical stability

Bug fixes:

* Camera Initialization improved to avoid recording error. Drone cannot be rearmed immediately after disarming to ensure proper video file termination.
* General bug fixes and improvements

### &#x20;**v1.3 March 2020**

New features:

* Distance lock setpoint is now tunable
* Improved tuning for auto closeup LED
* Drone blinks during arming sequence to estimate battery internal resistance
* Drone will not arm if battery is outside temperature range\
  Added more info to payload logs
* Avionics watchdog to debug avionics\
  Checks if camera SD Card is at least 64GB
* Will not start recording video if there is no space on SD card
* Better motion detection for IMU calibration
* Improved altitude control
* Live video feed switches to SD composite if HDMI error is detected\ <br>

Bug fixes:

* Removed glitches in camera warnings
* Improved yaw control
* Corrected trim implementation
* Improved drone stability on the ground
* Fixed logging issues


# Elios 2 Cockpit App

<figure><img src="/files/O9c4YklHuJAjLWVUVrR9" alt=""><figcaption></figcaption></figure>

Cockpit is the application used to pilot the **Elios 1** and **Elios 2** systems. Its main use is to allow the pilot to view the live video feed from the on board cameras, thus enabling FPV flights. In addition, different dashboards allowing precise monitoring of the of the system.

The app is designed and optimized for the tablets provided by Flyability (Samsung **T580** and **Active 2**).

{% hint style="danger" %}
**Important notice:**

Cockpit require an Internet connection to be activated!&#x20;
{% endhint %}

{% tabs %}
{% tab title="Download" %}
Latest release: January 2022

{% file src="/files/Lv0t4lAwI4avaKnfmfSx" %}
MD5: 246B3780217526A71D5A6993B938F080
{% endfile %}
{% endtab %}

{% tab title="Documentation" %}
{% file src="/files/y8cfdINdDnNaibTVgQ9r" %}
{% endtab %}
{% endtabs %}

{% content-ref url="/pages/BhdiEonJhyYS7QnXa3CQ" %}
[Cockpit 2 How to update](/aircraft/elios-2/elios-2-cockpit-app/cockpit-2-how-to-update)
{% endcontent-ref %}

{% content-ref url="/pages/2iSpIe3dgBo8f0T15poN" %}
[Cockpit 2 Release notes](/aircraft/elios-2/elios-2-cockpit-app/cockpit-2-release-notes)
{% endcontent-ref %}


# Cockpit 2 How to update

{% hint style="warning" %}
**Important notice:**

Cockpit require an Internet connection to be activated!&#x20;
{% endhint %}

### **Automatic update:**

Cockpit application will prompt you for an update whenever a new one is available and if the tablet is connected to the Internet. We recommend you do the update through the automated process. If for any reason you cannot follow the automatic update process use the following procedure to manually update Cockpit application.

&#x20;

### **Manual update:**&#x20;

Download the latest version of the [Cockpit APK](/aircraft/elios-2/elios-2-cockpit-app).

Connect the tablet to your computer, through the USB cable. You will need to unlock the tablet, and then the Android system might ask you to grant access. Please accept.

Copy the latest cockpit APK into the download folder. Once copied you can disconnect the tablet from the computer.

<figure><img src="/files/ASgt3nnK8dc5jfTraZdK" alt=""><figcaption><p>The shown version in the image above is for example only</p></figcaption></figure>

If you wish to backup your tablet recordings, you can do it now, Go to “My Files” application and then under Internal storage > Flyability > Cockpit > Recordings. They should not be removed when updating, but the backup is recommended as a safety measure.

![](/files/2tX0VCqs0ioHi1LqT3RM)

From the tablet go into Settings->Apps->Cockpit and tap on “Uninstall”

![](/files/K6l86BaPq8NF2G3S0F8Q)

Once finished go into the “My Files” application under the “Installation files” folder tap on the cockpit APK you have copied. The installation process will start. You might be prompted by the Android system to allow installation from unknown source. Please accept.

![](/files/airgRBqiPK0nABE0qb1G)

Once the installation is done you can start the cockpit application and follow the start up process from the app. You will be prompted for authorization please accept all of them.

![](/files/YJ4eYBmaQtGsjOedfAXH)


# Cockpit 2 Release notes

### **v2.8 January 2022:**  New features:

* Compatibility with new E2RAD sensor payloads (LOW, MID, HIGH level)
* When a battery error is detected the drone goes into autoland mode and the tablet vibrates for 3 seconds to warn the pilot.
* LED blink patterns updated, they will now blink red in case of a battery warning or a critically low battery.

Bug fixes:

* Wifi streaming reliability improved
* Transmission status logging fixed
* Maintenance panel information no longer gets stuck in 'loading' status

### &#x20;**v2.7 October 2021:**  New features:

* New Signal Strength indication
* The two indicators on the top left corner now indicate downlink and uplink RSSI instead of a quality indicator as it is more gradual and could prevent incidents in tricky environments such as sewers.
* Cockpit is now available in French, Spanish, German and Russian.
* Error codes added to warning messages.

\
Bug fixes:

* Fixed distance Lock bug in control mode 1
* False warning about exceeded number of battery cycles fixed
* Fixed memory leaks

### &#x20;**v2.6 August 2021:**  New features (Elios 2 only):

* Integration with E2 RAD Radiation detector payload
* Battery SoC displayed up to 60 cycles. Battery too old displayed for 60+ cycles\ <br>

Bug Fixes:

* "Old firmware" warning stays forever, even when drone is disconnected
* Camera switch toggled with no video after automatic switch to SD
* Cockpit not informing the user that the FW is not the right one with the current Cockpit version.
* Distance sensor text overlaps with imperial units when distance > 100
* Camera turning on by itself if previously on and drone is restarted

### &#x20;**v2.5 November 2020:**  New Features (Elios 2 only):

* Photogrammetry flight mode now has grid lines overlaid to help with managing\
  overlap during flight.
* New warnings to communicate about hardware issues in the transmission system.
* Added warnings to communicate that motors are approaching or have exceeded the maximum recommended replacement interval of 25 flight hours.
* Added warnings to communicate that the battery is approaching or has exceeded the maximum recommended lifetime of 40 discharge cycles.
* Battery SoC estimation is shown only if battery cycles < 40
* Warning to detect defective battery through high cells imbalance

\
Bug Fixes:

* Motor flight hours now also displayed correctly, even after 140 flight cycles.

### &#x20;**v2.4 March 2020:**  New features (for Elios 2 only):

* Battery diagnosis menu panel to access BMS data
* New in flight battery status monitoring (temperature and internal resistance)
* Motor diagnosis and flight time data added to maintenance menu panel\*
* Live video feed can be switched to composite (SD) if the HDMI (HD) feed fails camera SD card status icon on main screen shows remaining free space\ <br>

Bug Fixes:

* Circular buffer implemented for backup recording to ensure it can always record
* Battery current draw now always correctly displayed
* No longer crashes when changing settings panel while initiating connection with drone
* No longer crashes when arming the drone
* Cage free view, auto close up and strobing are now synced with CAMOP RC
* No longer crashes while performing Auto Trim
* Cam feed now always shows up when you tap "display camera"
* Next service due time no longer displayed (irrelevant to E2)
* Known limitations: Motor flight hours stop recording after 140 flights, use drone flight hours to keep track<br>


# Elios 2 Maintenance

### Elios 2 Cage pentagon replacement&#x20;

{% embed url="<https://www.youtube.com/watch?v=rpfzQGFfG8s>" %}

### Elios 2 Propellers replacement&#x20;

{% embed url="<https://www.youtube.com/watch?v=jSRrS_XFX_Q>" %}

<figure><img src="/files/RruzxFaX6BNJdEGb1xkB" alt="" width="516"><figcaption><p>Propellers orientation</p></figcaption></figure>

### Elios 2 Motors replacement

{% embed url="<https://www.youtube.com/watch?v=dDUQ9mZyL8Q>" %}

### Elios 2 Payload replacement

{% embed url="<https://www.youtube.com/watch?v=Nv5SGJeLNlg>" %}

### Elios 2 Extract avionic SD card

{% embed url="<https://www.youtube.com/watch?v=hYxQ9Wd2eGg>" %}


# Elios 2 Feature details


# Elios 2 Remote controller stick calibration

Calibration ensures that the control sticks have correct center point and range, the status LED on the GCS unit will blink red and a beeping sound will be heard when calibration is necessary. The control sticks can be calibrated with the DJI GO app by following these steps:

* Install "DJI GO--For products before P4" on your personal device. We do not recommend, to install it on the provided tablet. Cockpit and DJI GO do not get along well.\
  [Download DJI Go App for Android or IOS](https://www.dji.com/ch/downloads/djiapp/dji-go-3)
* Connect the GCS to a device with DJI GO, turn on the GCS and launch DJI GO
* DJI GO will automatically detect the Lightbridge 2, press on the "Camera" button

{% hint style="warning" %}
DJI GO will ask you to update the firmware of the Control unit. DO NOT do this. The firmware version of the controller must remain at version 1.2.10
{% endhint %}

{% hint style="danger" %}
As DJI GO and Elios Cockpit don't get along , we do not recommend you to install it on the Flyability tablet. We recommend installing DJI GO on your personal device, such as smartphone or tablet.
{% endhint %}

### Instructions

![](/files/FtC2FQwOjbtJZbyOp5I9)

* In the next screen, press the settings icon in the top right corner
* In the settings menu, select the transmitter icon tab, then press on the "Remote Controller Settings" arrow

![](/files/AE3wKvn9wKZrfZ8aco7r)

* Press on the "Remote Controller Calibration" arrow

![](/files/5oXdzqNEO3VUdUJAPQ7h)

* Press "Calibrate" and follow the instructions on screen

<figure><img src="/files/qrxnFCz3955Gu1O76fiF" alt=""><figcaption></figcaption></figure>


# Elios 2 Downgrade the remote controller firmware

The Elios and Elios 2 drones use DJI Lightbridge 2 transmission system, and as such require the DJI GO app to be used for some advanced operations such as:

* [Changing the camera operator settings (Page 76)](https://drive.google.com/file/d/1dxr_ctTOoVcKDP5YaXLbn0mI19RUkB4V/view)
* [Calibrating the control sticks](/aircraft/elios-2/elios-2-feature-details/elios-2-remote-controller-stick-calibration)
* [Setting up the HDMI output](/aircraft/elios-2/elios-2-feature-details/elios-2-configure-hdmi-output-for-secondary-monitor)
* [Troubleshooting the remote controller](/aircraft/elios-2/elios-2-troubleshooting/elios-2-remote-controller-is-beeping-and-red-led-flashes)

### Important notice

Flyability drones require firmware v1.2.10 to be installed on the control unit, it is therefore imperative that you ***do not let the DJI GO app perform a firmware update***, even if it shows a flashing banner:

![](/files/K6WjO422UteARQmDOf2E)

{% hint style="warning" %}
Performing this firmware upgrade will install version 1.2.40 or higher, leaving the drone unable to connect to the remote controller.
{% endhint %}

In case you need to downgrade the firmware version, these steps have to be followed:

***

### **What you will need**&#x20;

* Fully charged remote controller
* USB cable
* Charged Android or iOS device with DJI Go application installed and Internet access

***

### **Step by Step guide**

* Power on and connect the remote controller to a device with DJI GO (before P4) application\
  [DJI Go App (Android/IOS)](https://www.dji.com/ch/downloads/djiapp/dji-go-3)
* Open the application and wait until it detects the Lightbridge 2 product. Then tap and hold the 3 horizontal lines icon at the top right of the screen

  |   |
  | - |

  <figure><img src="/files/rnAr1hgNc7uzr45vWJAc" alt=""><figcaption></figcaption></figure>
* From the drop-down menu, select version 1.2.10 and tap the Download Firmware button. If the Android keyboard is displayed, tap the tablet return button to hide it and reveal the Download Firmware button.

  ![](/files/YxjRKXrfb3iQdrbOISh9)
* Once the firmware download is finished, tap the Start Upgrade button.&#x20;

  <figure><img src="/files/FIBbHsNxyR1WPdvFnlUG" alt=""><figcaption></figcaption></figure>
* The remote controller led will turn blue along with a beeping sound, the tablet will display the update progress. Wait until the firmware update has finished.&#x20;

  <figure><img src="/files/OL2Th00bUKzQTCbLadK4" alt=""><figcaption></figcaption></figure>
* When the update is done, you can switch off and switch back on the remote controller. You can now connect it to a tablet with Cockpit and from the ABOUT panel confirm that the GROUND UNIT firmware version is 1.2.10.


# Elios 2 Configure HDMI output for secondary monitor

The HDMI output can be connected to a secondary monitor for demonstration purposes, or in combination with higher brightness monitor when flying in direct daylight.

{% hint style="info" %}
To be used, the HDMI output needs to be configured on the remote controller.
{% endhint %}

### **What you will need**

* Android/IOS device with DJI GO app installed (DJI GO—for products before P4 version)\
  [DJI Go App (Android/IOS)](https://www.dji.com/ch/downloads/djiapp/dji-go-3)
* USB Cable
* The remote controller

{% hint style="warning" %}
DJI GO will ask you to update the firmware of the remote controller. DO NOT do this. The firmware version of the controller must remain at version 1.2.10
{% endhint %}

{% hint style="danger" %}
As DJI GO and Elios Cockpit don't get along , we do not recommend you to install it on the Flyability tablet. We recommend installing DJI GO on your personal device, such as smartphone or tablet.
{% endhint %}

### Instructions

<figure><img src="/files/DQ1s7y8x4AeGjFnt5ONN" alt=""><figcaption></figcaption></figure>

1. When the controller has connected to the tablet, the blue camera button will appear in the main menu of the DJI GO app.
2. Go to the HD tab (Image transmission settings)
3. Make sure you have
4. * HDMI Video output: **Enabled**
   * Output port: **HDMI**
5. &#x20;Check these settings: \
   &#x20;   \- App Output mode: **LB** \
   &#x20;   \- Output Port: **HDMI**\
   &#x20;   \- Output mode: **LB**\
   &#x20;   \- OSD Settings: **Disable OSD**
6. Then choose the Output Format that your monitor can display.
7. You may now leave DJI GO app and turn off the RC unit.

<figure><img src="/files/pcTs9hS9ZrZQSxL1SS4m" alt=""><figcaption></figcaption></figure>


# Elios 2 LED patterns

Basic diagnostic information is displayed on the four LED navigation lights of the ELIOS 2. A combination of blinking patterns and colors are used to transmit different types of information about the status of the drone.

## **Drone Idle**

| Ready to fly                                                   | <img src="/files/oWn0NocZ8MByUhkqvOZz" alt="" data-size="line"> |
| -------------------------------------------------------------- | --------------------------------------------------------------- |
| <p>Ready to fly</p><p>(low battery)</p>                        | <img src="/files/5I0LJ6Yxx8ccIytNKI3r" alt="" data-size="line"> |
| No radio link                                                  | <img src="/files/slf03x0iTljbsD6qXYgO" alt="" data-size="line"> |
| <p>Hardware error</p><p>(check Cockpit)</p>                    | <img src="/files/J4NLbfWjdDewpBfNUuJX" alt="" data-size="line"> |
| Motor error                                                    | <img src="/files/vP0z7Ce8dUMcroRGVIF9" alt="" data-size="line"> |
| <p>Firmware updating</p><p>(do not disconnect the battery)</p> | <img src="/files/2YFVJEpo55LnwcjWcZVq" alt="" data-size="line"> |

## **In flight**

|                                                |                                                                 |
| ---------------------------------------------- | --------------------------------------------------------------- |
| <p>Drone arming</p><p>(blinks for 3s)</p>      | <img src="/files/SwRZ3Kcm88yG0Zvmz1Ax" alt="" data-size="line"> |
| <p>Armed</p><p>(motors spinning)</p>           | <img src="/files/d32von85NwwFuP43Skp4" alt="" data-size="line"> |
| Low Battery                                    | <img src="/files/0613JtLvGghXVC2ETcXV" alt="" data-size="line"> |
| <p>No radio link</p><p>(emergency landing)</p> | <img src="/files/0VTzmnZYxQis9tbNkztv" alt="" data-size="line"> |


# Elios 2 How to test the transmission system

To check if your transmission system is 100% functional, please follow these checkpoints before each mission/flight:

1. Connect the system with a fully charged battery for the drone and for the Range Extender if you use one
   1. If you use a modified GCS ensure the antennas are correctly fitted
   2. If you use the Range Extender ensure the cables are correctly fitted

2. Place the GCS or Range Extender and the drone at the same level, the drone must be facing the GCS or Range Extender (drone antennas at the opposite side, red circles here below)

3. Leave about 3 meters (10 feet) distance, between the drone and the GCS or Range Extender \
   \ <br>

   <figure><img src="/files/LZp37cIkrbXkS7YCuzz1" alt=""><figcaption></figcaption></figure>

4. From Cockpit application, navigate to the Radio panel<br>

   <figure><img src="/files/6uS5Cjrorj1hmGe6Dy5M" alt=""><figcaption></figcaption></figure>

5. From the Radio panel, focus on the left part of the 2 first lines<br>

   <figure><img src="/files/iM1gCQVCWP9HhafLQrme" alt=""><figcaption></figcaption></figure>

6. You need to confirm the RSSI1 consistency between LB1, RC1, LB2 and RC2

   <br>

   <figure><img src="/files/rWRJa5Y8OIdFlMe8TU9P" alt=""><figcaption><p>Values between LB1,RC1, LB2 and RC2 and <strong>are below 20dbm difference</strong>.<br></p></figcaption></figure>

   <figure><img src="/files/6VrJGi6ORcD6n3mgGX3g" alt=""><figcaption><p>LB1 and LB2 values <strong>are higher than 20dbm difference</strong> compared to RC1 and RC2.</p></figcaption></figure>

7.

```
<figure><img src="/files/YRPPbEGoj0rlwfLdT2a7" alt=""><figcaption><p>LB1, LB2 and RC2 <strong>are higher than 20dbm difference</strong> compared to RC1</p></figcaption></figure>
```

When verifying those values, gently move the antennas around on the RC or gently bend up and down, left and right the Range Extender cables near the GCS and near the Power Module to ensure no ware or false contact are existing.

Each time you move the cable or antenna keep holding them in position and confirm the RSSI¹ consistency.

If one of the values gets higher than 20dbm compared to the others you must consider the device as faulty.

In this case, stop immediately all operations with the Range Extender and/or the GCS and contact <support@flyability.com> providing the serial number of the material and a screen shot of the radio panel showing the defect.

RSSI¹  = Received Signal Strength Indicator


# Elios 2 When to use the ATTI flight mode

Elios 2 has several flight modes which can be selected by the pilot. Each have their own properties and uses.&#x20;

**ASSIST** is the default control mode, and must be engaged at the beginning of a flight. In this mode, several optical sensors around the drone will measure its distance and motion with respect to nearby objects. It uses this information to automatically remain perfectly stationary.

However, optical sensors have limited range, and the quality of their measurements can be reduced by dust, direct sunlight, or featureless surfaces.&#x20;

In the **ATTI** flight mode, the pilot's inputs directly control the attitude of the drone and the optical sensors are not used. This control mode must be selected if the pilot notices erratic flight behavior due to the limitations of the optical sensors.

{% embed url="<https://www.youtube.com/watch?v=KRoOotgyJIE>" %}

Some flight environments are more demanding on the stability system (and pilot) than others. You can use the [difficulty assessment sheet](https://drive.google.com/file/d/1__j-gm0QieSgylzL-eMcBuo21qZvw4nq/view?usp=drive_link) to estimate the difficulty level in function of several environmental factors.


# Elios 2 Troubleshooting


# Elios 2 Warning messages

### Camera

| POI images are not saved onto the SD card                                                                                                                                         | If the camera SD card is full, new photos (POIs) cannot be saved. A warning appears when the camera SD card gets full for the first time.                                                                                                                                                                                                                                                                                                                                   |
| --------------------------------------------------------------------------------------------------------------------------------------------------------------------------------- | --------------------------------------------------------------------------------------------------------------------------------------------------------------------------------------------------------------------------------------------------------------------------------------------------------------------------------------------------------------------------------------------------------------------------------------------------------------------------- |
| <p>Cockpit error message:</p><p>VIDEO RECORDING ERROR RESTART AIRCRAFT</p>                                                                                                        | SD card is full, check that you have enough space in the video SD card before flying                                                                                                                                                                                                                                                                                                                                                                                        |
| <p>Camera stops recording after several<br>minutes into a flight.<br><br>Cockpit error message:<br>CAMERA ERROR</p>                                                               | <p>This occurs mainly when recording in 4K with certain 32GB sd cards (SanDisk Extreme 32GB)<br><br>Only use 64 or 128 GB SD cards: Sandisk Extreme micro SDXC UHS-I V30 recommended</p><p>Note that E2 is shipped with this 64 GB SD card. Do not swap it with the Payload log SD card, which is 32 GB (The log recorder won't work with SD cards over 32GB).</p>                                                                                                          |
| There is fog on the lens                                                                                                                                                          | <p>Condensation may form on the camera lens when the drone is cold and it enters hot, humid air. In some cases the condensation forms on the inner side of the lens, where it cannot be wiped off and it takes longer to disappear.</p><p>Pre-heat the drone (in a building or in a car) to prevent condensation.</p><p> </p><p>When condensation forms:</p><p>- Wait until it disappears</p><p>- Go back to a colder place. Condensation will disappear faster</p><p> </p> |
| <p>The camera image preview no longer works<br>when the drone is in standby for too long. </p><p>RC unit cannot connect to the drone.</p><p>Drone transmitter Lights are off.</p> | <p>Leaving the aircraft ON without flying for too long in hot environments might overheat the radio system. The radio system will automatically switch off to avoid permanent damage.</p><p>Unplug the drone and let it cool down.</p>                                                                                                                                                                                                                                      |

### **SD Cards**

| Which card should I use as a camera SD card?            | <p>The 4K camera is somewhat sensitive to the SD card used due to the high write data speed.<br>Therefore, it is crucial that only the recommended SD cards are used.</p><p><strong>We recommend using the Sandisk Extreme micro SDXC UHS-I V30 64GB SD card</strong> which we also provide with each drone. It has been thoroughly tested and validated at the office and on the field.</p><p>Alternatively, the 128GB version of the same series could be used. Sandisk Extreme micro SDXC UHS-I V30 128GB.</p><p><strong>32GB SD cards must not be used for the Elios 2 camera</strong> as these use the slower SDHC interface. A fast SD card with an SDXC interface is required for 4K recording.</p> |
| ------------------------------------------------------- | ---------------------------------------------------------------------------------------------------------------------------------------------------------------------------------------------------------------------------------------------------------------------------------------------------------------------------------------------------------------------------------------------------------------------------------------------------------------------------------------------------------------------------------------------------------------------------------------------------------------------------------------------------------------------------------------------------------- |
| Should I format the camera SD card with exFAT or FAT32? | <p>Use the recommended 64GB or alternative 128GB microSD card and format it with exFAT.<br>Do not use different cards or file systems.</p>                                                                                                                                                                                                                                                                                                                                                                                                                                                                                                                                                                 |
| Which card should I use as a LOG SD card?               | <p>The 32 GB SD cards provided with the Elios 2 should be used for both the Payload and Avionics logs.<br>The model is <strong>Sandisk Extreme micro SDHC UHS-I V30 32GB SD card</strong>. Only SD cards up to 32GB can be used for the data logging.</p>                                                                                                                                                                                                                                                                                                                                                                                                                                                  |

### **Radio Link**

| Drone will not connect to controller | Drone is not paired to Controller, perform pairing procedure.                       |
| ------------------------------------ | ----------------------------------------------------------------------------------- |
| 'Signal too strong' message appears  | The drone is too close to the controller during start-up to establish a connection. |

### **Propulsion**<br>

| One motor does not start after arming.                                                   | Disarm and try again. If the problem persists then replace the motor.                                             |
| ---------------------------------------------------------------------------------------- | ----------------------------------------------------------------------------------------------------------------- |
| <p>Drones yaws uncontrollably when pushing<br>against ceiling or in confined spaces.</p> | Do not push against ceilings, switch to manual throttle/ATTI mode in extremely confined spaces (<600mm diameter). |

### **Stabilization**

| <p>The drone drifts in large dark open spaces.<br>The automatic stabilization seems ineffective.</p>                               | <p>The sensors are less effective in such environments. Switch to the ATTI flight mode (in most cases the drone will do this automatically).</p><p>Familiarize yourself with using the ATTI flight mode in a safe environment.</p>                                                                                                                                                                                                                                                                                                |
| ---------------------------------------------------------------------------------------------------------------------------------- | --------------------------------------------------------------------------------------------------------------------------------------------------------------------------------------------------------------------------------------------------------------------------------------------------------------------------------------------------------------------------------------------------------------------------------------------------------------------------------------------------------------------------------- |
| Drone can get stuck in very cluttered or narrow spaces, or if it rolls over into a corner                                          | Use Manual thrust to get it unstuck. Disarm and restart the drone, this resets the motor speeds, and the initial uprighting maneuver is more violent and can help dislodge you.                                                                                                                                                                                                                                                                                                                                                   |
| <p>Drone stabilization won't work properly in environments with very little visual features<br>(shiny, uniform or very dusty).</p> | Switch to the ATTI flight mode. Plan your flight to pass near features if possible.                                                                                                                                                                                                                                                                                                                                                                                                                                               |
| <p>Stabilization does not work properly,<br>even though I am flying close to objects<br>with plenty of features.</p>               | <p>The sensors might be dirty. Remove any dust from the stabilization sensors. These must be cleaned every flight in dusty environments.</p><p><strong>Or</strong>: the stability sensors might not be paired correctly.</p><p>Rebind the stability sensors.</p><ol><li>In Cockpit, go to the maintenance page</li><li>Click "Rebind sensors"</li><li>Look at the blinking LEDs on your drone and follow the sequence to rebind</li></ol>                                                                                         |
| <p>The green/red navigation LEDs stop working. <br><br>Cockpit error message: CALIBRATE SENSOR</p>                                 | <p>The position of each sensor must be ‘calibrated’ into the drone. Currently, if the drone stays in standby mode for a very long time (more than 30min) It will lose track of the location of each sensor. The LEDs of an ‘unpaired’ sensor will no longer work to indicate this failure.</p><p>If this error occurs: Rebind the stability sensors.</p><ol><li>In Cockpit, go to the maintenance page</li><li>Click "Rebind sensors"</li><li>Look at the blinking LEDs on your drone and follow the sequence to rebind</li></ol> |

### **Inspector**

| The LOG files will not load properly                                                               | ELIOS2 requires Cockpit 2.0 or higher to read the LOG files. |
| -------------------------------------------------------------------------------------------------- | ------------------------------------------------------------ |
| <p>The POIs of another flight will also appear,<br>and the thermal video might not be correct.</p> |                                                              |

### Battery

| I plugged the battery into the charger, but the light stays green and it will not charge. | The battery has a built-in temperature sensor, and will not accept a charge when it is too hot. Let the battery cool down and re-connect the battery. |
| ----------------------------------------------------------------------------------------- | ----------------------------------------------------------------------------------------------------------------------------------------------------- |


# Elios 2 Remote controller is beeping and red LED flashes

#### **A  beeping sound and red flashing LED can indicate the following errors:**

* Low battery
* Stick calibration
* Hardware error

If the possibility of a low battery has been eliminated then the use of the "DJI GO" app is required the debug the issue further.&#x20;

{% hint style="info" %}
As DJI GO and Elios Cockpit don't get along , we do not recommend you to install it on the Flyability tablet. We recommend installing DJI GO on your personal device, such as smartphone or tablet.
{% endhint %}

***

### **Important notice**

{% hint style="warning" %}
firmware version of the controller must remain at version 1.2.10
{% endhint %}

{% hint style="danger" %}
As DJI GO and Elios Cockpit don't get along , we do not recommend you to install it on the Flyability tablet. We recommend installing DJI GO on your personal device, such as smartphone or tablet.
{% endhint %}

***

### **What you will need**

* Android/IOS device with DJI GO app installed (DJI GO—for products before P4 version)\
  [DJI Go App (Android/IOS)](https://www.dji.com/ch/downloads/djiapp/dji-go-3)
* USB Cable
* The remote controller

***

### Step by Step guide

* Deploy, connect the USB cable and turn on the GCS.
* Launch DJI GO app
* Once the Remote Controller Picture appears, tap on Camera.

<figure><img src="/files/yLO6yEAIwQQvR7UK4etd" alt=""><figcaption></figcaption></figure>

* Tap on the bar at the top of the screen to display the cause of the error.

<figure><img src="/files/tDXkMsOAv2stybtsNAJ9" alt=""><figcaption></figcaption></figure>

1. If calibration is required: follow the on screen instructions to perform the calibration.\
   [Instruction are detailed in this articles](/aircraft/elios-2/elios-2-feature-details/elios-2-remote-controller-stick-calibration)
2. If hardware error: The unit will need to be sent to Flyability for repairs or swapped out for a new unit. Please contact the [support](https://www.flyability.com/support-request)


# Elios 2 Mission and Flying

{% content-ref url="/pages/1aDUZVuqiRwXz1C7e4Cy" %}
[Mission preparation](/aircraft/elios-2/elios-2-mission-and-flying/mission-preparation)
{% endcontent-ref %}

{% content-ref url="/pages/JTLo6LZn1qyUm5xrmQbi" %}
[Flight planning and analysis process](/aircraft/elios-2/elios-2-mission-and-flying/flight-planning-and-analysis-process)
{% endcontent-ref %}

{% content-ref url="/pages/7YVEpacTIyQnxyONUVQZ" %}
[How much flight time is needed for an inspection](/aircraft/elios-2/elios-2-mission-and-flying/how-much-flight-time-is-needed-for-an-inspection)
{% endcontent-ref %}

***

### **Drone Lighting: Configuration, Operation, and Best Practices**&#x20;

The ELIOS 2 drone features strategically placed light panels to enhance visibility in dusty environments. The main lights are positioned away from the camera and angled outward to minimize glare. A close-up light, located next to the camera, helps reduce shadows but should be turned off in large dusty areas to prevent blinding effects.

To manage lighting effectively, pilots can choose between **automatic mode**, where the close-up light activates within 90 cm of a surface, and **manual mode**, which requires full control over light operation. Proper use of these settings improves visibility and performance in challenging conditions.

{% embed url="<https://www.youtube.com/watch?v=0_OGgqBfPcA>" %}

***

### **Battery temperature management for optimal  performance**

Maintaining batteries within the ideal **20-25°C range** is crucial for performance, especially in extreme climates. A built-in temperature sensor alerts users if the battery falls below **10°C** or exceeds **40°C**, with monitoring available in the Cockpit app.

For **cold climates**, store batteries in an insulated box, use a battery discharger for gradual warming, or place a hot water bottle inside. In **warm climates**, cooling can be achieved with a frozen water bottle wrapped in a towel. Proper temperature management ensures battery efficiency and longevity.

{% embed url="<https://www.youtube.com/watch?v=eidaWREfQ4M>" %}

***

### Drone Safety Precautions: Handling and Protective Measures

Spinning propellers pose a safety risk, but the **ELIOS drone’s protective cage** minimizes danger, allowing safer handling. To avoid injuries, **wear gloves** and hold the drone cage **with flat hands**.

Regularly inspect the **cage for damage**, as broken parts can have sharp edges and compromise protection. Following these safety guidelines ensures both user and drone safety during operation.

{% embed url="<https://www.youtube.com/watch?v=AvzLheeeBd8>" %}

***

### **ELIOS 2 Stabilization System: Sensors, Control Modes, and Best Practices**

The **ELIOS 2 stabilization system** allows precise hovering using **optical and distance sensors** instead of GPS. These sensors measure movement and distance but can be affected by **dust, direct sunlight, and dark or reflective surfaces**.

The default **ASSIST Mode** stabilizes the drone, but in **dusty or featureless environments**, the system may fail, requiring a switch to **Attitude Mode** for manual control. Pilots should **clean sensors after each flight, practice Attitude Mode, and plan routes near textured surfaces** for optimal stability.

{% embed url="<https://www.youtube.com/watch?v=MbnKnpPSS6s>" %}

***

### **Propellers Maintenance: Inspection and Replacement**

The **ELIOS drone propellers** spin at up to **30,000 RPM**, designed to deform upon impact, they can suffer **wear from dust and dents from debris**, leading to **increased drag, vibrations, and motor strain**.

To maintain performance, **inspect propellers before every flight** and **replace them if deformations exceed 1mm**.

{% embed url="<https://www.youtube.com/watch?v=jvxHwkivfdM>" %}

***

### **Enhancing Comfort for Optimal Drone Operation**

Pilots need **full focus** when flying indoor inspection drones. However, **industrial settings** can be uncomfortable, with **standing positions and screen reflections** affecting visibility and concentration.

To improve focus and reduce fatigue, pilots should **bring a chair for comfort, use an umbrella to eliminate screen glare, and sit to maintain a stable posture**. A relaxed position ensures better control, minimizing errors and enhancing inspection efficiency.

{% embed url="<https://www.youtube.com/watch?v=IFGo7UaEVF8>" %}


# Mission preparation

## **Gather information about the flight environment**&#x20;

Avoid unpleasant surprises by gathering as much information as possible about the flight environment before you are on site. Ask for blueprints, photos, or descriptions of the flight area. You should be able to answer the following questions:

### **Is the environment in which the Elios will be operated safe?**

Drones are sensitive to its surroundings. The mission environmental conditions must be within the specifications listed in the user manual of the drone. Think about conditions such as: temperature, presence of water, wind speed, explosive atmospheres etc.

&#x20;

### **What Personal Protective Equipment (PPE) is needed for the operators?**

Flyability drones are relatively safe to fly close to humans provided that adequate precautions are taken. The following PPE must always be carried:

* Eye protection
* Hearing protection
* Protective gloves

Also list the dangers posed by the presence of hazardous materials in the flight area, this might can range from corrosive chemicals to bio-hazards caused by untreated sewage.&#x20;

You must be aware of the effects of flying in your working environment and prepare accordingly by taking additional measures. For example if the environment is dusty, wear respiratory protection.

&#x20;

## **Pilot Skill Requirements**

Some flight environments are more demanding on the pilot than others. You can use the Mission difficulty assessment sheet to estimate the skill level of the pilot required. Bear in mind that the ELIOS2 is much less demanding to fly than the original Elios drone.

{% file src="/files/NP4RyDCRY9z9d3x36mMF" %}

### **Prepare the Paperwork**

### **Method Statement**

The Method Statement (MS) lists all the different steps that will be performed during the inspection. It will also specify all the required equipment to fulfill the mission.&#x20;

The “Method Statement – Template” document offers a template to establish your own:

{% file src="/files/n22UsW5vanIybtlET1cd" %}

An example of a filled in document can be found here:

{% file src="/files/tVgZraqaGriMazuuf8i4" %}

This document will be required on most industrial sites, and is used to communicate the scope of your work to the local work coordinators.

&#x20;

### **Risk Assessment**

The Risk Assessment (RA) is a document which breaks down the steps taken and specifying all the risks that can occur during the progress of the mission. It also states the mitigating measures that can be taken to limit the likelihood and/or consequences of a mishap.&#x20;

The “Risk Assessment – Template” document offers a template to establish your own:&#x20;

{% file src="/files/5YR2KbCU9SW3xvvTZe1u" %}

You can also download an example of a completed document here:

{% file src="/files/iwR8xKIhrXcL6O5eNJEk" %}

### **Do you have the proper flight authorization?**

If you perform outdoor flights, depending on the area and on the country in which you will conduct your flight, you will need a specific authorization. Make sure that you satisfy all requirements of the Civil Aviation Authority to go ahead with your flight.

Note that in most countries, indoor areas are not in the civil airspace, so drone flights conducted inside are not regulated.

&#x20;

### **Flight Planning**

Once the objectives and risks of the inspection are known, you should proceed with the flight planning stage. During visual inspections, all areas of interest must be systematically visited and filmed. A well defined and executed flight plan will help you get the most out of a flight. Flight planning and systematic inspection is covered in a [dedicated article](/aircraft/elios-2/elios-2-mission-and-flying/flight-planning-and-analysis-process).


# Flight planning and analysis process

During visual inspections, all areas of interest must be systematically visited and filmed. A well defined and executed flight plan will help you get the most out of a flight by:

* Helping the preparation of the flight.
* Helping you identify local risks.
* Ensuring that all areas of interest are visited during the flight.
* Simplifying later analysis of the footage.

The correct process of flight planning and analysis will be demonstrated with a simple mission example where we will be inspecting 5 lamps on a hangar ceiling. In particular, we will show how Flyability Inspector and a Clapperboard can be used together to improve flight planning, execution and video analysis.

{% file src="/files/Dwnxs1zM8BIIa50djQFl" %}

<figure><img src="https://knowledge.flyability.com/hs-fs/hubfs/Knowledge%20Base%20Files/Images/Other/Lamps%20Hangar%20celling.jpg?width=469&#x26;name=Lamps%20Hangar%20celling.jpg" alt=""><figcaption></figcaption></figure>

### **Planning**

The first step is to draw a simple schematic of the flight area on front of the Clapperboard. Be sure to add relevant features such as:

* The items to be inspected&#x20;
* Pilot position
* Obstacles or dangers
* The orientation of the building

An accurate sketch can help communicate what will be inspected during the mission, it also serves as a reference during the mission to determine what has already been inspected. After the mission, it can be used to identify the features on the video footage.

Before you fly, use the sketch to decide on the optimal flight path along all inspection items. Divide the mission into several flights if necessary. Numbering the inspection items allows each one to be referred to individually and unambiguously. This may appear trivial, but some missions involve hundreds of inspection items which all need to be individually identified and systematically visited.

Luckily, the "Hangar Lamps" mission is quite simple, the sketch will look something like this:

<img src="https://knowledge.flyability.com/hs-fs/hubfs/Knowledge%20Base%20Files/Images/Other/Flight%20plan%20on%20Clapperboard.png?width=391&#x26;name=Flight%20plan%20on%20Clapperboard.png" alt="" width="391">

The north marker and the exit location are used to establish the orientation of the sketch. Clearly marked are the five lamps to be inspected, which are numbered accordingly. From experience, the pilot can estimate that two flights are needed to adequately inspect all five lamps. There are also some strings hanging from the ceiling which could entangle Elios. Take these factors into account when deciding how to approach the lamps.&#x20;

### **Flight**

Be sure to insert the Mission and flight name into the Cockpit app, this will simplify the later identification of the files in Inspector.

The reverse side of the clapperboard contains the flight list which should be updated before every flight. The numbers of the inspection items to be visited during that flight are written down.

Showing the clapperboard to the on-board camera at the beginning of every flight will later allow you to quickly identify which inspection items are visited in a particular video file. Remember: the camera only starts recording once Elios is armed.

![Clapperboard 1 from Cockpit](https://knowledge.flyability.com/hs-fs/hubfs/Knowledge%20Base%20Files/Images/Other/Clapperboard%201%20from%20Cockpit.png?width=313\&name=Clapperboard%201%20from%20Cockpit.png)            ![Clapperboard 2 from Cockpit](https://knowledge.flyability.com/hs-fs/hubfs/Knowledge%20Base%20Files/Images/Other/Clapperboard%202%20from%20Cockpit.png?width=313\&name=Clapperboard%202%20from%20Cockpit.png)

At the beginning of flight 1.                                     At the beginning of flight 2.

Be sure to mark a POI whenever you reach a numbered inspection item during a flight. This will mark the point in time where each lamp is shown on the video.
<img src="https://knowledge.flyability.com/hs-fs/hubfs/Knowledge%20Base%20Files/Images/Other/POI.png?width=454&#x26;name=POI.png" alt="POI" width="454">

### **Analysis**

Once all the flights are completed collect the video files (.MP4) from the CAM SD card and the .LOG files from the LOG SD card. It is useful to rename the files according to their flight number for easier reference. In Flyability Inspector, open the matching pair of files from any flight. You will be able to click on the POIs and jump towards the inspection items visited during that flight, simplifying post mission analysis by skipping to the interesting bits of the video.

For example in the image below, flight 2 is being analyzed. The POIs corresponding to lamps 3, 4 and 5 can be seen in the timeline. Each POI can be directly traced to a specific lamp, all thanks to careful flight planning and execution.&#x20;

<img src="https://knowledge.flyability.com/hs-fs/hubfs/Knowledge%20Base%20Files/Images/Other/Inspector%202%20with%20Clapperboard.png?width=476&#x26;name=Inspector%202%20with%20Clapperboard.png" alt="Inspector 2 with Clapperboard" width="476">


# How much flight time is needed for an inspection

#### When planning inspections, it is important to be able to give an estimation of how much time is needed to inspect a certain asset. In this article we will discuss some of the variables which influence the duration of an inspection.

Generally speaking, a flight can be divided into two phases: transit to (and from) the inspection area inside the asset, and the inspection itself.

### **Transit**

Transit time will depend on the distance to be travelled, and the nature of the environment. The pilot will not be able to fly as fast in a cluttered environment as in an open environment. For example, the top speed in the 'ASSIST' flight mode typically used in cluttered environments is 1.3m/s, which corresponds roughly to 80m per minute. In risky environments and even slower speed is recommended.  In an open environment the 'ATTI' flight mode is more likely to be used, and the top speed is 4m/s, or 240m/minute.

The maximum controlled vertical speed of Elios 2 , whether going up or down, is also 1.3m/s, or roughly 80m/minute. It is also important to keep this in mind when determining the battery level needed to safely return from high areas, such as smoke stacks or boilers. This speed can be increased in 'Manual Thrust' mode, which allows the drone to climb at up to 10m/s and descend at almost free-fall velocity.&#x20;

Remember that the cage offers protection from impacts at speeds up to 3.6m/s on flat surface, and 1.5m/s on sharp surfaces. Flying faster can get the job done quicker, but it comes at a significant risk.&#x20;

***

### **Inspection**

The time needed for the actual inspection depends on the size of the area to inspect, and the required detail of the inspection. Detail is often expressed in Ground Sampling Distance (GSD), which is the distance between two adjacent pixels, measured on the observed object. A GSD of 1mm/pixel means that one pixel on the image represents 1 mm in the real world. A smaller GSD means that smaller details will be visible in the image. For more information concerning GSD and camera resolution, we recommend reading [this article](https://www.flyability.com/articles-and-media/drones-camera-resolution-three-metrics-you-should-know-about).

To obtain a smaller GSD (more detail) you must fly closer to the object to inspect, the relation between these is linear. This in turn means that a smaller area is in the field of view of the camera at any given time,  reducing the surface area that can be scanned in a given time. The white line in the following graph shows the relation between GSD, and the surface area which can be scanned per minute of flight:

<figure><img src="/files/W8VE5Bsnb9YqIftfquJk" alt=""><figcaption><p>The red line shows the maximum flight speed to maintain for a given distance (or GSD). The reason for this is motion blur. Elios 2's video camera adapts its shutter speed in function of brightness of the objects in view. Visible motion blur will occur when the image is 'smeared' over several pixels during the time where the camera captures an image.</p></figcaption></figure>

In the case where the object is illuminated exclusively by the drone's on-board LED lighting, then the emitted light will be more concentrated when the drone is up close against it, and the object will appear brighter. In turn the shutter speed can be relatively high, up to 1/250th of a second. When flying far away from a surface then the light is distributed over a larger area, and the shutter speed can be as slow as 1/50th of a second. The reason that the maximum motion blur speed decreases as you fly closer to a surface, is because the distance represented by one pixel decreases faster than the shutter speed increases. This is especially the case at less than 2m from a surface, as shown in the detail view of the same plot:

<figure><img src="/files/eAtKxgug2aGG0AXjhWw0" alt=""><figcaption><p>In light of these values, it should become clear that in order to conduct effective inspections in time-critical applications, one should pick detailed inspection points carefully, and where necessary choose between GSD, and 'Getting Stuff Done'.</p></figcaption></figure>


# Elios 2 Training

Every Flyability drone comes with a complementary training, but for some users it is sufficient to go through a self-training process. The following documents are available for pilots wishing to go through self training.

[Online Introductory Course.](https://flyabilityacademy.thinkific.com/courses/Introductorytrainingcourse) This is a short theory presentation to introduce new users to the features of the Elios 2 drone.&#x20;

{% hint style="success" %}
**It must be completed by all new pilots to activate the warranty.**
{% endhint %}

Flight simulator: This simulator runs on the Elios 2 tablet and can be used familiarize yourself with the flight controls in a realistic setting. Download and install the .APK file onto the tablet,  run the app, and connect the tablet to a controller. The tablet requires an internet connection for a one time activation at first use.&#x20;

{% content-ref url="/pages/CQYpDc5jEGT3xKq10Pgi" %}
[Elios 2 Training simulator](/aircraft/elios-2/elios-2-training/elios-2-training-simulator)
{% endcontent-ref %}

[Training Exercises](https://drive.google.com/file/d/17ExJ3o8mBRS8wTY0cuXk0bndMDKGufS8/view?usp=drive_link). These are designed to give new pilots hands on experience  with flying the drone in a safe area before heading out into the field. The training box shown in the exercises can be created by cutting ca. 450mm diameter holes into a cardboard box. It serves to give an impression of the behavior of the drone in extremely confined spaces.

Explore the product support articles. Read the manual, familiarize yourself with the features of the drone to avoid surprises. Start with simple inspections, and [plan them carefully](/aircraft/elios-2/elios-2-mission-and-flying/mission-preparation).

**Additional Training**

Flyability and its local resellers offer additional training programs:

* Advanced Inspection Methodology training
* Photogrammetry Training

Visit our [training page](https://www.flyability.com/training) for a complete overview of our offering.


# Elios 2 Training simulator

We have created a basic flight simulator to help pilots build and maintain their skills. This simulator runs on the Elios 2 tablet and can be used to familiarize yourself with the flight controls in a realistic setting.

Download and install the APK file onto the tablet, the app will be called "Elios Training". The installation requires an internet connection for a one time activation at first use.&#x20;

{% tabs %}
{% tab title="Download" %}
[APK file](https://www.flyability.com/hubfs/EliosTraining-0.2_20211110-release-1.apk)
{% endtab %}
{% endtabs %}

When connecting the remote controller to the tablet via USB, the tablet will ask you to allow this app to connect to the DJI controller, you must press confirm to continue. The simulator might take a few moments to launch.


# Elios 1

<figure><img src="/files/i8Bf83jA9XabP1zvtst7" alt="" width="375"><figcaption></figcaption></figure>

{% content-ref url="/pages/R2UdG5yovs1TrjrQFtMM" %}
[Elios 1 Documentation](/aircraft/elios-1/elios-1-documentation)
{% endcontent-ref %}

{% content-ref url="/pages/0yju7ywzucyR4Ey7khbV" %}
[Elios 1 System update](/aircraft/elios-1/elios-1-system-update)
{% endcontent-ref %}

{% content-ref url="/pages/V7lkK1jRJCGYzaQR67up" %}
[Elios 1 Maintenance](/aircraft/elios-1/elios-1-maintenance)
{% endcontent-ref %}

{% content-ref url="/pages/ltVycw26AL95aItZROcf" %}
[Broken mention](broken://pages/ltVycw26AL95aItZROcf)
{% endcontent-ref %}

{% tabs %}
{% tab title="Tablet App and Software" %}
{% content-ref url="/pages/nLruB84lLW7du01hxY2o" %}
[Elios 1 Cockpit App](/aircraft/elios-1/elios-1-cockpit-app)
{% endcontent-ref %}

{% content-ref url="/pages/DU76nSCXs6Un0btODsBz" %}
[Inspector 2](/software/inspector/inspector-2)
{% endcontent-ref %}
{% endtab %}
{% endtabs %}

{% content-ref url="/pages/YxraM16HHmfud6Mutl28" %}
[Elios 1 Troubleshooting](/aircraft/elios-1/elios-1-troubleshooting)
{% endcontent-ref %}


# Elios 1 Documentation

### General Documentation&#x20;

{% file src="/files/2wxBUouPUNXulne1eyS1" %}

{% file src="/files/OMsgQx2t1aCvAhSCkjZI" %}

### Battery and Charger

{% file src="/files/Fgv7KTitFu79sJ1BWkQW" %}

{% file src="/files/2jeLBvTJfRYtbCu2PJlz" %}

{% file src="/files/irw7pUQ9Bgzffo7AsZ9V" %}

### Material Safety Data Sheet & Test Report

{% file src="/files/k6N3y3SE8tPFxylRTR50" %}

{% file src="/files/9tQhpwZknigqJ2EvzptM" %}

{% file src="/files/XQa9RxNGqqS58o0XLbrZ" %}

{% file src="/files/zrrtdGDi9lGnpqkIines" %}

{% file src="/files/36RZLqKGdAkyyBGkktSO" %}


# Elios 1 System update

{% tabs %}
{% tab title="Download firmware" %}
**Avionic v1.2** (md5: 180174f5a9e45b52f038b53e323519df)

{% file src="/files/DlzvICdtkpgCEV9CN8BM" %}

**Camera v0.11** (md5: 133f0ad6357d6d68f462dda0cf3c61e6)

{% file src="/files/hSJzSi86TUP3FylsP9WS" %}
{% endtab %}
{% endtabs %}

### **Before Starting**

1. Download the latest version of the Elios 1 avionic firmware
2. [Update Cockpit](/aircraft/elios-1/elios-1-cockpit-app) to the latest Version on the Tablet of the controller

### **Automatic Installation**

All Elios 1 systems running Avionics Firmware 1.1 or higher and Cockpit 1.1 or higher are capable of automatically upgrading, provided that the tablet has access to the internet. Upon starting the Cockpit app, a notification will appear to inform you that a new version is available. Follow the instructions to install the new version of the App. The avionics firmware of the drone can be upgraded "over the air" if the ground controller and drone are also connected and powered on.

{% hint style="info" %}
Make sure that there are no old firmware files left on the SD card, as in this case the "Over The Air" upgrade will not work correctly.
{% endhint %}

If you do not wish to connect your tablet to the internet, or if you are running firmware prior to V1.1, then the application and firmware can be upgraded offline through the process described below:

### **Manual update instruction:**

#### **Avionic Firmware:**&#x20;

1. Download the Avionic Firmware
2. Make sure that the drone is not powered
3. Remove the LOG SD card from your drone and plug it into your computer
4. Copy the "V1.2.bin" into the LOG SD card's root
5. Plug the LOG SD card back into the drone
6. Power up the drone by plugging in a battery
7. The navigation LEDs (Red - Green) will blink in sync for a moment and then blink alternately
8. Unplug the battery
9. You could check the update has been successful by checking the firmware version in the ''About'' panel in the Cockpit application\ <br>

#### **Camera Firmware:** (has not changed since V0.11 of July 2017, so you will most likely not have to update it)

1. Download the Camera Firmware
2. Make sure that the drone is not powered
3. Remove the Camera SD card from your drone and plug it into your computer
4. Copy the "FTWLC1.bin" into the Cam SD card's root
5. Plug the CAM SD card back into the drone
6. Power up the drone by plugging in a battery
7. The CAM LED status will blink blue for a moment and then become solid green
8. Unplug the battery
9. You could check the update has been successful by checking the firmware version in the ''About'' panel in the Cockpit application


# Elios 1 Cockpit App

<figure><img src="/files/O9c4YklHuJAjLWVUVrR9" alt=""><figcaption></figcaption></figure>

Cockpit 2 is the application used to pilot the **Elios 1** and **Elios 2** systems. Its main use is to allow the pilot to view the live video feed from the onboard cameras, thus enabling FPV flights. In addition, different dashboards allow precise monitoring of the system.

The app is designed and optimized for the tablets provided by Flyability (Samsung **T580** and **Active 2**).

{% hint style="danger" %}
**Important notice:**

Cockpit requires an Internet connection to be activated!&#x20;
{% endhint %}

{% tabs %}
{% tab title="Download" %}
Latest release: January 2022

{% file src="/files/Lv0t4lAwI4avaKnfmfSx" %}
MD5: 246B3780217526A71D5A6993B938F080
{% endfile %}
{% endtab %}

{% tab title="Documentation" %}
{% file src="/files/9mc1WslTU5aNq5eQVQ0p" %}
{% endtab %}
{% endtabs %}

{% content-ref url="/pages/BhdiEonJhyYS7QnXa3CQ" %}
[Cockpit 2 How to update](/aircraft/elios-2/elios-2-cockpit-app/cockpit-2-how-to-update)
{% endcontent-ref %}

{% content-ref url="/pages/2iSpIe3dgBo8f0T15poN" %}
[Cockpit 2 Release notes](/aircraft/elios-2/elios-2-cockpit-app/cockpit-2-release-notes)
{% endcontent-ref %}


# Cockpit 2 How to update

{% hint style="warning" %}
**Important notice:**

Cockpit requires an Internet connection to be activated!&#x20;
{% endhint %}

### **Automatic updates:**

The Cockpit application will prompt you for an update whenever a new one is available and if the tablet is connected to the Internet. We recommend you do the update through the automated process. If for any reason you cannot follow the automatic update process, use the following procedure to manually update the Cockpit application.

&#x20;

### **Manual update:**&#x20;

Download the latest version of the [Cockpit APK](/aircraft/elios-1/elios-1-cockpit-app).

Connect the tablet to your computer, through the USB cable. You will need to unlock the tablet, and then the Android system might ask you to grant access. Please accept.

Copy the latest cockpit APK into the download folder. Once copied, you can disconnect the tablet from the computer.

<figure><img src="/files/ASgt3nnK8dc5jfTraZdK" alt=""><figcaption><p>The shown version in the image above is for example only</p></figcaption></figure>

If you wish to backup your tablet recordings, you can do it now. Go to “My Files” application and then under Internal storage > Flyability > Cockpit > Recordings. They should not be removed when updating, but the backup is recommended as a safety measure.

![](/files/2tX0VCqs0ioHi1LqT3RM)

From the tablet, go into Settings->Apps->Cockpit and tap on “Uninstall”

![](/files/K6l86BaPq8NF2G3S0F8Q)

Once finished, go into the “My Files” application under the “Installation files” folder tap on the cockpit APK you have copied. The installation process will start. You might be prompted by the Android system to allow installation from unknown source. Please accept.

![](/files/airgRBqiPK0nABE0qb1G)

Once the installation is done, you can start the cockpit application and follow the startup process from the app. You will be prompted for authorization. Please accept all of them.

![](/files/YJ4eYBmaQtGsjOedfAXH)


# Cockpit 2 Release notes

### **v2.8 January 2022:**  New features:

* Compatibility with new E2RAD sensor payloads (LOW, MID, HIGH level)
* When a battery error is detected, the drone goes into autoland mode and the tablet vibrates for 3 seconds to warn the pilot.
* LED blink patterns updated, they will now blink red in case of a battery warning or a critically low battery.

Bug fixes:

* Wifi streaming reliability improved
* Transmission status logging fixed
* Maintenance panel information no longer gets stuck in 'loading' status

### &#x20;**v2.7 October 2021:**  New features:

* New Signal Strength indication
* The two indicators on the top left corner now indicate downlink and uplink RSSI instead of a quality indicator as it is more gradual and could prevent incidents in tricky environments such as sewers.
* Cockpit is now available in French, Spanish, German, and Russian.
* Error codes added to warning messages.

\
Bug fixes:

* Fixed distance Lock bug in control mode 1
* False warning about exceeded number of battery cycles fixed
* Fixed memory leaks

### &#x20;**v2.6 August 2021:**  New features (Elios 2 only):

* Integration with E2 RAD Radiation detector payload
* Battery SoC displayed up to 60 cycles. "Battery too old" displayed for 60+ cycles\ <br>

Bug Fixes:

* "Old firmware" warning stays forever, even when the drone is disconnected
* Camera switch toggled with no video after automatic switch to SD
* Cockpit not informing the user that the FW is not the right one with the current Cockpit version.
* Distance sensor text overlaps with imperial units when distance > 100
* Camera turning on by itself if previously on and drone is restarted

### &#x20;**v2.5 November 2020:**  New Features (Elios 2 only):

* Photogrammetry flight mode now has grid lines overlaid to help with managing\
  overlap during flight.
* New warnings to communicate about hardware issues in the transmission system.
* Added warnings to communicate that motors are approaching or have exceeded the maximum recommended replacement interval of 25 flight hours.
* Added warnings to communicate that the battery is approaching or has exceeded the maximum recommended lifetime of 40 discharge cycles.
* Battery SoC estimation is shown only if battery cycles < 40
* Warning to detect defective battery through high cells imbalance

\
Bug Fixes:

* Motor flight hours now also displayed correctly, even after 140 flight cycles.

### &#x20;**v2.4 March 2020:**  New features (for Elios 2 only):

* Battery diagnosis menu panel to access BMS data
* New in-flight battery status monitoring (temperature and internal resistance)
* Motor diagnosis and flight time data added to maintenance menu panel\*
* Live video feed can be switched to composite (SD) if the HDMI (HD) feed fails camera SD card status icon on main screen shows remaining free space\ <br>

Bug Fixes:

* Circular buffer was implemented for backup recording to ensure it can always record
* Battery current draw is now always correctly displayed
* No longer crashes when changing settings panel while initiating connection with the drone
* No longer crashes when arming the drone
* Cage free view, auto close up, and strobing are now synced with CAMOP RC
* No longer crashes while performing Auto Trim
* Cam feed now always shows up when you tap "display camera"
* Next service due time no longer displayed (irrelevant to E2)
* Known limitations: Motor flight hours stop recording after 140 flights, use drone flight hours to keep track<br>


# Elios 1 Maintenance

### Cage element replacement&#x20;

{% content-ref url="/pages/bajaItjfnyT60err4n5W" %}
[Repair the cage](/complementary-information/spare-parts-and-maintenance/repair-the-cage)
{% endcontent-ref %}

### Propellers replacement&#x20;

{% embed url="<https://www.youtube.com/watch?v=jSRrS_XFX_Q>" %}
Product shown on the video is Elios 2 but the procedure and the tools remain the same
{% endembed %}

<figure><img src="/files/eS06GLE0CBT5DEiSGZp7" alt=""><figcaption></figcaption></figure>

### Carbon ring replacement&#x20;

![](/files/BhGgY4Yy1FiY0PlCSqgn)

1. Install the bearing from the outside into the carbon ring on the straight part.
2. Position the Carbon beam into the ring.
3. Tighten up the carbon beam into the ring with the black screw. Use the T10 screwdriver and
4. Repeat steps 1. 2. and 3. for the other side.
5. Tighten up the Screw Top into the carbon ring with a flat screwdriver. Apply a light torque by hand. Replat on the other sides.

### Suspension replacement&#x20;

Necessary equipment:&#x20;

* 2x Bearings Ø8x3 4mm
* 1x Spacer bearing
* 1x M3x16 Screw with Tuflok
* 1x Suspension
* 1x Pentagon
* Cutting pliers
* Needle-nosed pliers
* 5 Zip-ties

![](/files/ZmnyadIJLZmBjH6XoNfa)

&#x20;

1 - Assemble the bumpers to the ring as shown on the schematic below

![](/files/3bKqCekrEkcWw51lodgh)

2 - Place the zip-ties on the cage's connector, ensure the zip-ties ratchets are located in the cage as shown in the picture below

<img src="https://knowledge.flyability.com/hs-fs/hubfs/Bred%20(1)-1.jpg?width=688&#x26;name=Bred%20(1)-1.jpg" alt="" width="688">

3 - Pass the zip-ties tape through the pentagon, then the suspension
<img src="https://knowledge.flyability.com/hs-fs/hubfs/Ziptie%202.jpg?width=688&#x26;name=Ziptie%202.jpg" alt="" width="688">

4 - Tighten zip-ties with the needle-nosed pliers and trim them close to the ratchet with the cutting pliers.
<img src="https://knowledge.flyability.com/hs-fs/hubfs/Ziptie%203.jpg?width=688&#x26;name=Ziptie%203.jpg" alt="" width="688">

<br>


# Elios 1 Troubleshooting


# Elios 1 Bind the remote controller

{% embed url="<https://www.youtube.com/watch?v=7WuOL6WnGYg>" %}


# Elios 1 Configure HDMI output for secondary monitor

The HDMI output can be connected to a secondary monitor for demonstration purposes, or in combination with a higher brightness monitor when flying in direct daylight.

{% hint style="info" %}
To be used, the HDMI output needs to be configured on the remote controller.
{% endhint %}

### **What you will need**

* Android/IOS device with DJI GO app installed (DJI GO—for products before P4 version)\
  [DJI Go App (Android/IOS)](https://www.dji.com/ch/downloads/djiapp/dji-go-3)
* USB Cable
* The remote controller

{% hint style="warning" %}
DJI GO will ask you to update the firmware of the remote controller. DO NOT do this. The firmware version of the controller must remain at version 1.2.10
{% endhint %}

{% hint style="danger" %}
As DJI GO and Elios Cockpit don't get along , we do not recommend you to install it on the Flyability tablet. We recommend installing DJI GO on your personal device, such as a smartphone or tablet.
{% endhint %}

### Instructions

<figure><img src="/files/DQ1s7y8x4AeGjFnt5ONN" alt=""><figcaption></figcaption></figure>

1. When the controller has connected to the tablet, the blue camera button will appear in the main menu of the DJI GO app.
2. Go to the HD tab (Image transmission settings)
3. Make sure you have
4. * HDMI Video output: **Enabled**
   * Output port: **HDMI**
5. &#x20;Check these settings: \
   &#x20;   \- App Output mode: **LB** \
   &#x20;   \- Output Port: **HDMI**\
   &#x20;   \- Output mode: **LB**\
   &#x20;   \- OSD Settings: **Disable OSD**
6. Then choose the Output Format that your monitor can display.
7. You may now leave the DJI GO app and turn off the RC unit.

<figure><img src="/files/pcTs9hS9ZrZQSxL1SS4m" alt=""><figcaption></figcaption></figure>


# Elios 1 Remote controller stick calibration

Calibration ensures that the control sticks have the correct center point and range. The status LED on the GCS unit will blink red, and a beeping sound will be heard when calibration is necessary. The control sticks can be calibrated with the DJI GO app by following these steps:

* Install "DJI GO--For products before P4" on your personal device. We do not recommend installing it on the provided tablet. Cockpit and DJI GO do not get along well.\
  [Download DJI Go App for Android or IOS](https://www.dji.com/ch/downloads/djiapp/dji-go-3)
* Connect the GCS to a device with DJI GO, turn on the GCS, and launch DJI GO
* DJI GO will automatically detect the Lightbridge 2, and press on the "Camera" button

{% hint style="warning" %}
DJI GO will ask you to update the firmware of the Control unit. DO NOT do this. The firmware version of the controller must remain at version 1.2.10
{% endhint %}

{% hint style="danger" %}
As DJI GO and Elios Cockpit don't get along, we do not recommend installing it on the Flyability tablet. We recommend installing DJI GO on your personal device, such as a smartphone or tablet.
{% endhint %}

### Instructions

![](/files/FtC2FQwOjbtJZbyOp5I9)

* In the next screen, press the settings icon in the top right corner
* In the settings menu, select the transmitter icon tab, then press on the "Remote Controller Settings" arrow

![](/files/AE3wKvn9wKZrfZ8aco7r)

* Press on the "Remote Controller Calibration" arrow

![](/files/5oXdzqNEO3VUdUJAPQ7h)

* Press "Calibrate" and follow the instructions on the screen

<figure><img src="/files/qrxnFCz3955Gu1O76fiF" alt=""><figcaption></figcaption></figure>


# Elios 1 How to test the transmission system

To check if your transmission system is 100% functional, please follow these checkpoints before each mission/flight:

1. Connect the system with a fully charged battery for the drone and the Range Extender if you use one
   1. If you use a modified GCS, ensure the antennas are correctly fitted
   2. If you use the Range Extender, ensure the cables are correctly fitted

2. Place the GCS or Range Extender and the drone at the same level. The drone must be facing the GCS or Range Extender (drone antennas at the opposite side, red circles below)

3. Leave about 3 meters (10 feet) distance between the drone and the GCS or Range Extender \
   \ <br>

   <figure><img src="/files/LZp37cIkrbXkS7YCuzz1" alt=""><figcaption></figcaption></figure>

4. From the Cockpit application, navigate to the Radio panel<br>

   <figure><img src="/files/6uS5Cjrorj1hmGe6Dy5M" alt=""><figcaption></figcaption></figure>

5. From the Radio panel, focus on the left part of the 2 first lines<br>

   <figure><img src="/files/iM1gCQVCWP9HhafLQrme" alt=""><figcaption></figcaption></figure>

6. You need to confirm the RSSI1 consistency between LB1, RC1, LB2 and RC2

   <br>

   <figure><img src="/files/rWRJa5Y8OIdFlMe8TU9P" alt=""><figcaption><p>Values between LB1,RC1, LB2 and RC2 and <strong>are below 20dbm difference</strong>.<br></p></figcaption></figure>

   <figure><img src="/files/6VrJGi6ORcD6n3mgGX3g" alt=""><figcaption><p>LB1 and LB2 values <strong>are higher than 20dbm difference</strong> compared to RC1 and RC2.</p></figcaption></figure>

7.

```
<figure><img src="/files/YRPPbEGoj0rlwfLdT2a7" alt=""><figcaption><p>LB1, LB2 and RC2 <strong>are higher than 20dbm difference</strong> compared to RC1</p></figcaption></figure>
```

When verifying those values, gently move the antennas around on the RC or gently bend up and down, left and right, the Range Extender cables near the GCS and near the Power Module to ensure no wear or false contact exists.

Each time you move the cable or antenna, keep holding them in position and confirm the RSSI¹ consistency.

If one of the values gets higher than 20 dBm compared to the others, you must consider the device as faulty.

In this case, stop immediately all operations with the Range Extender and/or the GCS and contact <support@flyability.com>. Please provide the serial number of the material and a screenshot of the radio panel showing the defect.

RSSI¹  = Received Signal Strength Indicator


# Elios 1 Tablet not connecting to the remote controller

The GCS is mounted (tablet and controller ON and connected with the USB cable). If the connection status in Elios Cockpit shows the controller blinking, that means you have either a USB cable failure, a tablet’s connector failure or an issue within the Tablet default USB accessory attribution.

<figure><img src="/files/YyTJU7QSZPgCEqjaIpZJ" alt=""><figcaption></figcaption></figure>

**Faulty USB cable**

Try another USB cable and see if it works. If not, it is probably a connectors failure or a software failure.

**Faulty Tablet’s micro USB connector**

Try wiggling the USB plug on the Tablet’s side. If no connection is made, it is probably a software failure.

**Fix the software failure**

1. Disconnect the tablet from the controller and turn off the controller.
2. Go to the application menu and open settings.&#x20;
3. Go to Application > Application manager > cockpit > Set as default > CLEAR DEFAULTS.&#x20;
4. Restart the tablet and wait for it to be fully turned on.
5. Connect the controller to the tablet, then turn on the controller.
6. A dialog box will pop up. Check the case “Use by default for this USB accessory” and tap OK. If instead a list slides up from the bottom side of the screen, tap on “Cockpit”.


# Elios 1 Remote controller is beeping and red LED flashes

#### **A  beeping sound and red flashing LED can indicate the following errors:**

* Low battery
* Stick calibration
* Hardware error

If the possibility of a low battery has been eliminated then the use of the "DJI GO" app is required the debug the issue further.&#x20;

{% hint style="info" %}
As DJI GO and Elios Cockpit don't get along, we do not recommend you to install it on the Flyability tablet. We recommend installing DJI GO on your personal device, such as a smartphone or tablet.
{% endhint %}

***

### **Important notice**

{% hint style="warning" %}
The fiirmware version of the controller must remain at version 1.2.10
{% endhint %}

{% hint style="danger" %}
As DJI GO and Elios Cockpit don't get along, we do not recommend you to install it on the Flyability tablet. We recommend installing DJI GO on your personal device, such as a smartphone or tablet.
{% endhint %}

***

### **What you will need**

* Android/IOS device with DJI GO app installed (DJI GO—for products before P4 version)\
  [DJI Go App (Android/IOS)](https://www.dji.com/ch/downloads/djiapp/dji-go-3)
* USB Cable
* The remote controller

***

### Step by Step guide

* Deploy, connect the USB cable and turn on the GCS.
* Launch DJI GO app
* Once the Remote Controller Picture appears, tap on Camera.

<figure><img src="/files/yLO6yEAIwQQvR7UK4etd" alt=""><figcaption></figcaption></figure>

* Tap on the bar at the top of the screen to display the cause of the error.

<figure><img src="/files/tDXkMsOAv2stybtsNAJ9" alt=""><figcaption></figcaption></figure>

1. If calibration is required: follow the on-screen instructions to perform the calibration.\
   [Instructions are detailed in this article](/aircraft/elios-2/elios-2-feature-details/elios-2-remote-controller-stick-calibration)
2. If hardware error: The unit will need to be sent to Flyability for repairs or swapped out for a new unit. Please contact the [support](https://www.flyability.com/support-request)


---

[Next Page](/llms-full.txt/1)