# How to Install FARO connect
### **Downloading FARO Connect and Flyability script installer**
{% tabs %}
{% tab title="Download " %}
**What do you need to download before getting started:**
**FARO Connect:**
[FARO Connect 2025.1](https://www.flyability.com/hubfs/faro-connect-release-v2025.1.0.exe) ([Release notes](https://knowledge.faro.com/Software/FARO_Connect/Connect/Release_Notes_for_FARO_Connect))
**Flyability Script Installer:**
{% file src="/files/E6sWtxSnskHVjM8HBJlw" %}
{% file src="/files/K5S9Q7yc80bJhyKPrrbY" %}
{% endtab %}
{% endtabs %}
***
With an activation license code, the FARO connect software installer and Flyability script installer downloaded, you are ready to install FARO connect.
### How to install and activate the FARO Connect Software:
1. Double click the FARO connect software installation package(faro-connect-release-vxxxx.x.x) to install the software.
2. Open *FARO Connect Licensing Manager.*
3. Click on the *Activate tab.*
4. Paste the Activation license code provided to you by email from Flyability. If you did not receive an activation code, please contact our sales admin team:\

5. Click on the green *Activate* button.
6. Your FARO Connect Software is now activated.
7. Close the FARO Connect software.
8. The Flyability script enables the processing of Elios 3 LiDAR data on FARO Connect, if you haven't already downloaded it, please download from [here](#downloading-faro-connect-and-flyability-script-installer).
9. Run the Faro.FlyabilityScriptInstallerVx.x.x.exe (if needed, right-click and use “Run as administrator”)
10. Start *FARO Connect.*
{% hint style="info" %}
There are two options for logging into FARO connect: Sphere XG(FARO cloud service) or by creating a Local user.
{% endhint %}
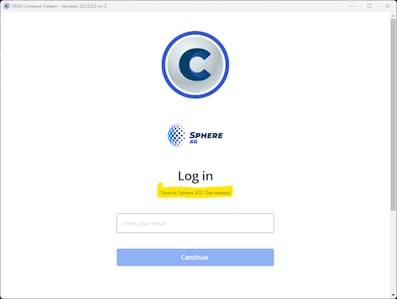
#### Create a Sphere XG account
When opening FARO Connect, you are presented with the Sphere XG log-in form. If you don't have log-in credentials you must create a new FARO Sphere XG account and use this account to log in to Connect.
1. From the login page select *Get Started* to create a new Sphere XG account (former GeoSLAM Connect accounts are no longer valid):\

2. Choose whether you want to store your data on a EU or US server.
3. Select one of the single sign-on options or continue with email.
4. A page opens where you can enter your name, the company name, your email address and create a password. Click **Create Account** to create your Sphere XG account.
\
You will be sent an invitation email.
5. Important: Please check your mailbox for a "*Welcome to FARO Sphere XG*" email (from the address) and click "*Verify email address*" in order to activate your FARO Connect account.
> **Important Notice!**
>
> On the first start of FARO Connect, you will be prompted to “MIGRATE” all your previous projects. This will DOUBLE all the files previously created with GeoSLAM Connect (such as *.geoslam* files, and *.LAZ*), so only do the migration if you need to further use the old projects in FARO Connect, and if you have enough disk space available!
#### Create a Local user
You can create one or more local Connect user accounts independently from a Sphere XG user account. This may be useful for situations where you do not have Internet access or prefer not to create a Sphere XG account. Scroll down below the Sphere XG log in to access this option.
1. Create a local user account by scrolling to the bottom of the sign-up and log-in screens and clicking the **Create local Connect user button**. A form with the following fields will be displayed: 
2. Enter user credentials, your name and email address.
3. Click **Create user**.
You can now log in with the local user account using your username and password. To log in scroll to the bottom of the log-in screen and click the **Login with local connect user** button, and enter the credentials created.
---
# Agent Instructions: Querying This Documentation
If you need additional information that is not directly available in this page, you can query the documentation dynamically by asking a question.
Perform an HTTP GET request on the current page URL with the `ask` query parameter:
```
GET https://knowledge.flyability.com/third-party-software/faro-connect/software-general-information/how-to-install-faro-connect.md?ask=
```
The question should be specific, self-contained, and written in natural language.
The response will contain a direct answer to the question and relevant excerpts and sources from the documentation.
Use this mechanism when the answer is not explicitly present in the current page, you need clarification or additional context, or you want to retrieve related documentation sections.
-1.png?width=377&height=362&name=image%20(1)-1.png)